Jump to content


Sediment/Light Correcting Underwater Photos in Gimp


  • Please log in to reply
11 replies to this topic

#1 Guest_farmertodd_*

Guest_farmertodd_*
  • Guests

Posted 08 May 2012 - 10:56 AM

Hi folks,

Creekwalker and I have been exchanging some emails about correcting underwater photos. I think it would be really advantageous for me to post the process here so we all can enjoy the sights we saw, but the camera saw a little differently. Light does some pretty funny things in even the slightest amount of dissolved sediment, and water on it's own filters some of the spectrum away. That doesn't mean we have to have washed out yellow and white photos :)

The software that I've been working with is Gimp (http://www.gimp.org/). It is FREE and it's available for any platform. If others figure out how to use these functions in other programs, it would be great if you post it here on this thread.

The example I will use is one of the most difficult situations... A flashed image with sediment becoming mobilized around the object. The original appeared like this:

Attached File  Big Tuck original.jpg   226.06KB   2 downloads

Not awful, but it has more potential than this.

I used to do a lot of tinkering with colors and curves and what a hassle and expense in time. Fortunately I met the master, Jeremy Monroe, of Freshwaters Illustrated, and he's shown the way. You want to use the histogram function in your software... In Gimp, it's under Colors:Levels.

Attached File  01.jpg   127.37KB   1 downloads

Here you will see a histogram of the colors, with arrows marking the shadows (left), midtones (middle) and highlights (right).

Attached File  02.jpg   102.97KB   2 downloads

What you want to do is tighten the arrows to the curve so that you're only viewing the colors that are present in the image. All the rest is just "blank".

Attached File  03.jpg   105.33KB   4 downloads

Then you can go through by each color band... Red, Green Blue:

Attached File  05.jpg   111.87KB   7 downloads

And once through the bands, and this is important... RETURN to "Value" to make sure it's still squared up (you may have to reset the arrows there again).

In most cases, that would be it and would be the difference between these photos:

Attached File  shiners.jpg   60.48KB   8 downloads

However, you might want to tweek the brightness and contrast, which is found under Colors:Brightness-Contrast.

Attached File  04.jpg   143.55KB   5 downloads

I usually find that I darken images and increase the contrast. Remember, on a laptop, its going to look different... So don't push anything too far. Trust the software :)

And you end up with something like this...

Attached File  Big Tuck 2.jpg   280.46KB   4 downloads

To get a little more color out of it, esp in a blown out pic like this, consider cropping before you make the modifications.

Attached File  cropped.jpg   40.95KB   3 downloads

Which is the true essence of gutselli!

So hopefully this is helpful. I don't make any of these suggestions as a criticism, just hoping to help everyone show our native critters off in the best light possible :) And thank you Geoff for taking these great pictures and letting me use them as an example!

Todd

Edited by farmertodd, 08 May 2012 - 11:00 AM.


#2 Guest_jblaylock_*

Guest_jblaylock_*
  • Guests

Posted 08 May 2012 - 11:36 AM

wow, that's nice. Are there any time limits or other limitation with the free software?

I wonder how my employer would feel about me installing that on my work laptop :)

Edited by jblaylock, 08 May 2012 - 11:36 AM.


#3 Guest_Uland_*

Guest_Uland_*
  • Guests

Posted 08 May 2012 - 11:40 AM

wow, that's nice. Are there any time limits or other limitation with the free software?

I wonder how my employer would feel about me installing that on my work laptop :)


Josh,
It's a small program and doesn't hog. Large photos might tax your graphic card and a laptop will likely crunch a while on PNG's etc but really it's a tiny program and would likely go unnoticed.

Todd, nice tutorial, thanks for posting. Those are nice edits.

Edited by Uland, 08 May 2012 - 11:41 AM.


#4 Guest_Creekwalker_*

Guest_Creekwalker_*
  • Guests

Posted 08 May 2012 - 11:53 AM

Works on Photoshop too.

Image/Adjustments/Levels.

Thanks Todd!

Attached Files


Edited by Creekwalker, 08 May 2012 - 11:57 AM.


#5 Guest_mneilson_*

Guest_mneilson_*
  • Guests

Posted 08 May 2012 - 04:11 PM

Nice walkthough, Todd....I've been doing this for years for my snorkeling/SCUBA photos. The 'Auto' button on your screenshot will do automatically do this to the levels in your photo; for some photos it's acceptable, but I generally prefer to adjust them manually.

Another tip/trick is to limit the color range by setting black/white points (i.e., identify the portion of the image that you want to use as pure black/white). I'll use your screenshot to point out how to do this

Attached File  GIMP-levels.jpg   157.12KB   2 downloads

I generally only set the black point; for fishes, good pixels to use for this are generally those in the pupil of the eye. If your photo subject has patches of white on them, then you can use that patch to set the white point as well. A more thorough explanation of setting white/black points can be found here.

#6 Guest_Kanus_*

Guest_Kanus_*
  • Guests

Posted 08 May 2012 - 10:24 PM

Todd, thanks for this. I caught that little exchange on creekwalkers post and was actually hoping this exact thread would come from it. I've been toying around with my photos in Photoshop but I think I'm going to install GIMP also just to compare and see what I can do with it. Photoshop definitely does have similar effects that can be had (and are honestly the only thing I'm at all proficient at in Photoshop) but I'm going to see if I can figure out both and see which does what better.

#7 Guest_Uland_*

Guest_Uland_*
  • Guests

Posted 09 May 2012 - 07:02 AM

Thanks for posting that tutorial Matt. That is really well done although a tad heavy in the steps. I'm sure it's worth every step for that once in a lifetime shot.

#8 Guest_Usil_*

Guest_Usil_*
  • Guests

Posted 09 May 2012 - 10:00 AM

Gimp is a linux based photo program that has been around for years. As such it remains in the public domain and has been regularly updated by users. It is an excellent program that has been ported to Windows. Always free.

Usil

Edited by Usil, 09 May 2012 - 10:01 AM.


#9 Guest_farmertodd_*

Guest_farmertodd_*
  • Guests

Posted 09 May 2012 - 11:40 AM

Yes, Matt, thanks for posting that. Looks like I have even more tricks to learn... Let's make these fish look like how we get to see 'em! :)

Todd

#10 Guest_chrish_*

Guest_chrish_*
  • Guests

Posted 08 October 2012 - 06:15 AM

A bit late to this conversation, but I thought I would add a discussion of how to do this using Adobe Lightroom (4.1).
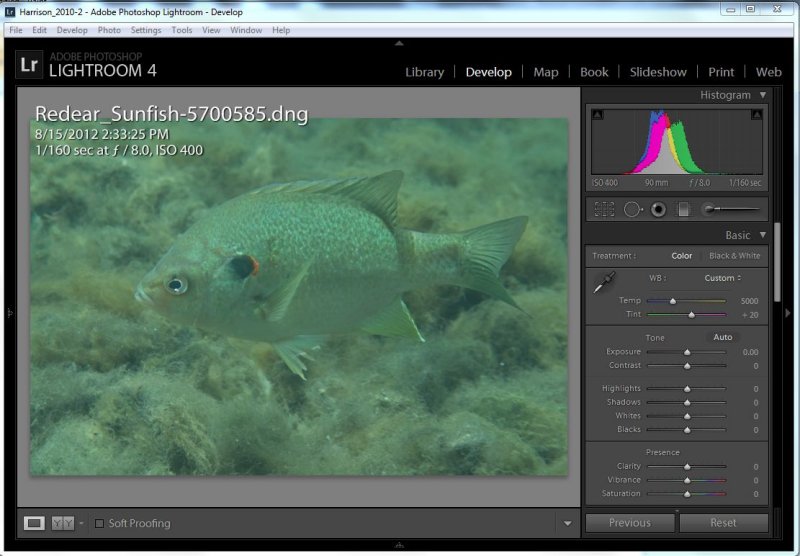
This isn't a very inspiring photo of a Red-eared Sunfish from Florida, but it will do for a quick tutorial. I am not some Lightroom Guru, but I do use it to tweak my photos. I'm sure there are others who could do a better job or use a different path within Lightroom's many tools, but this works for me.

This photo was taken with a Sony a-57 inside a Dicapac DSLR Housing (~$80 US). These inexpensive housing are a great way to get your DSLR into the water for snorkeling in shallow water (< 20 feet).

So here is my original photo taken with natural light (backlight) in a Florida spring in the Lightroom Develop window -

Posted Image

Clearly it leaves a little to be desired, but a few quick tweaks can bring the fish out more.

Step 1: Correct the White Balance.
I could have done this in the camera prior to hitting the water, but since my DSLR allows me to shoot RAW, I can more easily fix it back on land.
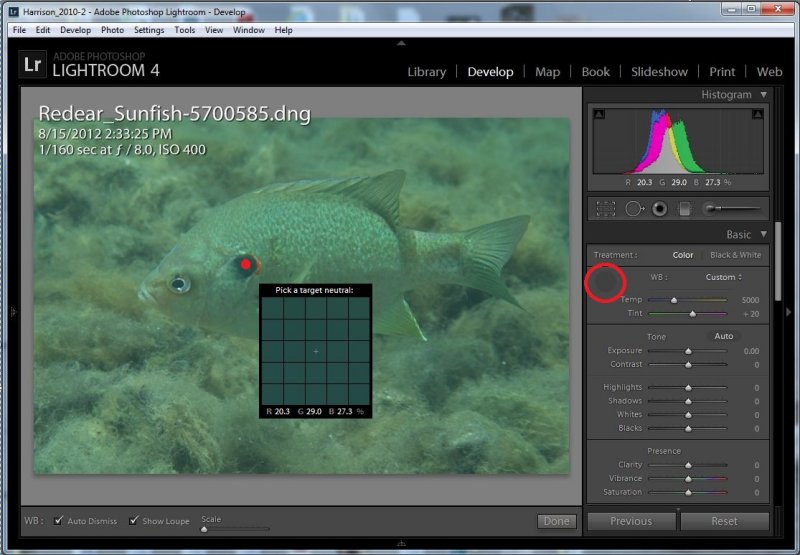
To correct this I will choose the white balance eyedropper. It is the little eye dropper visible in the second panel below the histogram above. Unfortunately for the purposes of demonstration, once I select it (below) the eyedropper disappears. On my screen while I am doing this I can see and move the eye dropper with my mouse after clicking it.

I moved the eye dropper over to the spot on the fishes opercular flap which should by black. This is what I see on screen, except the red dot on the operculum will actually be they eyedropper tool when you are really doing it. The checkerboard square next to the eyedropper indicates what colored pixels are under the dropper. You can see how "green" these blacks really are on my original image. I click the mouse here to set these pixels to true black and the rest of the image is adjusted to this white balance point.

Posted Image

It is worth noting that in Lightroom, this tool is not a separate Black, White and Gray point tool. It is only used to adjust the White Balance. You simply choose something which should be neutral (black, white or gray) and Lightroom removes the color cast.

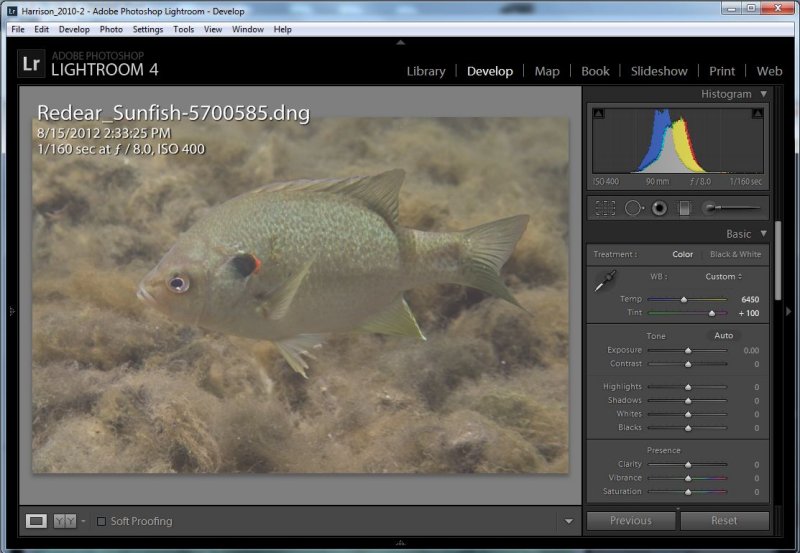
Here's my adjusted white balance result:

Posted Image

Continued in next reply

Edited by chrish, 08 October 2012 - 06:18 AM.


#11 Guest_chrish_*

Guest_chrish_*
  • Guests

Posted 08 October 2012 - 06:15 AM

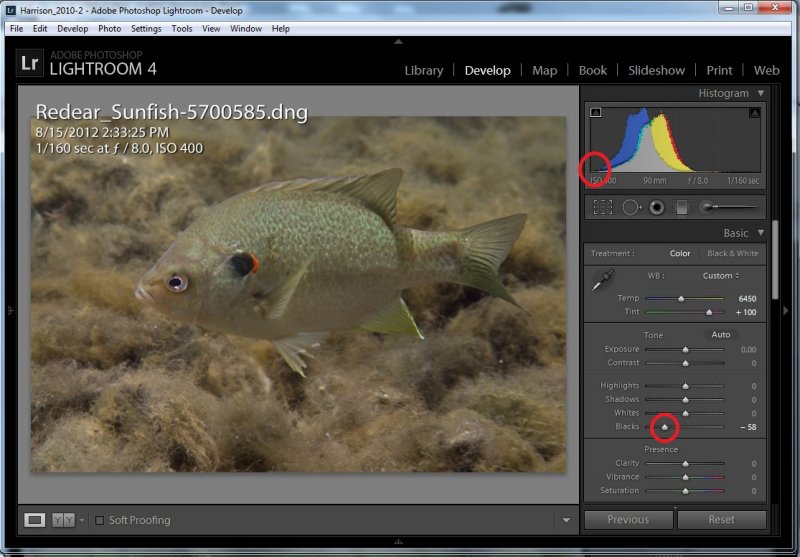
Step 2. Adjusting the Black Point.
This adjustment will set where the darkest areas of the image are and just how dark I want them. I am telling Lightroom which areas I want to be black and having it adjust the levels (exposure) accordingly.
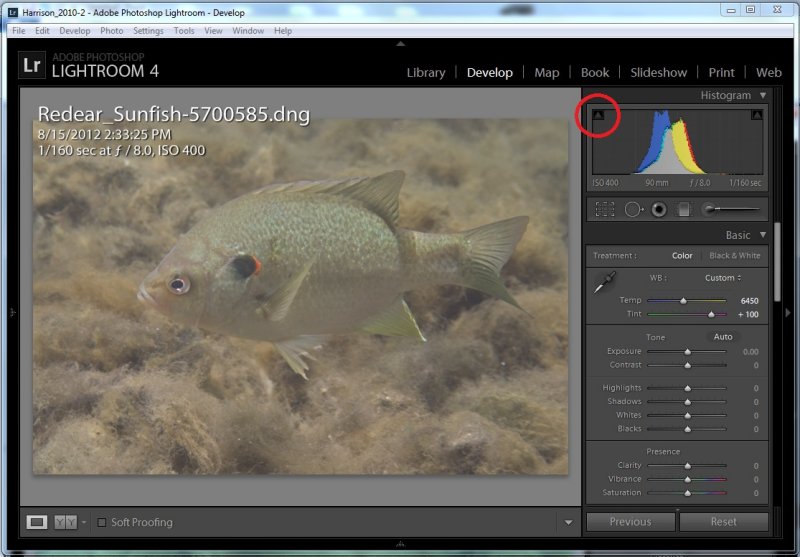
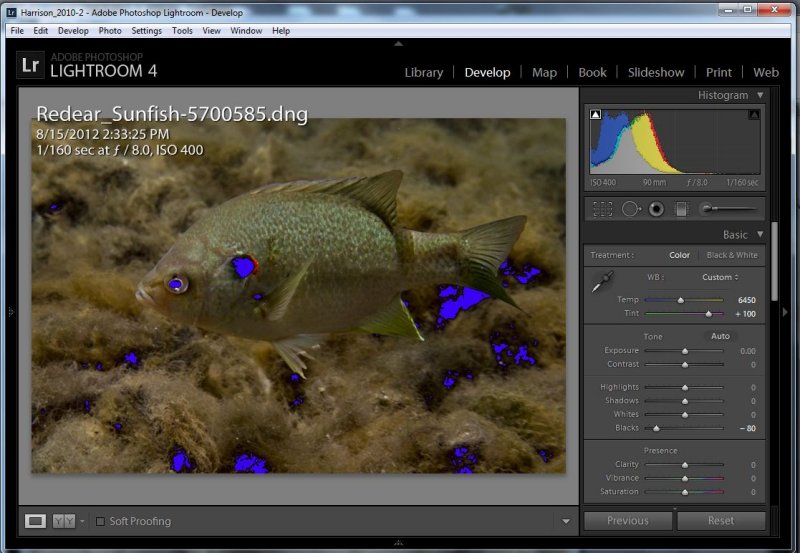
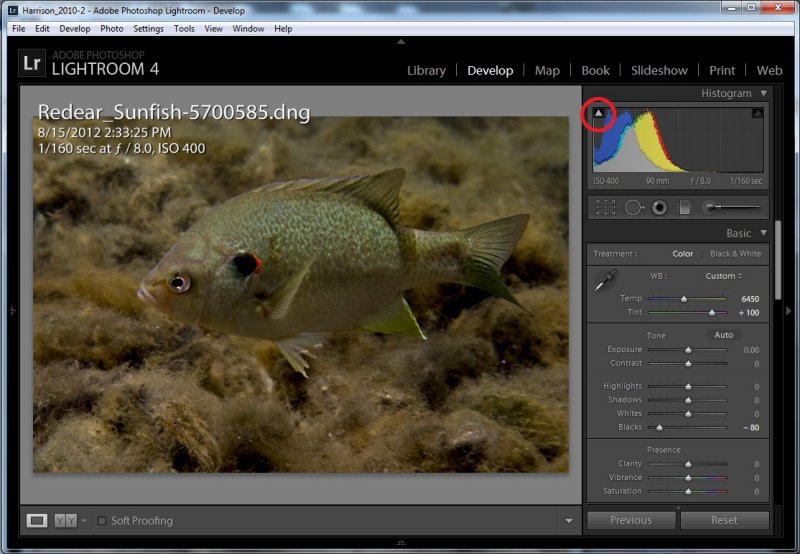
For this adjustment, I want to see where these darkest areas will be, so I click the little Show Shadow Clipping icon at the top left of the histogram. This will "highlight" all the completely black areas blue during this process, making it easier for me to see just what detail I might be losing by decreasing the black point.

Posted Image

Now that I have the blacks "showing", I can start to adjust the Blacks slider (if you have an older version of Lightroom, these sliders look and work differently). I drag the Blacks slider to the left until the histogram reaches the left edge of the axis. At this point, nothing is completely black so no detail is lost yet.

Posted Image

At this point you could stop, but there are clearly areas of this image that have no meaningful detail that could be make completely black without harming the image of the fish, so I can adjust the slider further left. Because I have the Show Shadow Clipping icon clicked, Lightroom will show me what parts of the image will be completely black and have no detail.

Posted Image

At this point, you can see that I have adjusted the black point further to the left. Now, areas of shadow in the weedy bottom will be detailless black. However, I think I have gone too far because I have also lost detail in the opercular spine, the pupil and just in front of the pectoral fin. This is really a matter of taste here, there is no wrong answer. You can unclick the Show Shadow Clipping icon now and take a look at your photo without the blue highlights to check if you are happy.

Posted Image

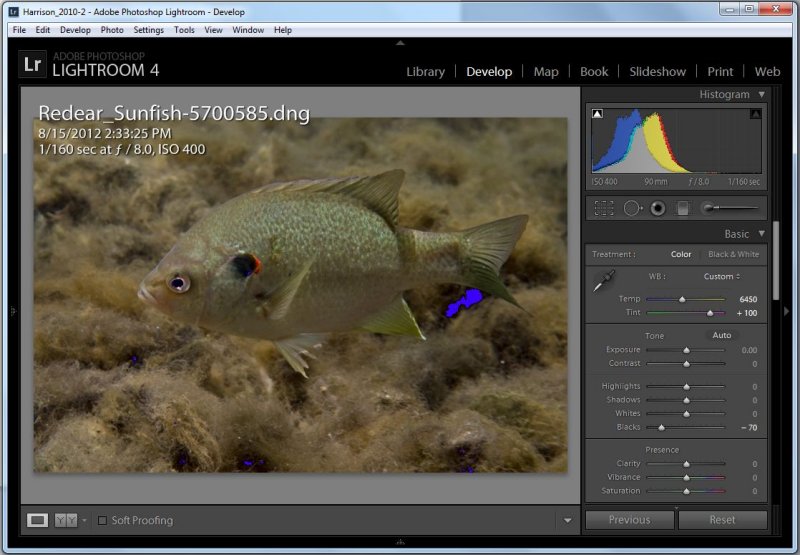
I wasn't so I am going to bring the Blacks slider a bit back to right. I turned the Show Shadow Clipping icon back on and got it where I liked it:

Posted Image

Step 3: Adjusting the Contrast

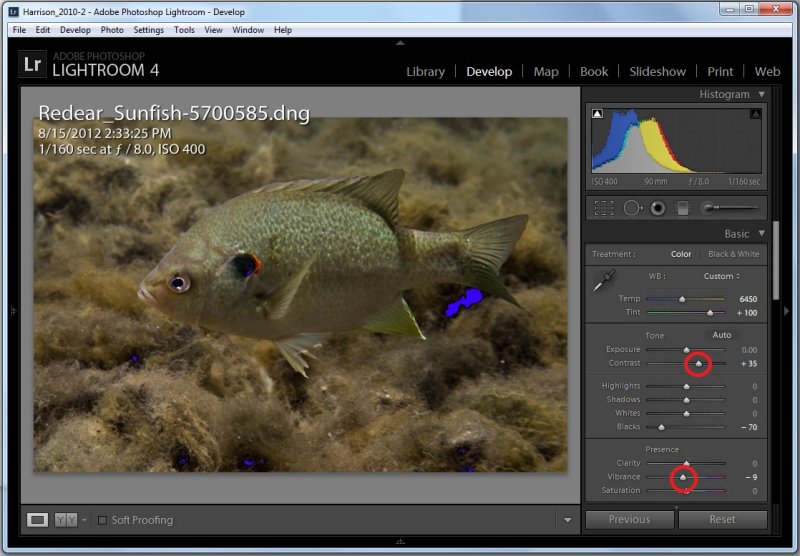
My photo is still a bit flat for my tastes, so now I will use the contrast slider to increase the contrast a bit.
However, I find that increasing the contrast also increases the saturation too much (colors become exaggerated), so I then use the vibrance tool to bring them back into check (usually about -10% vibrance works for me).

Posted Image


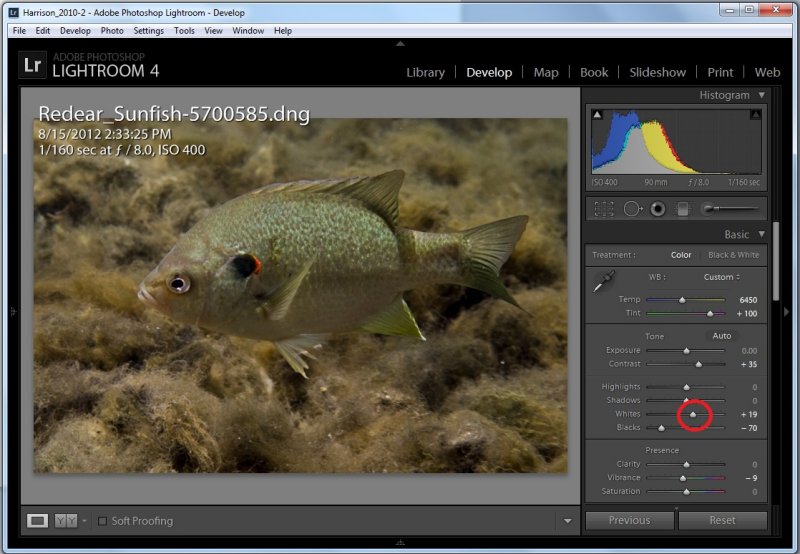
Step 4: Lightening the image with the Whites Slider

I am reasonably happy with my quick improvements, but I think the images is a bit overall too dark. I could adjust using the Exposure slider, but that would undo some of the changes I have already made. I just want to make the lighter areas a bit brighter so I will move the Whites slider a bit to the right until I am happy.

Posted Image

Step 5: Reviewing the Final Image

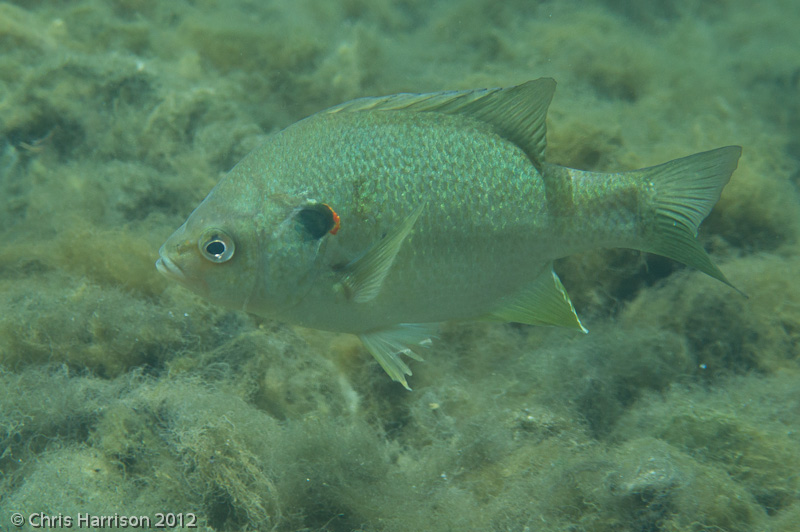
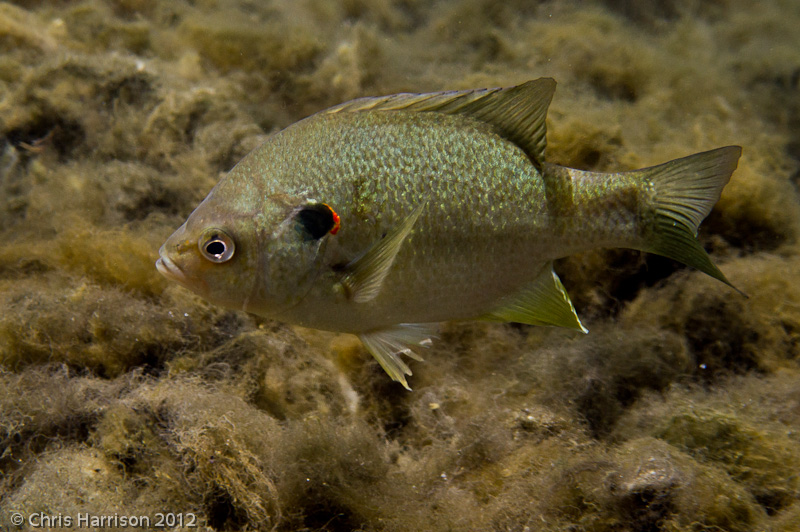
It isn't going to win any photo contests, but here's my before and after of this quick tweak:


Posted ImagePosted Image

Remember, YMMV!

Chris

Edited by chrish, 08 October 2012 - 06:23 AM.


#12 Guest_Kanus_*

Guest_Kanus_*
  • Guests

Posted 10 October 2012 - 04:34 PM

Thanks guys! I have been experimenting with all these tips and my photos just keep getting better and better.


1 user(s) are reading this topic

0 members, 1 guests, 0 anonymous users