
I love the photos that several of my fellow NANFAns are able to capture. And I like the idea of being able to capture and keep fish without always having to have a spare aquarium ready for them. Technology has made digital photography better and easier. I have a pretty good camera. And there are some instructions out there for how to build an acrylic, field photo tank. However, I am not that comfortable working with acrylic and solvents, while trying to keep five sides of a box all perpendicular to each other at the same time.
But I do have a fair amount of experience in woodworking, and I have enjoyed reading some accounts that others have put on the web of building wooden (usually plywood) aquariums. One thing that I learned about those wooden aquariums is that while wood is good for structural purposes, it is hard to make it watertight. One option is to coat the wood with a laminate. Often fiberglass resin is used for larger aquarium, but a purchased laminate would also work.
So putting these two ideas together (photo tanks and wooden aquariums) I decided to construct a wooden photo tank. I decided to use readily available white, laminated shelving as the basic material. It is relatively easy to cut and drill with standard wood working tools. And it is covered with a solid, watertight coating. It also has the advantage of being white, which will help in reflecting light into the photo area.
Construction
I cut equal portions off of the ends of the shelf to use as the left and right side of the photo tank. These were cut to a length that is the same as the width of the shelf so as to be able to use the full width of the shelf as the height of the photo tank. The bottom and back are cut from the remaining middle of the shelf. In order to keep the volume of the photo tank down, and in so doing make it easier to fill, I chose to rip the sides and bottom down to about 3.75 inches.
The back, bottom and sides were drilled, the holes countersunk. All of the edges, whether those to be screwed together or exposed, on each piece were coated with silicone to provide some water resistance for the shelving substrate. The sides were then screwed to the bottom, and the back screwed onto the assembly to create the basic frame for the photo tank. All of the edges were then filled with silicone to seal the tank.
Finally, A thick bead of silicone was applied to the front edge of the photo tank and the pre-cut, pre-sized piece of glass was placed directly on the front of the tank and a weight applied while the silicone cured.
I purchased a piece of lexan to use as the background paddle for controlling the fish. Using a grinding wheel, I slightly rounded the corners to minimize the possibility of gouging the silicone seal. This was then spray painted a medium grey color. By looking at what others have done I believe that this color is the best compromise for displaying various colors of fish.
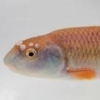
So here are some of my first tries with my wooden photo tank...
 swamp darter 20090802-1.jpg 103.74KB
29 downloads
tourquoise darter 20090802-1.jpg 164.85KB
12 downloads
ironcolor shiner 20090802-1.jpg 87.86KB
10 downloads
rainbow shiner 20090802-1.jpg 74.02KB
9 downloads
florida flag fish 20090802-1.jpg 219.77KB
8 downloads
swamp darter 20090802-1.jpg 103.74KB
29 downloads
tourquoise darter 20090802-1.jpg 164.85KB
12 downloads
ironcolor shiner 20090802-1.jpg 87.86KB
10 downloads
rainbow shiner 20090802-1.jpg 74.02KB
9 downloads
florida flag fish 20090802-1.jpg 219.77KB
8 downloads


