While a view bucket, also known as a view scope, glass bottom bucket, etc., are primarily to view sessile, benthic organisms like mussels, they can be extremely handy when one wants to view benthic fish like darters and madtoms when the water is too shallow or cold to snorkel. I started building three this afternoon and midway through the first one I thought I should take pictures. I'll start with a description of items needed and then post some pictures tomorrow since I'll have buckets in various stages of construction.
5 gallon bucket. I prefer black because it does not reflect light, which keeps glare on the glass surface down. I happen to get mine from a local hardware store that recieves bulk chain in them. They save them for me and I buy them for $5 a piece. It's hard to get them from many places in small quantities.
Stainless steel fasteners: bolt, washers x 2, nut. I'll post exact sizes later. 5-7 per bucket.
Quick sealing water resistant/proof silicon caulk. Don't cheap out, get the best stuff otherwise your bucket will leak and eventually the bottom will blow out.
Plexiglass/lexan: Readily available in sheets of various thickness at your big box hardware stores, mine came from Lowes. I'll post exact specs later.
Cordless drill, drill bit of same size as diameter of fasteners, jig saw, good fine toothed jig saw blades, various marking and measuring instruments.
All for now...
DIY view bucket
Started by
Guest_ashtonmj_*
, Feb 11 2010 05:31 PM
10 replies to this topic
#2
 Guest_CATfishTONY_*
Guest_CATfishTONY_*
-

- Guests
Posted 11 February 2010 - 08:27 PM
please do i need two for the kids.While a view bucket, also known as a view scope, glass bottom bucket, etc., are primarily to view sessile, benthic organisms like mussels, they can be extremely handy when one wants to view benthic fish like darters and madtoms when the water is too shallow or cold to snorkel. I started building three this afternoon and midway through the first one I thought I should take pictures. I'll start with a description of items needed and then post some pictures tomorrow since I'll have buckets in various stages of construction.
5 gallon bucket. I prefer black because it does not reflect light, which keeps glare on the glass surface down. I happen to get mine from a local hardware store that recieves bulk chain in them. They save them for me and I buy them for $5 a piece. It's hard to get them from many places in small quantities.
Stainless steel fasteners: bolt, washers x 2, nut. I'll post exact sizes later. 5-7 per bucket.
Quick sealing water resistant/proof silicon caulk. Don't cheap out, get the best stuff otherwise your bucket will leak and eventually the bottom will blow out.
Plexiglass/lexan: Readily available in sheets of various thickness at your big box hardware stores, mine came from Lowes. I'll post exact specs later.
Cordless drill, drill bit of same size as diameter of fasteners, jig saw, good fine toothed jig saw blades, various marking and measuring instruments.
All for now...
sounds like a good after noon of fun on a winter dull day. i can get carpet glue 4 gallon buckets @ work i think they may work with a good cleaning
#3
Guest_ashtonmj_*
Guest_ashtonmj_*
-
- Guests
Posted 15 February 2010 - 03:18 PM
Some pictures...
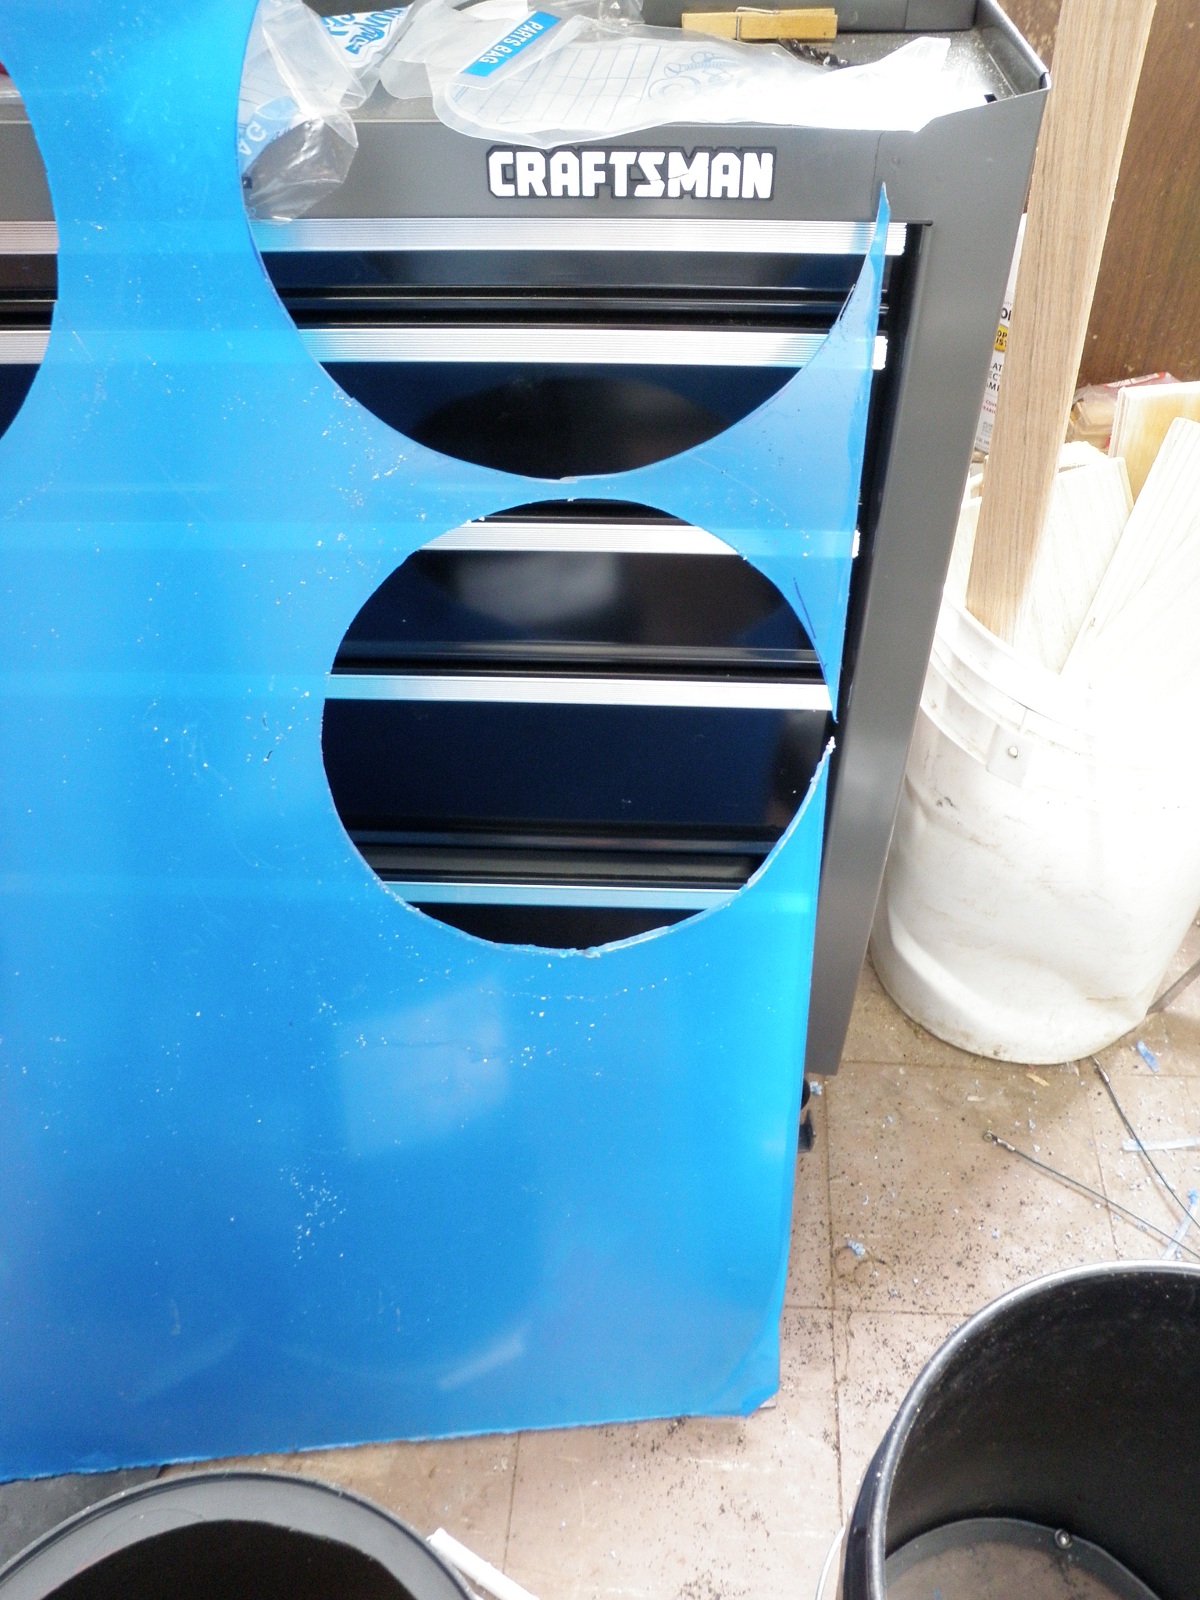
If you have a compass use it! It makes cutting the bucket and acrylic much easier and you want as tight a fight as possible in the end.
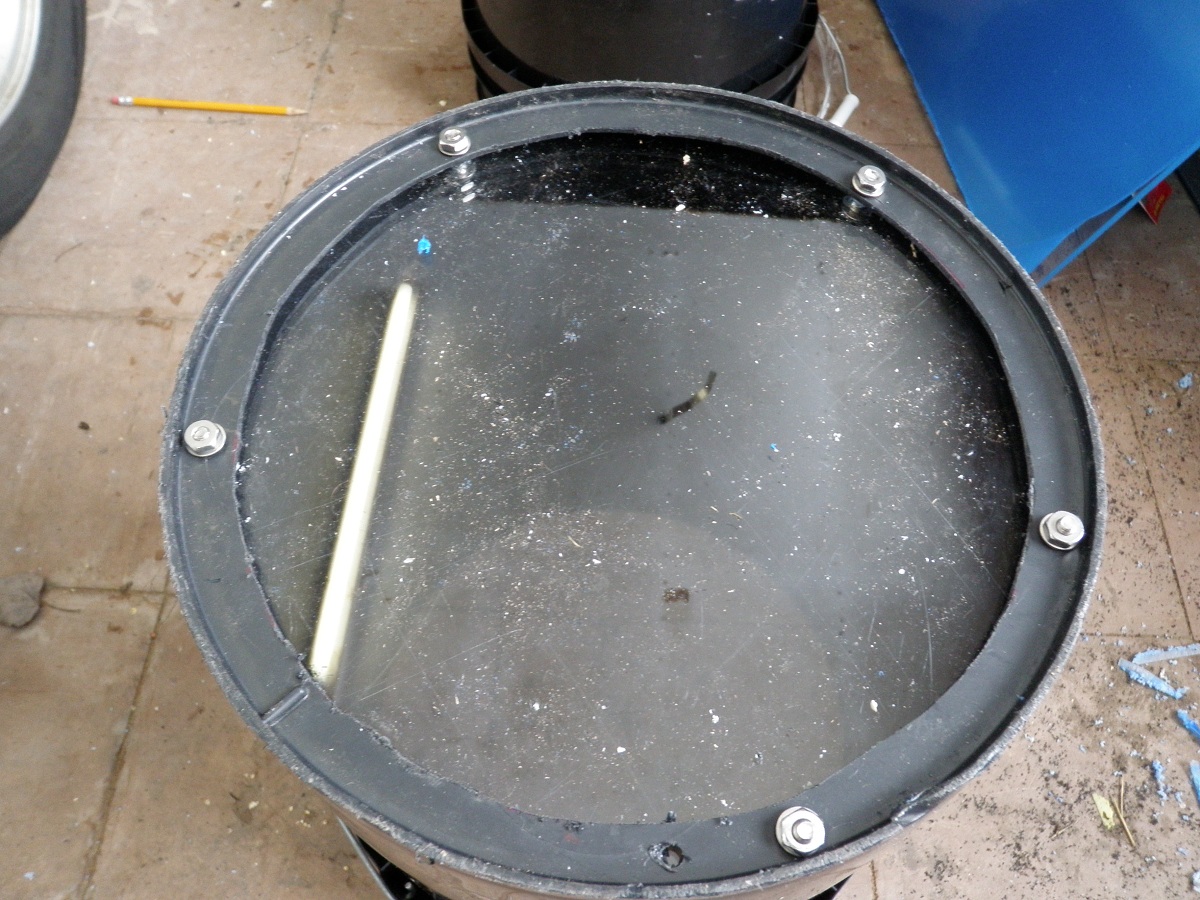
I cut the bucket with a jig saw and left a 1" lip around the bottom of the bucket. Anything less and you don't have much room for error with fastenors and caulk. I then traced out the acrylic (1/8") to a circle very slightly smaller in diameter than the inside diameter of the bottom of the bucket. Cut the acrylic with your jig saw. Expect the acrylic to get a little sticky towards the endand melt back together. I used diffferent sanding and filing tools to clean up the edges. I think drilled out 6 equally distanced holes in the lip of the bucket for the fasteners and made sure all the holes were clean on both sides. I then put the acrylic circle inside the bucket and held it horizontal with one hand in the bucket holding the acrylic in place while the other hand was used to mark it with a permanent marker inside the bucket holes to mark where to drill. Drill out the acrylic and be careful to put too much pressure or go too slow or you will chip the back end when the bit comes out. I then partly assembled the bucket using a stainless steel bolt and washer inside the bucket to fasten the acrylic sheet and a washer and bolt on the outside of the bucket. I literally only put the nuts onto the first few threads. With the bucket upside down you should have about 1/2" of space between the bucket and acrylic. I then ran a heavy bead of caulk inisde that gap all the way around and checked inside the bucket to make sure I nearly or completley filled in the that 1" wide lip of the buckets bottom edge. Screw bucket down the bucket until caulk starts to push out on the inside, but not all the way, or it won't cure as well. I'll try and get a picture of the caulk later, a few too many fumes and acrylic dust for me today.
If you have a compass use it! It makes cutting the bucket and acrylic much easier and you want as tight a fight as possible in the end.
I cut the bucket with a jig saw and left a 1" lip around the bottom of the bucket. Anything less and you don't have much room for error with fastenors and caulk. I then traced out the acrylic (1/8") to a circle very slightly smaller in diameter than the inside diameter of the bottom of the bucket. Cut the acrylic with your jig saw. Expect the acrylic to get a little sticky towards the endand melt back together. I used diffferent sanding and filing tools to clean up the edges. I think drilled out 6 equally distanced holes in the lip of the bucket for the fasteners and made sure all the holes were clean on both sides. I then put the acrylic circle inside the bucket and held it horizontal with one hand in the bucket holding the acrylic in place while the other hand was used to mark it with a permanent marker inside the bucket holes to mark where to drill. Drill out the acrylic and be careful to put too much pressure or go too slow or you will chip the back end when the bit comes out. I then partly assembled the bucket using a stainless steel bolt and washer inside the bucket to fasten the acrylic sheet and a washer and bolt on the outside of the bucket. I literally only put the nuts onto the first few threads. With the bucket upside down you should have about 1/2" of space between the bucket and acrylic. I then ran a heavy bead of caulk inisde that gap all the way around and checked inside the bucket to make sure I nearly or completley filled in the that 1" wide lip of the buckets bottom edge. Screw bucket down the bucket until caulk starts to push out on the inside, but not all the way, or it won't cure as well. I'll try and get a picture of the caulk later, a few too many fumes and acrylic dust for me today.
Attached Images

#4
Guest_Uland_*
Guest_Uland_*
-
- Guests
Posted 15 February 2010 - 03:47 PM
Matt,
Thanks for taking the time to post this DIY thread. I will take full use of it in the next few weeks I hope.
This is very helpful as I'm certain I would have been a little more conservative in the viewing area (to assure a good seal) and used thicker acrylic. Now I know I can use 1/8" acrylic and have a large viewing window. This saves me a few bucks and many hours in the trail and error department.
Oh, I know what you mean about the acrylic reforming and melting behind the blade and I think I can help prevent that. In my thread about making acrylic photo tanks, I mention using the "finest blade possible"....Well, you can go too fine as I found when I purchased a special saw blade. Try and get a few less teeth per inch blade next time and see if that helps. I must admit that even when I have the right teeth per inch blade, I still can have melting issues if I don't watch saw speed and feed rate.
#5
Guest_jase_*
Guest_jase_*
-
- Guests
Posted 15 February 2010 - 04:04 PM
Thanks, nice project.
Matt, I assume you've put the acrylic inside the bucket to better protect against scratching? Seems the quality of the silicone seal may be less critical with the acrylic on the outside of the bottom so water pressure would be working with you, rather than against you. A trade-off, I imagine.
Matt, I assume you've put the acrylic inside the bucket to better protect against scratching? Seems the quality of the silicone seal may be less critical with the acrylic on the outside of the bottom so water pressure would be working with you, rather than against you. A trade-off, I imagine.
#6
Guest_smilingfrog_*
Guest_smilingfrog_*
-
- Guests
Posted 15 February 2010 - 04:13 PM
Thanks, nice project.
Matt, I assume you've put the acrylic inside the bucket to better protect against scratching? Seems the quality of the silicone seal may be less critical with the acrylic on the outside of the bottom so water pressure would be working with you, rather than against you. A trade-off, I imagine.
Jase, you beat me to it I was just wondering the same thing.
#7
Guest_farmertodd_*
Guest_farmertodd_*
-
- Guests
Posted 15 February 2010 - 05:54 PM
Dang, you guys get real high tech with your buckets! We just cut the sheets off in squares and slap 'em on. The corners give nice edges to accelerate water into the substrate. I've yet to have one get too scratched up before someone put too much load in it and break the silicone. And then we bought the $100 Nuova Rade bathyscopes on grants, so why bother with something gangly?
Also find that on a cloudy day, a white bucket is your best friend. There are times I'm using the orange bathyscopes and they're too dark. But I guess I'll just never get what people see in black buckets
Regardless, these are the real deal. It's one step closer to getting you all snorkelin'
Todd
Also find that on a cloudy day, a white bucket is your best friend. There are times I'm using the orange bathyscopes and they're too dark. But I guess I'll just never get what people see in black buckets
Regardless, these are the real deal. It's one step closer to getting you all snorkelin'
Todd
#8
Guest_ashtonmj_*
Guest_ashtonmj_*
-
- Guests
Posted 15 February 2010 - 06:29 PM
Uland; I've gone as narrow as 3/4" of a lip on the bottom of the bucket but you have to be dead on with your pilot holes and fastener holes. It also puts you on the edge of the acrylic and you can get the rare but entirely possible cracking of the acrylic. I like the 1" because it lets me be a little more sloppy with the holes and edges of the acryclic. I'm sure you could go 1.5" and still have about an 8" wide viewing area. My feed rate and the pressure you put while making a circular cut definately caused some of the melting. The first circle went fine, the second one the blade was practically white hot. I should have, and did, change blades between cut outs. I wish this would have come oout a little mmore fluidly but I was fried and frozen after wrapping up and hacking roof ice again today.
Jase, the acrylic is on the inside. You're right about trade offs. You will scatch a heck of a lot more with it on the bottom but you won't run into a blow out from water pressure. Speaking of scratches, I leave the plastic coating on the acrylic until the past posisble step of construction and try and keep as clean a cutting soffice as possible because this stuff scratches so easily. Another reason for the acrylic on the inside is you can seal both sides a little more effectively I think. After the acrylic seals I'll touch up around the bolts as thats where leaks likely occur even though it is surrounded on the inside in between the bucket and acrylic.
Bathyscopes, sheesh someone is a little too ecologicall posh. I have thought about stealing an idea from those by putting some kind of large metal handle on two sides of the bucket so you have that steering wheel effect like you do with the scopes. Can't carry equipment in a bathyscope though... I will agree ther eare days when you need a little more reflection off the bucket, but I think if you wait a little while your eyes adjust to the point you can see enough. You could always throw a little dive light on the rim of the bucket or wear a head lamp. We have to use dive lights quite a bit snorkeling in some of the coastal plain streams for various reasons.
#9
Guest_jblaylock_*
Guest_jblaylock_*
-
- Guests
Posted 15 February 2010 - 07:55 PM
Matt,
Have you ever experimented with cutting the depth of the bucket down? I wonder if this would help viewing in shallower water? If you have a 5gal bucket that is, let's say, 24in deep would it be harder to see fish in shallow water than if you cut it down to 12in?
I have a couple of extra buckets from moving my tank and I may make a few of these, I just wonder if cutting one down would benefit viewing or be a waste of time.
#10
Guest_ashtonmj_*
Guest_ashtonmj_*
-
- Guests
Posted 16 February 2010 - 07:33 AM
I think you have a different image of their use in your head than what is actually done. You don't put your face up to the glass as close as possible. You're putting the glass surface of the bucket close to what you want to view. In fact, I rarely put my head inside the bucket past the point where my ears are at the rim of the bucket. For really shallow water the only thing that is different than deeper water is the amount of bucket submerged in the water. Take for instance the scopes Tood was talking about. Those have a cushy face viewing thing like the old view finders we all had as kids with the wheels of photographic negatives, but the glass surface is almost two feet below.
Edited by ashtonmj, 16 February 2010 - 07:34 AM.
#11
Guest_gerald_*
Guest_gerald_*
-
- Guests
Posted 16 February 2010 - 01:15 PM
I made mine several years ago with thick glass and GOOP to seal it inside the bucket; no screws. GOOP (or Shoe-Goo) holds much better on polyethylene than silicone does. It doesn't get heavy usage, but its held up for years. Glare off the glass is a problem in sun. Is acrylic less glare-prone than glass?
I bought a small piece of pricey non-glare glass from an art frame shop (for a photo tank) but then discovered than non-glare glass is very blurry unless the object you're viewing is pressed flat against it. I'm mystified by the optical physics behind this, but now ive got a piece of useless glass (until i find a small picture worth framing).
I bought a small piece of pricey non-glare glass from an art frame shop (for a photo tank) but then discovered than non-glare glass is very blurry unless the object you're viewing is pressed flat against it. I'm mystified by the optical physics behind this, but now ive got a piece of useless glass (until i find a small picture worth framing).
Reply to this topic


1 user(s) are reading this topic
0 members, 1 guests, 0 anonymous users

