Jump to content


Photo

75 Gallon Native Stream Tank Build


  • Please log in to reply
392 replies to this topic

#161 Chasmodes

Chasmodes
  • NANFA Member
  • Central Maryland

Posted 02 August 2018 - 11:46 AM

If you decide to go the live–plant route, creating small pockets in the deeper crevices where you can put substrate to allow plant growth on your wall with look cool.

I really love this project.  Cannot wait to see the final layer


Thank you!  That's a great idea!  I know that there will be at least one or two crevices that I might be able do that with (the ones separating the three sections).  It all depends on what they look like after I silicone it all in place.


Kevin Wilson


#162 mattknepley

mattknepley
  • NANFA Member
  • Smack-dab between the Savannah and the Saluda.

Posted 05 August 2018 - 11:31 AM

Looks fabulous, Kevin!
Matt Knepley
"No thanks, a third of a gopher would merely arouse my appetite..."

#163 Chasmodes

Chasmodes
  • NANFA Member
  • Central Maryland

Posted 06 August 2018 - 10:12 AM

Thank you Matt.  I was going to paint again yesterday, but life got in the way.  Plumbing issues (other than aquariums)...my least favorite thing on earth.


Kevin Wilson


#164 Chasmodes

Chasmodes
  • NANFA Member
  • Central Maryland

Posted 07 August 2018 - 06:59 AM

I painted the last lighter layer of this paint mix.  I'm really happy with it so far.  It is still a monotone color, although it no longer is the charcoal color of the cement dye, the yellow gives it a greenish gray tint.  So for the next layer or two, I plan to add a little brown and maybe green.  I don't think that I'll cover the entire wall though, just a dab here and there.  I may even focus on a few of the shale layers to add to differentiate some strata, as you might see in nature:

IMG_0041_zps2boumujd.jpg

IMG_0042_zpse587gbq6.jpg

IMG_0046_zpsd3p0sodk.jpg


I really like how using Drylok rather than a layer of dried cement allows you to bring out the detail that you carve.  That is a good thing unless you carve a mistake!  In this case, the faux fossils that I pressed into the foam show up well.  I'm happy that i started with the darkest color first and then added the highlighting, because it really makes the cracks and faux fossils pop.  

IMG_0043_zpszk5msycd.jpg

IMG_0044_zpsqrhtfdom.jpg


I used springs that I had laying around the house to imitate crinoid stem fossils by bending them and pressing them into the foam.  I also pressed in small sea shells to imitate brachiopods and other bivalves.  The coral that I pressed into the foam turned out nice too.  It is subtle, but was enough to break up the flat shiny surface of new foam board.  I don't know how much will show up later after algae builds up, but for now, I'm happy with how it turned out so far.

IMG_0045_zpseiuvz0w6.jpg


Kevin Wilson


#165 Chasmodes

Chasmodes
  • NANFA Member
  • Central Maryland

Posted 08 August 2018 - 06:41 AM

I sponged on a little brown last night on a few layers to break up the monotone color and display a more stratified effect.  I will touch it up a little more perhaps before installing it into the tank this weekend.

IMG_0047_zpsafj7vhfx.jpg

IMG_0048_zpsjwp2tbx8.jpg


Kevin Wilson


#166 Chasmodes

Chasmodes
  • NANFA Member
  • Central Maryland

Posted 09 August 2018 - 07:39 AM

One of my biggest concerns with the background is the amount of foam that I used and the risk that the entire thing will float up to the top after I fill the tank with water.  To mitigate those risks, I filled the structure with river rocks and used spray foam to fill in the gaps.  The foam will help bind all of the foam boards together along with the glue and plastic popsicle sticks that I used for the internal structure.  The river rocks were to offset the buoyancy that the extra foam might cause.  Also, the structure is big enough that it fits tightly in place under the frame of the tank.  The junctions of the three foam sections also are shaped in such a way as you can't just pull them straight out.  I plan to use a ton of silicone to affix this background to the tank glass underneath, on the sides and on the back of the background structure.  The Drylok application made the fit even tighter.  It fits so tightly that I can't pull it straight out to the front of the tank.  I think that it might not need the silicone to stay in place, but I'm not going to take a chance on not using the silicone.


Last night, I fit the structure into the tank.  The tight fit discussed above created another problem.  Not only will it be challenging to apply the silicone neatly, but I had to really push to get it into place.  The tight squeeze caused about a quarter sized spot of Drylok to chip away at the junction of the center and right sections.  I'm going to pull it out and repaint that spot, but if it happens in during the final installation, then I'll just have to do an in-tank touch up.  I'd rather not do that, but....I gotta get it done. 


Here's what it looks like from the left side, you can't see the spot that chipped away.  The spots that you see are just a reflection off of the glass.

IMG_0051_zpsblw13fso.jpg


You can see where the paint chipped away near the top of the junction of the middle and right sections, leaving the pink foam exposed.  It should be easy to fix, so I'm not that worried about it.

IMG_0050_zps0rcoepu0.jpg


Kevin Wilson


#167 muskellunge

muskellunge
  • NANFA Guest
  • Wisconsin

Posted 10 September 2018 - 12:23 PM

This is incredible. Any more progress?

#168 Chasmodes

Chasmodes
  • NANFA Member
  • Central Maryland

Posted 11 September 2018 - 01:07 PM

This is incredible. Any more progress?


Thank you! 


I did a little bit of work on the structure and repainted the two spots where the Drylok came off (from the first fitting that was too tight).  I also trimmed some foam off of the back corner so that the three sections would slide into place easier.  I've purchased enough silicone to do the job, probably over doing it, but I want to make sure that this thing doesn't float up and smash my tank.  I suspect that the amount of foam that I used is comparable to the amount of foam used in my boat for flotation, LOL.


Kevin Wilson


#169 Chasmodes

Chasmodes
  • NANFA Member
  • Central Maryland

Posted 23 November 2018 - 08:22 AM

I installed my background into the tank last night with silicone.  I faced several issues that I had to deal with that have bothered me since I finished the construction of this beast, and two issues that I hadn't thought about.  The issues were:


1)  I used enough foam board and spray foam when constructing this background to float my boat, and needed to use a ton of silicone to keep it from ripping away and floating.

2)  Because this background fits tightly when fitted into the tank, you have to slide the last section in to get everything to fit, so, I couldn't silicone one section at a time in place.  I needed the silicone to remain uncured and wet during the process.

3)  How exactly could I accomplish physically solving the two problems above without making a mess.

4)  While applying the silicone, I wasn't sure if I purchased enough tubes, and it was Thanksgiving afternoon, and finding a store that was open to sell them to me was a problem.  Not only that, we had family plans, and time for me to work was limited.

5)  The silicone fumes were intense.


Below are pics of the process, and explanations on how I dealt with each issue.


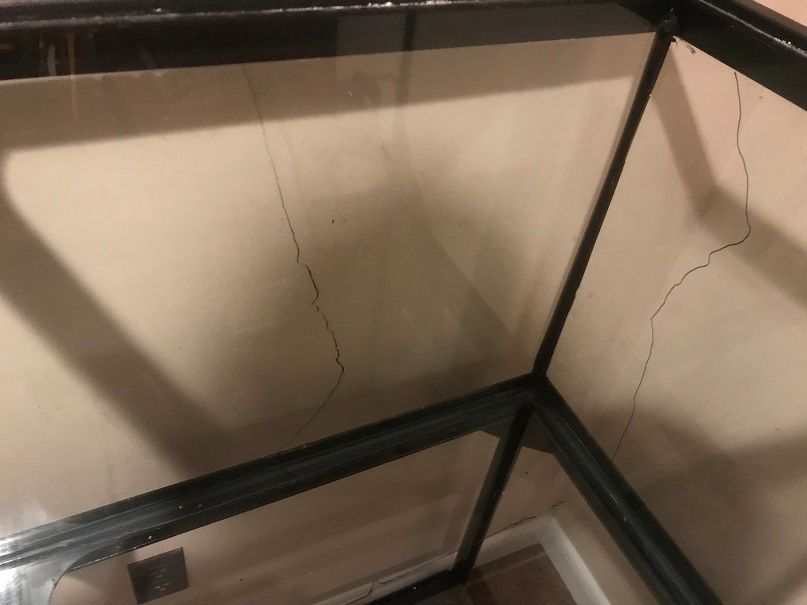
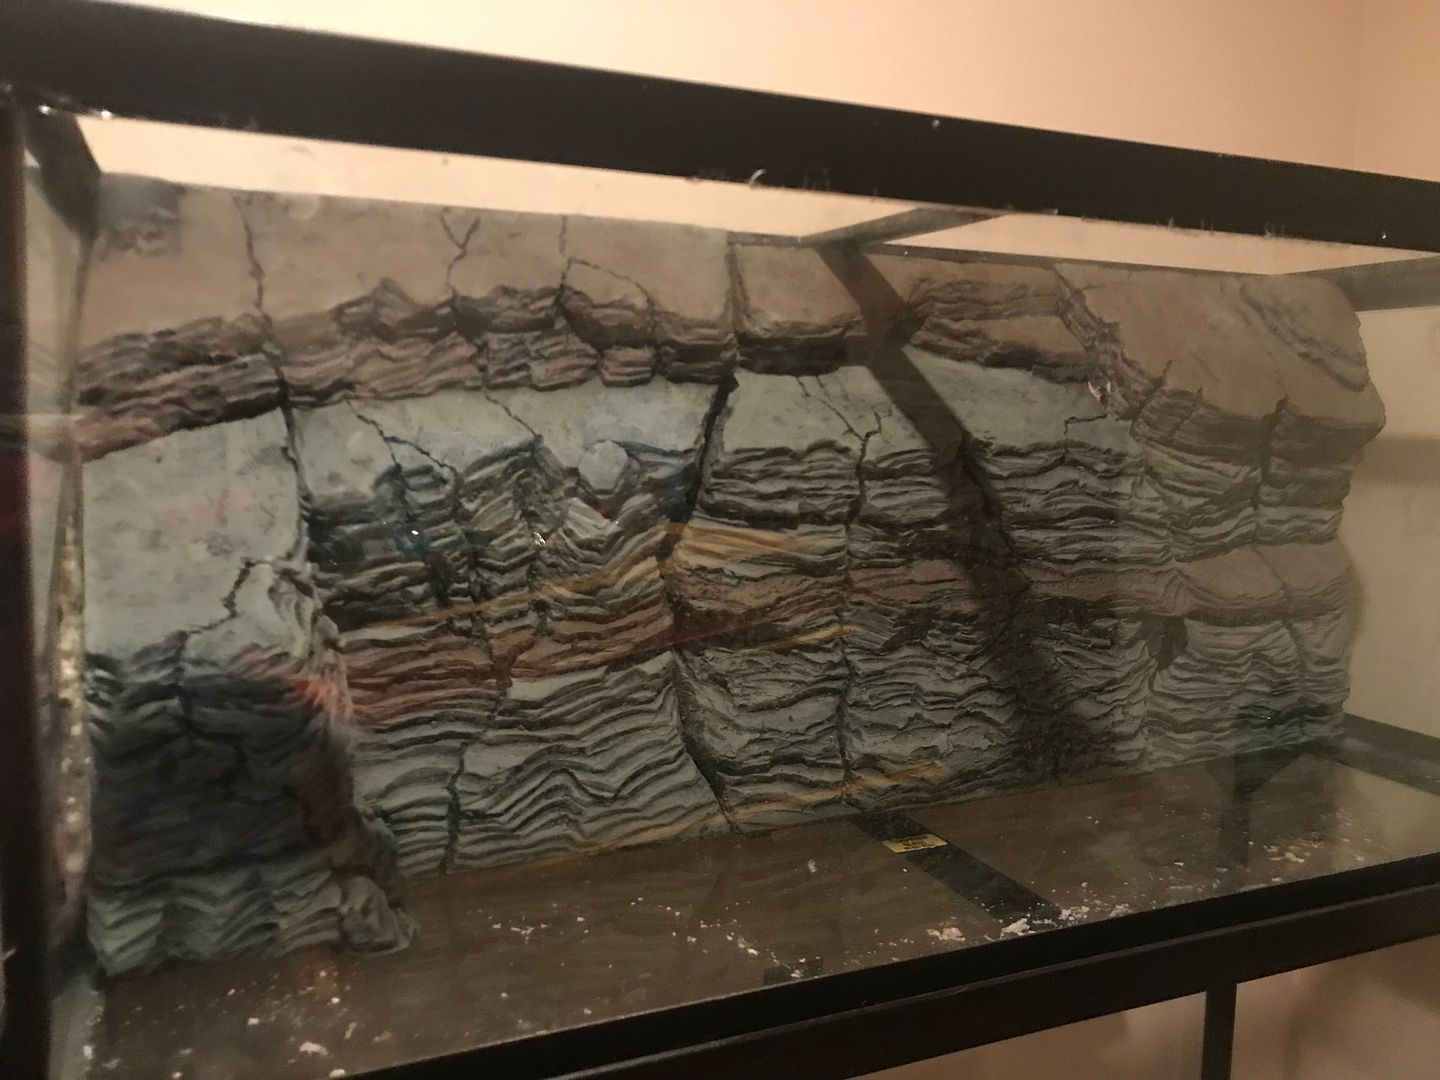
First, I cleaned the tank and drew lines with a sharpie of approximately where I needed to apply silicone directly to the glass. 

IMG_0332_zpsejahsnyb.jpg


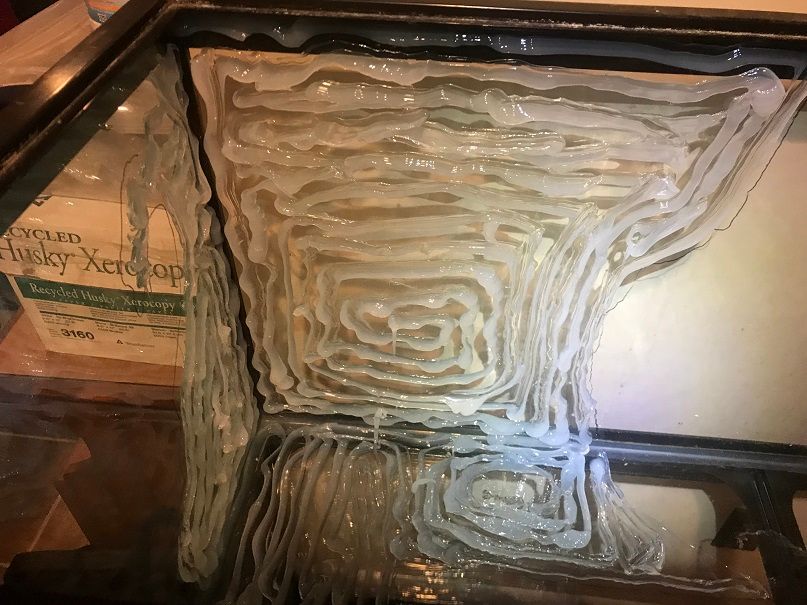
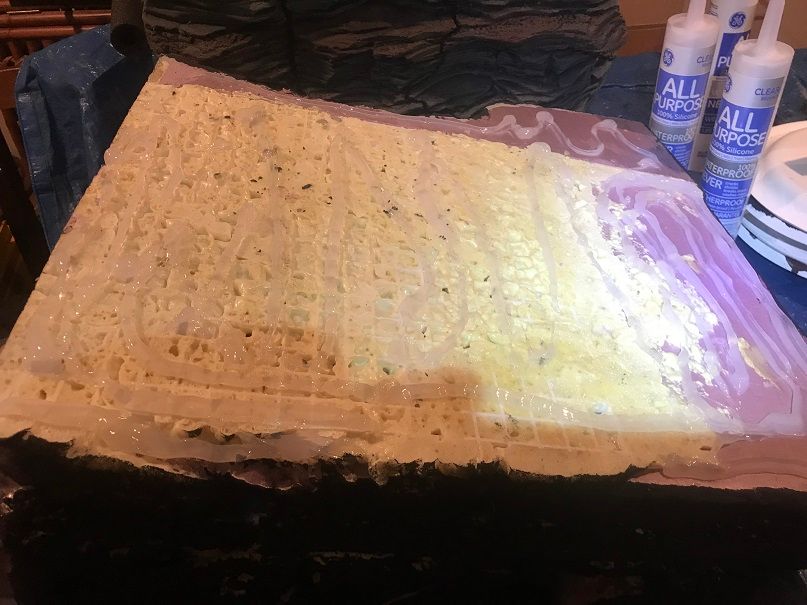
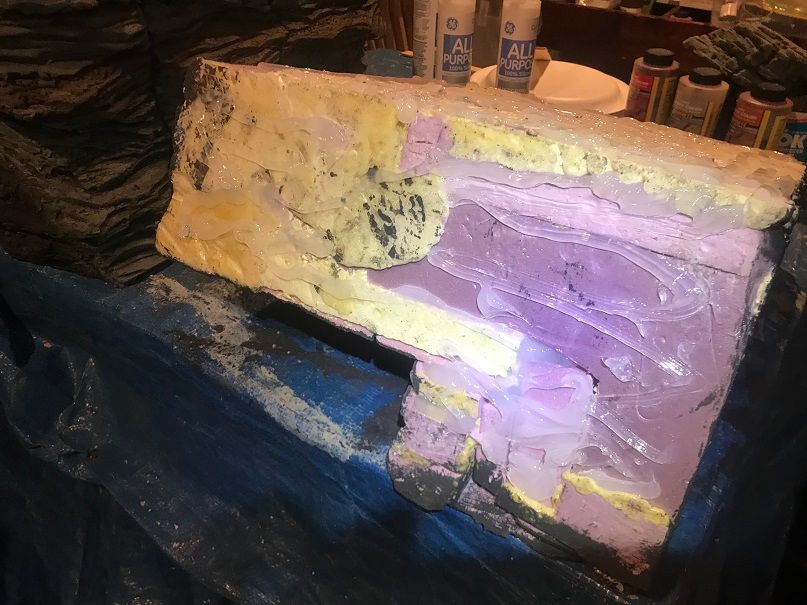
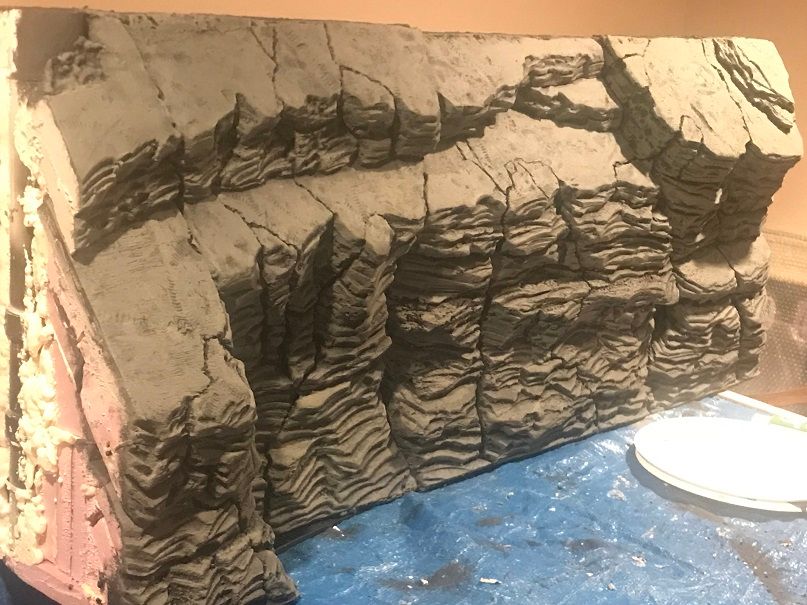
Issue #1:  Applying enough silicone to keep it from breaking away and floating.  I applied silicone directly to the glass, then to the back and bottom of each background section.  I cut each tube to allow me to apply a thick bead of silicone to each surface.  On the backgrounds, I focused on areas that may not make contact with the glass, thinking that the silicone on the glass and in a given crevice would make contact and bond, and the areas that made direct contact with the glass would have sufficient silicone from the amount that I applied to the glass.

IMG_0336_zpsukgje13u.jpg

IMG_0334_zpsvr9nb5ig.jpg

IMG_0335_zpsjw1abk0c.jpg

IMG_0337_zpstwmfldrc.jpg


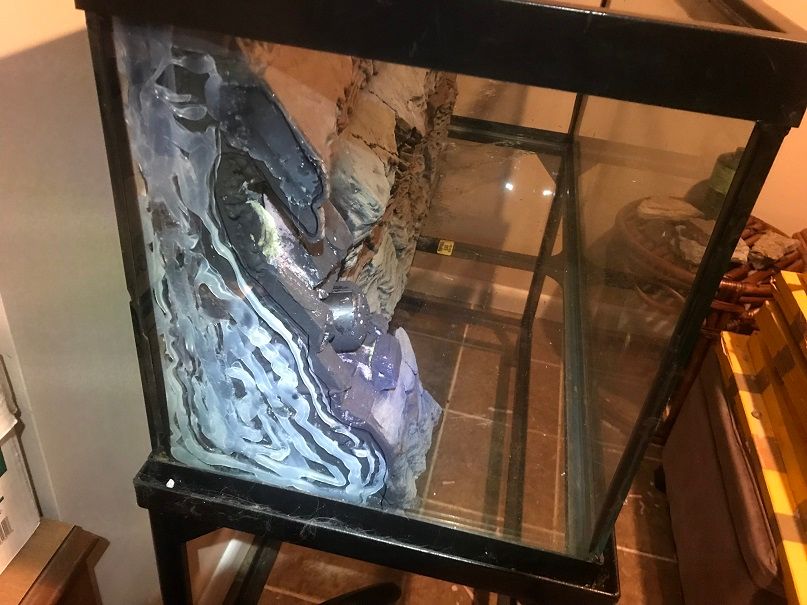
Issue #2:  Solved by installing everything as soon as possible.  My only mistake was applying silicone to the right side of the last section.  I should have applied a thicker amount of silicone directly to the glass, so that when I slid the last section into place, it wouldn't make a mess.  Issue #3:  I left enough room on the edges of the structure to be able to lift and maneuver each section into place.  This also kept most of the silicone out of sight.

IMG_0338_zpssf1uw1z0.jpg


Issue #4:  Solved, because I barely purchased enough.  I went through 7 tubes.  Using a very thick bead causes you to go through each tube much quicker than you would for household applications.  

Issue #5:  My entire rec room still smells of silicone.  I had a really tough time after installing the first section, especially reaching over the tank.  The fumes were intense.  I had to turn away, take a deep breath of fresh air, then hold my breath while working in the tank the rest of the time.  I opened the door to the outside, and that, at least, allowed me access to some fresh air.  It didn't help inside the tank though.  


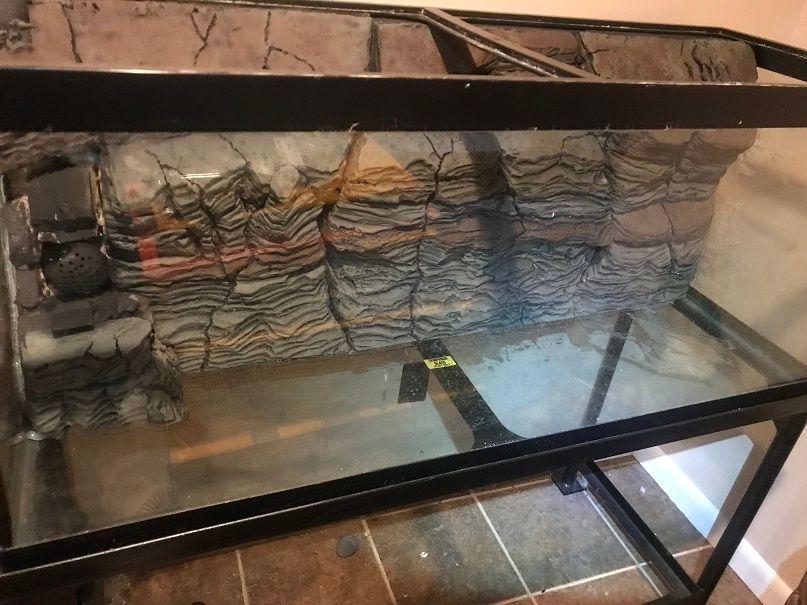
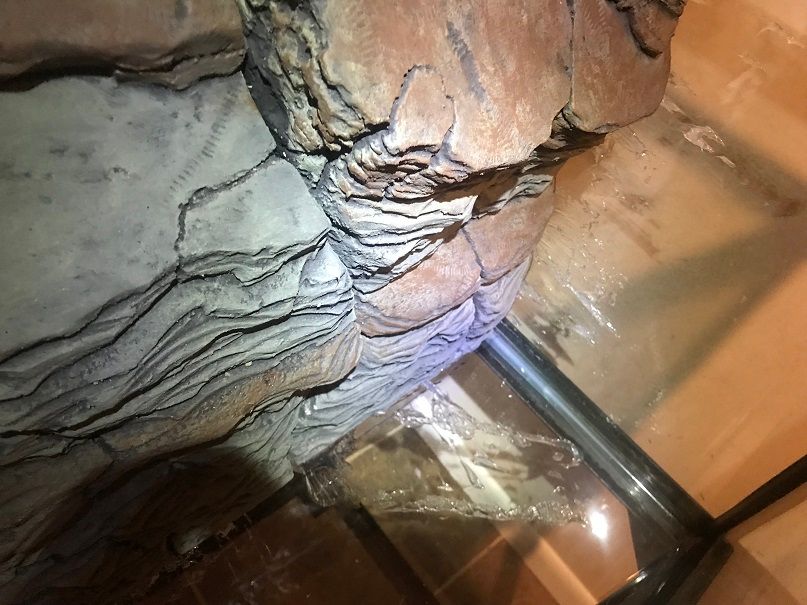
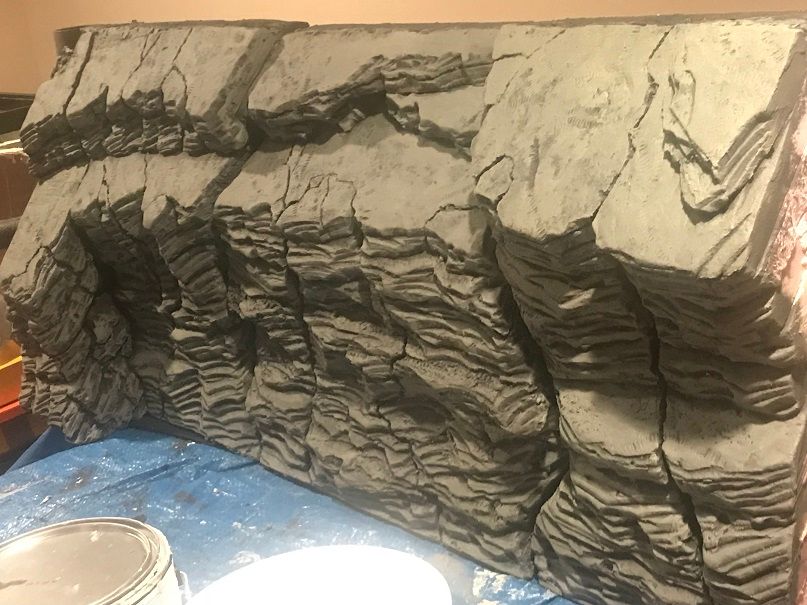
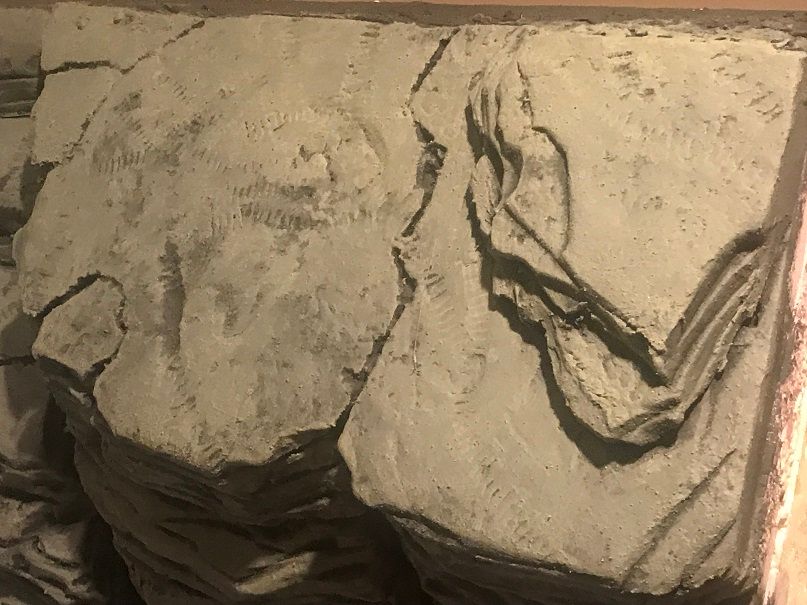
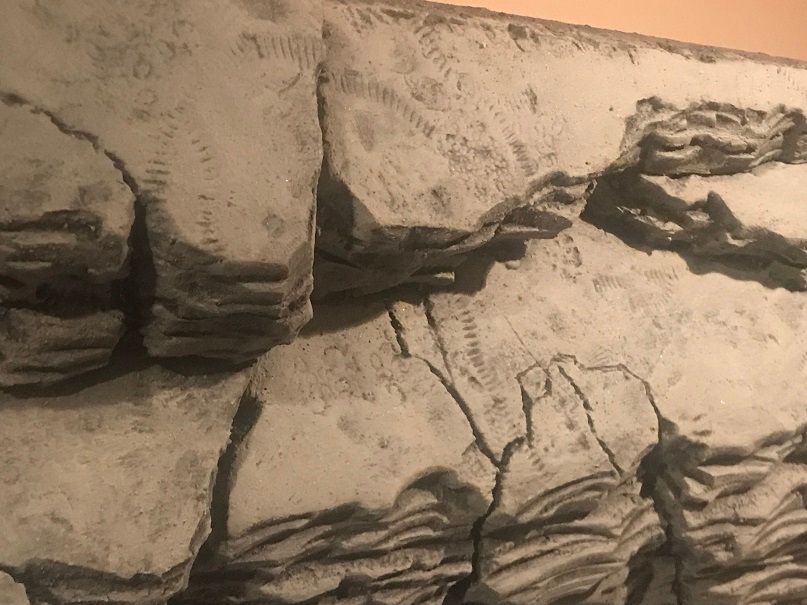
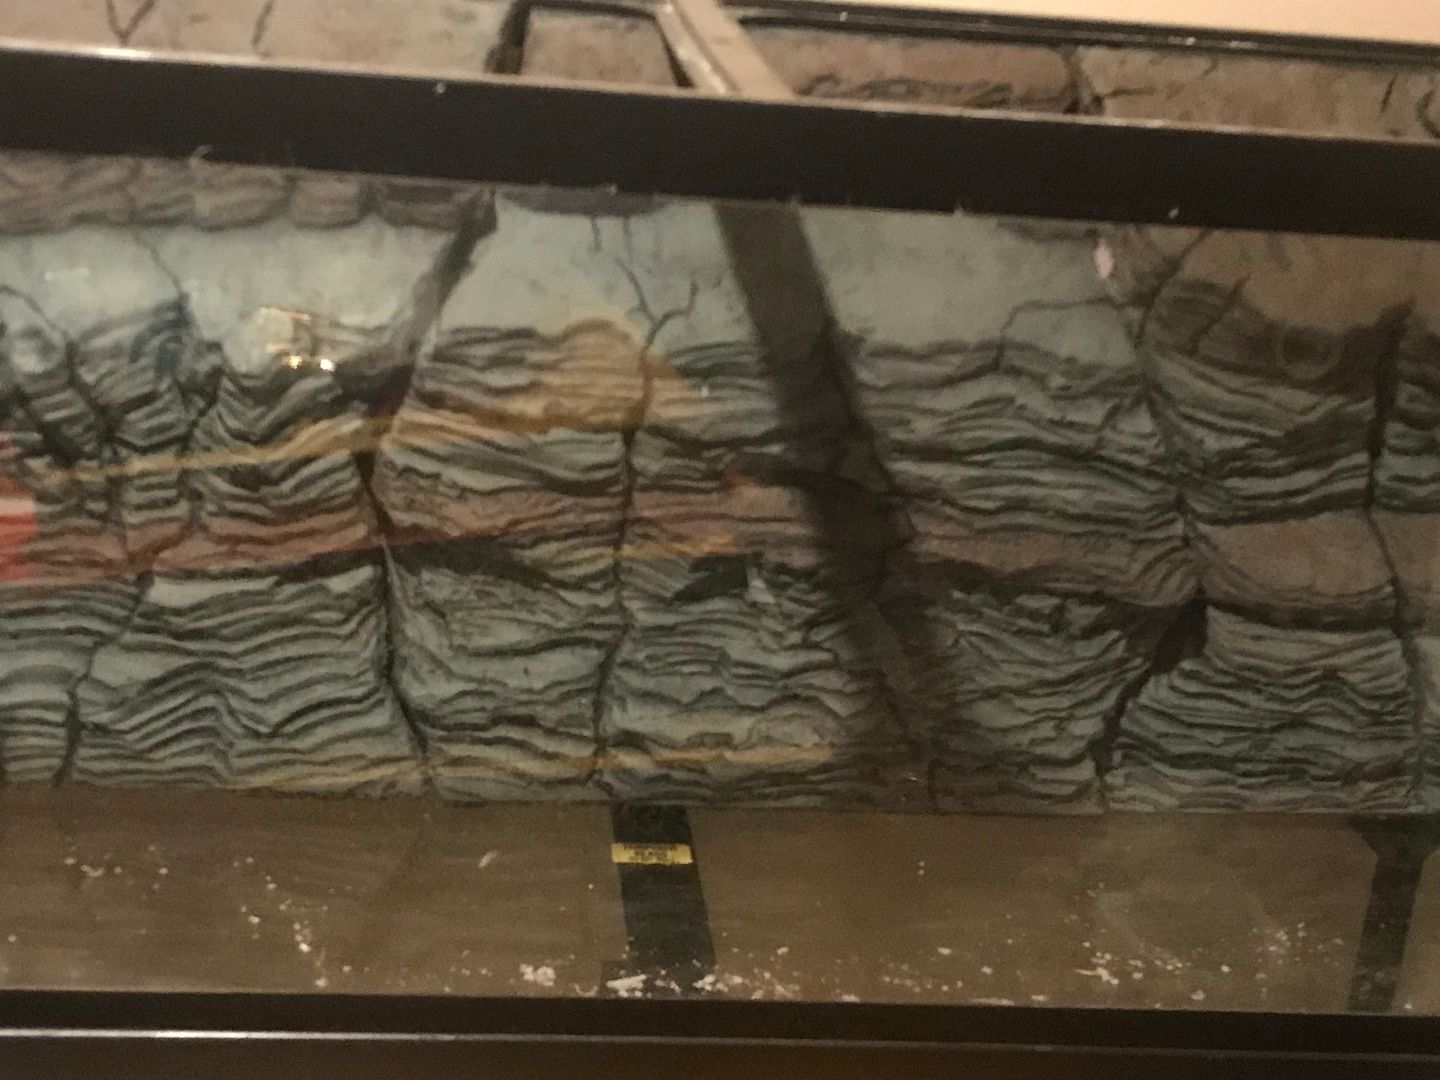
In the above pic, you can see the mess that I created while sliding in the last section of the background.  It's not a big deal.  I'll take a razor blade to it after it cures.  Here's a closer look of the mess:

IMG_0339_zpsjiez1ymc.jpg


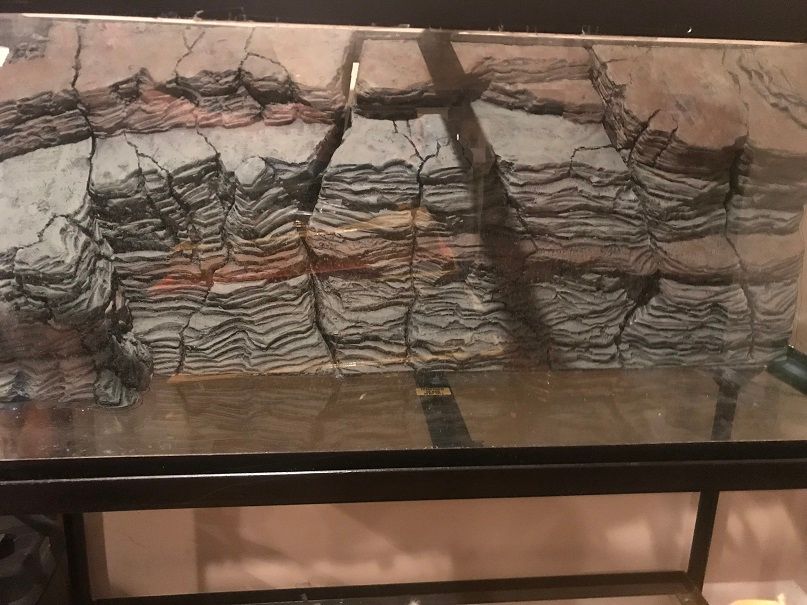
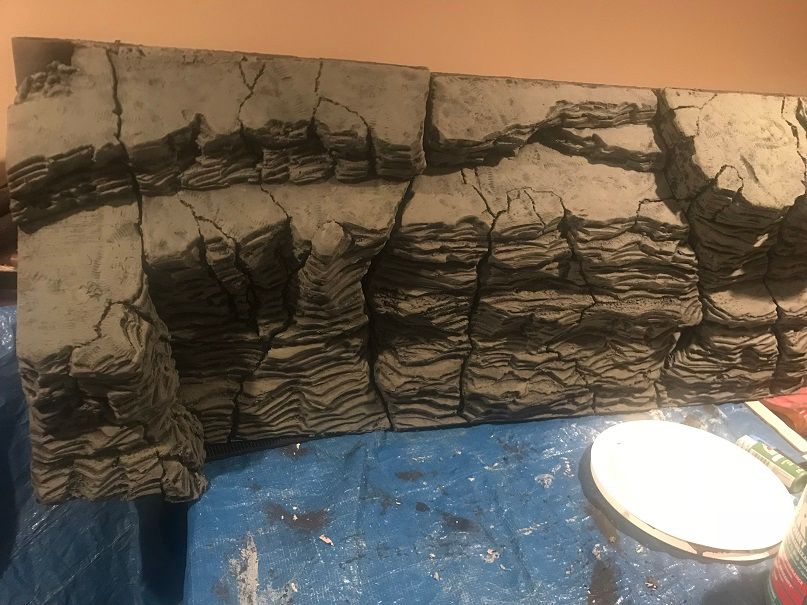
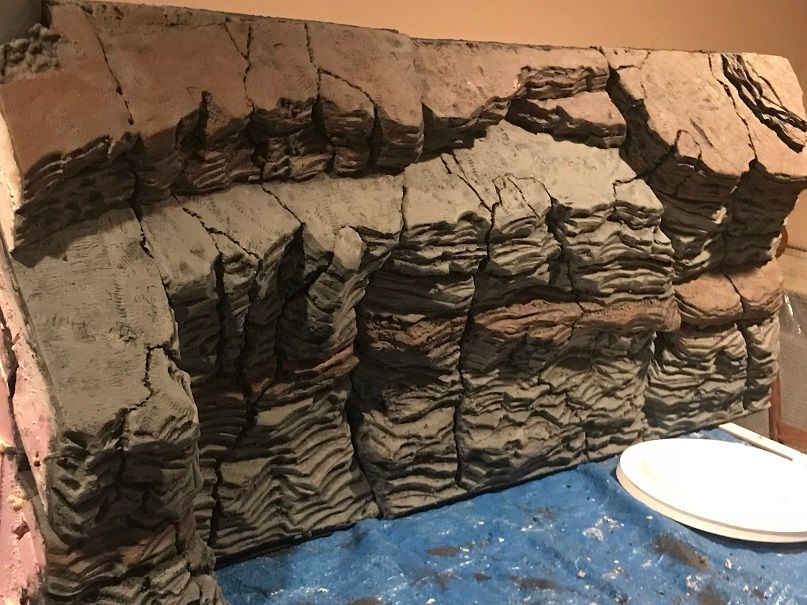
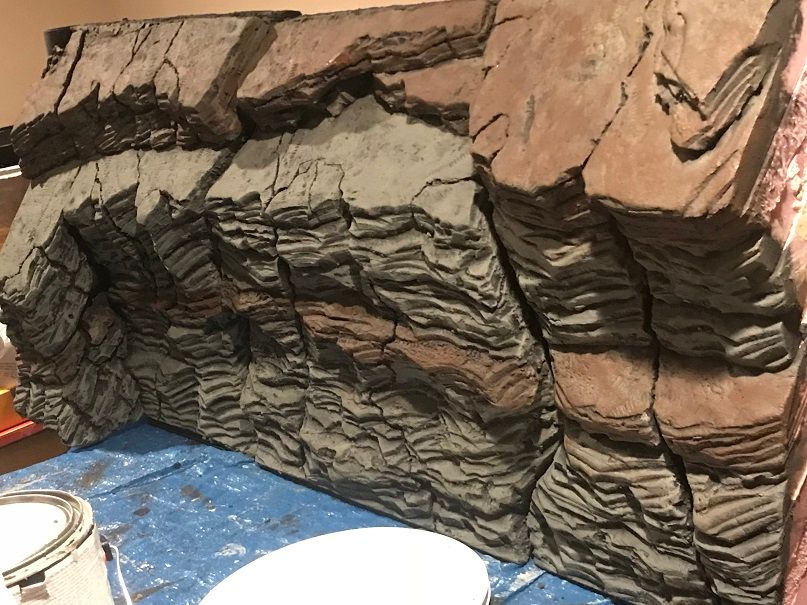
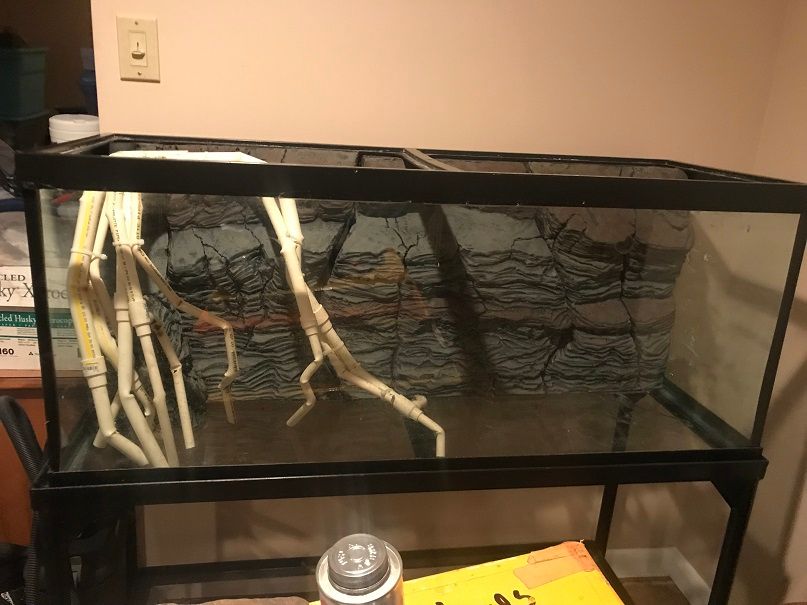
After gluing it all in place, and pressing it as firmly as possible against the glass, I installed the removable piece for a pic of what is should look like once the tank is up and running:

IMG_0342_zpsq015af3l.jpg


Next steps:

I need to paint the glass on the sides and back where the background meets the glass, to hide the ugly silicone work.  There is a gap between the first two sections where light passes through.  Painting the back of the tank should hide that and make it look like a natural crevice.  There is a gap on the lower part of the left side that I may have to deal with.  I haven't decided if I'll apply a little foam there and carve it back, and paint it, or just leave it as it is.  It bothers me though (you can't see it in this pic), because the silicone shows through there and looks unnatural.


I'm going to give this some time, about three weeks, to completely cure.  Then, I'll fill the tank and test to see if the installation and glue holds up enough to move forward.  I'll leave it filled for 24 hours.  If it doesn't rip away and break the glass, and flood my basement, then, I'll move ahead.  I am fairly confident that it will be OK.


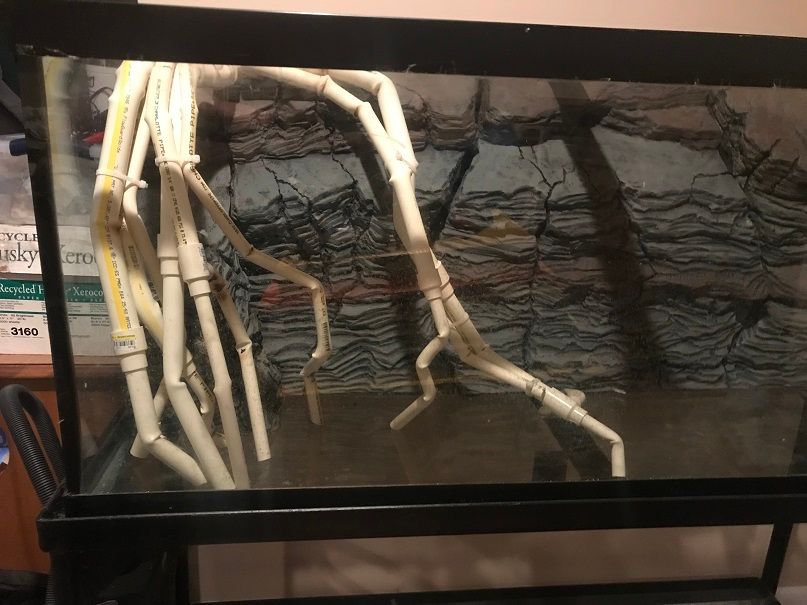
I will begin working on the fake roots.  I trashed what I had done so far...didn't like it.  I have a plan though.  In the meantime, I need to head to the river and start collecting rocks, gravel, and sand to hardscape the tank and get it ready to set up.  Once I do that, then I'll set the tank up.  The roots will be installed after the tank is up and running, unless I can finish them earlier than planned.


As far as substrate goes, I would like to grow stargrass at the right third of the tank, so my bottom layer of substrate will be dirt to provide nutrients for the grasses.  Sand and gravel will go over top of that.


The thought of installing this thing posed some issues and was a source of my procrastination...the thought that it wouldn't work had occurred to me.  Yesterday, I woke up determined to move forward.  I'm glad that part is behind me and my stress level is way reduced.


After the tank is cycled, then the fun part begins...collecting and stocking.


Kevin Wilson


#170 littlen

littlen
  • NANFA Member
  • Washington, D.C.

Posted 23 November 2018 - 10:04 AM

Nice!  

Yeah, I think a lot of us have almost dropped out using silicone in large amounts.  Great stuff, but comes with a kick when it is fresh.


Nick L.

#171 Chasmodes

Chasmodes
  • NANFA Member
  • Central Maryland

Posted 23 November 2018 - 11:18 AM

I'm slightly worried about my oyster reef tank.  It's in that room, but on the other side of the room.  The smell is a lot stronger in other areas of the room than I imagined that it would be.  


Kevin Wilson


#172 brackishdude

brackishdude
  • NANFA Member

Posted 27 November 2018 - 11:58 AM

I can't wait to see it up and running!


As your fellow, I can demand of you no more, and accept no less, than I allow to be demanded of myself

#173 Chasmodes

Chasmodes
  • NANFA Member
  • Central Maryland

Posted 28 November 2018 - 08:02 AM

Thanks Andy.  Me too!  I'm way behind my schedule on this project, but, I want all that silicone to cure and have this thing solidly in place.  I'm probably being a bit too careful in waiting so long for that to happen, but, my thought is, better safe than sorry.  I don't want this thing floating up.  My test date is 12/15, when I fill the tank with water and see what happens.  If all goes well with that, then I'll set the tank up and get it cycled.  One of my biggest problems with my builds is that much of my procrastination is fueled by the fear of failure on DIY projects like these.  I want them done perfectly (at least matching my vision), and the rest of it is probably just trying to solve problems that come up...or lack of money.


Much of the silicone fumes have gone away, still a little left.  My other tanks are just fine.


Kevin Wilson


#174 brackishdude

brackishdude
  • NANFA Member

Posted 29 November 2018 - 01:23 PM

I would think that the structural integrity of the foam itself is a bigger risk than inadequate glue strength. You've got a bleep ton of foam there, and I'd wager any failure would be the foam itself shearing, leaving a thin layer of well-glued foam still stuck to the glass, with the remaining foam floating away.  or shooting upwards with great force. . .


I know what you mean about slow perfection on DIY projects.  I do not regard that as a character flaw.


As your fellow, I can demand of you no more, and accept no less, than I allow to be demanded of myself

#175 Chasmodes

Chasmodes
  • NANFA Member
  • Central Maryland

Posted 29 November 2018 - 02:55 PM

Thanks Andy.  That actually makes me feel better.  The Gorilla Glue/foam board bond is extremely strong.  I couldn't separate the glued boards without breaking them entirely.  Also, I reinforced the glued bonds with plastic popsicle sticks, each covered with Gorilla Glue when applied, so that the sticks and form created a sort of bony skeleton inside the structure.  Each section is extremely strong.  The spray foam was just a filler and sealed the gaps, and also provided additional structure and bonding, especially with the river stones in there.  If you think that the silicone will hold, then I'm pretty confident that the rest of it will hold together.   :D/


Kevin Wilson


#176 Chasmodes

Chasmodes
  • NANFA Member
  • Central Maryland

Posted 26 December 2018 - 07:40 AM

I finally got my butt in gear and started back on the roots.  I don't know if you all remember, but I scrapped my last attempt because, I just didn't like the way it was turning out.  So this time, I decided to start by building the frame first, and not try to work details in as I went, and I'm much happier with the progress.  Basically, I worked with just CPVC pipe, CPVC fittings, a heat gun, and a few zip ties to build the frame.  I'm almost done with the frame, then I'll apply the CPVC glue and lock it up.  I'm making these roots removable to make maintenance on the tank easier.  Here is what it looks like so far:


Full tank shot:

IMG_0435_zpsgsowrfg4.jpg


Close up:

IMG_0434_zpsn1slxxyx.jpg


Here is what it looked like before (ugh):

IMG_7777_zps3qr6asb8.jpg


Next steps:


*  Glue the CPVC structure together

*  Glue some rope and other detail materials in place with a hot glue gun

*  Wrap as much pipe as I can with plaster gauze to give stuff something other than a slippery surface to cling to

*  Apply some spray foam to some areas for bulk and to get rid of straight lines to make it more realistic.

*  Carve the foam to finish the base skeleton of the roots

*  Apply grout for the next most outer layer of the roots to provide the final amount of bulk and sculpting for realism.

*  Paint and seal with Drylok mixed with cement die to provide the final details and realism but also to seal in the grout to prevent pH issues.


Kevin Wilson


#177 Fleendar the Magnificent

Fleendar the Magnificent
  • NANFA Guest
  • Ohio

Posted 26 December 2018 - 03:06 PM

Looks like this will be a killer setup and tank once finished!


#178 Chasmodes

Chasmodes
  • NANFA Member
  • Central Maryland

Posted 26 December 2018 - 05:35 PM

Looks like this will be a killer setup and tank once finished!


Thank you!  I hope so.  It's been a long time from start to finish on this build.  But, I'm determined to get it done.  I tend to procrastinate and overthink problems.  Once I figure a way to solve them and get working, things move much faster.  I think that I've overcome my last hurdle and can get the tank cycled and fish in it before the end of spring, hopefully sooner.


Kevin Wilson


#179 Fleendar the Magnificent

Fleendar the Magnificent
  • NANFA Guest
  • Ohio

Posted 26 December 2018 - 08:37 PM

I understand about procrastination. My philosophy... Why do today what I can put off until tomorrow. My wife wants to kill me at times... ](*,)


#180 Chasmodes

Chasmodes
  • NANFA Member
  • Central Maryland

Posted 27 December 2018 - 07:38 AM

Yes, how true!  There's always something getting in the way too...lack of $, or a football game, or a fishing trip, or reruns of The Office are on, or I have a head ache, or...or...or... sometimes, I just like watching the fish that I currently have.  Which reminds me, my tanks are due water changes.  Ah!  It can wait until tomorrow!   :biggrin:


Kevin Wilson


0 user(s) are reading this topic

0 members, 0 guests, 0 anonymous users