Could someone direct me to some DIY options for filter systems on 200+ gallon tanks? Possibly utilizing smaller tanks.
DIY Filter
Started by
Guest_NCNativeFish_*
, Apr 19 2011 02:23 PM
28 replies to this topic
#2
 Guest_Newt_*
Guest_Newt_*
-

- Guests
Posted 19 April 2011 - 02:47 PM
Days worth of reading here: http://monsterfishke...splay.php?f=337. Read at your own risk. Also look here:
http://www.algaescru...ic.php?f=9&t=68
http://www.janrigter.nl/mattenfilter/
Also, if you are going the separate tank route, consider stuffing the tank with fast-growing plants that tolerate wet roots: most aroids (peace lily, philodendron, pothos, etc.), dracaenas, ornamental bog plants, and many native emergents. You could also use a mini-hydroponic setup with some vegetables.
#3
Guest_gerald_*
Guest_gerald_*
-
- Guests
Posted 19 April 2011 - 07:14 PM
Really simple but ugly biofilter: 5-gal bucket with an outlet pipe near the bottom, fill with lava rock or Poret foam, place above tank, pump water from tank with a submersible pump or powerhead.
#4
Guest_mywan_*
Guest_mywan_*
-
- Guests
Posted 20 April 2011 - 12:28 AM
I was looking at canister filter designs myself thinking about a 5 gallon bucket overflow setup and was not happy with anything I seen. Then I got to thinking about 6' inch ID PVC standing straight up behind the aquarium. This could have an input feed at the bottom with water overflowing back into the aquarium at the top, or top feed with a small 3/4 PVC pipe feeding back up from the bottom as a return. A 6" inch u-joint could also be put at the bottom so it effectively doubles the total filter medium volume. Something like this:
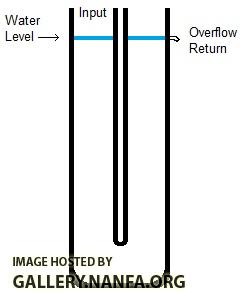
Doing the math: If you have a standard 29" inch high stand with a standard 20 gallon aquarium the water level sits about 44" inches off the floor. The volume formula for the 6" inch pipe is V = Pi * R^2 * h, divided by 231 for gallons when done in inches. This gives the total volume of a 44" inch 6" ID PVC pipe at about ~5.4 gallons, or ~10.8 gallons if done like in the pic. If 8" inch ID PVC pipe is used that becomes a little over ~9.5 gallons, or ~19 gallons volume if doubled.
This can be enclosed in a wooden container for looks and used similar to a HOB filter. Being an overflow setup it requires very little head pressure on the pump and safely remains primed even in a power failure, but the input side would need to stand high enough over water level to insure it did not overflow on the input side due to back pressure from the filter media. This is not something I have tried as yet but better suits my personal taste. It would be easily portable between tanks and a nice slim enclosure would resolve aesthetic issues.
#5
Guest_EricaWieser_*
Guest_EricaWieser_*
-
- Guests
Posted 20 April 2011 - 08:30 AM
I can never tell if links I post from my iPod touch are going to work or not, but here's a video on YouTube called "DIY sump for less than $40".
Also, live plants do quite a lot to decrease the nitrogen concentration in the water when they are growing. If you look up the Walstad method, it uses no filtration but live plants and never has a nitrate buildup.
Also, live plants do quite a lot to decrease the nitrogen concentration in the water when they are growing. If you look up the Walstad method, it uses no filtration but live plants and never has a nitrate buildup.
#6
Guest_Irate Mormon_*
Guest_Irate Mormon_*
-
- Guests
Posted 20 April 2011 - 08:32 AM
This is a good idea. You could have a modular filter system this way. Use different pipes for different purposes (fluidized bed, mechanical filtration, etc.).
#7
Guest_mywan_*
Guest_mywan_*
-
- Guests
Posted 20 April 2011 - 11:11 AM
The things I do not like about the DIY sump in the video is the ease of losing the siphon, the head pressure of pumping it back to the tank, the unsightly overflow tray, unwieldy plumbing, and the unwieldy process of moving it around to different aquariums/locations. The only way around the siphon issues is to either custom build the aquarium with a water level overflow or drill a hole in the aquarium glass at water level to mount a drain pipe.
I prefer the pump to provide the output from the aquarium which then overflows back into the aquarium. Hence no priming or special drain holes needed under any circumstances, so any aquarium is suitable without any priming issues. The problem is that this means the sump has to be at least slightly above aquarium level such as a shelf. That is why I thought of the large diameter PVC pipe, as it could be moved around almost as easily as a regular HOB filter. It is also fully self contained, so no plumbing has to be rerouted if you move it around. The thin cheap lumber used for making privacy fencing would make a very nice looking case for it stained or not. It would even look reasonably decent as an external background or provide adjustable hangars for an external background. You could also put it at one end of the aquarium rather than behind it, as the intake and return are just a couple of short flexible hoses coming out of the wooden enclosure. If full of water it will be fairly heavy but handles mounted on the sides would make it as easy to transport as a 5 gallon bucket of water. Without water it would not be heavy enough to be concerned about.
I looked in my storage and I have plenty of 3 inch ID PVC, which would give a volume of 2.7 gallons on the 20 gallon tank if doubled with a u-joint at the bottom. A drop in charcoal basket with a sponge covering could be put in the intake side for easy removal for cleaning or replacement. The rest would be filled with bioballs or plastic scrubbing pads which are easily dumped for cleaning. I still have the HOB plant tray filters to build to.
#8
Guest_gerald_*
Guest_gerald_*
-
- Guests
Posted 20 April 2011 - 01:14 PM
I like mywan's low-head concept. With his U-design, you could add a horizontal bypass pipe near the top between the inlet (downflow) pipe and the outlet (upflow) pipe so that when the media clogs up the inlet pipe can overflow to the outlet side, rather than on the floor.
#9
Guest_mywan_*
Guest_mywan_*
-
- Guests
Posted 20 April 2011 - 04:55 PM
I did not think of that and I just got back from getting supplies to build it and another filter (HOB plant filter). I should be able to just drill holes and silicone around the cross pipe without fittings. No fittings are going to be perfect tapped into the side of a round pipe anyway. All the other connections are disconnectible, so maybe I should just wait for the two connectors. I could also put a float on the intake side that shuts down the pump if it gets high enough for a prong to pass through a hole drilled in the cap and trip a normally closed switch. I should mount a water resistant electrical outlet in the wooden container box also. Seal the inside part with silicone or great stuff and put an eyebrow roof over the external part of the outdoor rated double outlet.I like mywan's low-head concept. With his U-design, you could add a horizontal bypass pipe near the top between the inlet (downflow) pipe and the outlet (upflow) pipe so that when the media clogs up the inlet pipe can overflow to the outlet side, rather than on the floor.
#10
Guest_EricaWieser_*
Guest_EricaWieser_*
-
- Guests
Posted 20 April 2011 - 06:43 PM
Can you post pictures of this so we can see what you're doing?I did not think of that and I just got back from getting supplies to build it and another filter (HOB plant filter). I should be able to just drill holes and silicone around the cross pipe without fittings. No fittings are going to be perfect tapped into the side of a round pipe anyway. All the other connections are disconnectible, so maybe I should just wait for the two connectors. I could also put a float on the intake side that shuts down the pump if it gets high enough for a prong to pass through a hole drilled in the cap and trip a normally closed switch. I should mount a water resistant electrical outlet in the wooden container box also. Seal the inside part with silicone or great stuff and put an eyebrow roof over the external part of the outdoor rated double outlet.
#11
Guest_MrCatfish_*
Guest_MrCatfish_*
-
- Guests
Posted 20 April 2011 - 07:09 PM
It seems that you may have issues with it clogging quickly. Resulting in having to clean it often. I made an internal filter out of 3 inch pvc http://nativefishkee...canister-filter
And here they are in my tank
http://www.youtube.com/watch?v=vRggywS-Dh4
And here they are in my tank
http://www.youtube.com/watch?v=vRggywS-Dh4
#12
Guest_mywan_*
Guest_mywan_*
-
- Guests
Posted 21 April 2011 - 03:27 AM
Yes. I will continue on the HOB plant filter thread with pics of that that filter and start another thread for the u-joint sump filter.Can you post pictures of this so we can see what you're doing?
Yes. Maybe not so quickly as on a 20 or 55 gallon as your 150 gallon. However, this being an external HOB type setup the primary sponge likely to clog can be pulled rinsed or replaced in all of 15 seconds without even shutting down the pump. Most of the length of the pipe will merely hold bioballs or equivalent and not too subject to clogging. I will likely use layers of filter media cut from an HVAC return air filter rather than a sponge for the initial filter. That should slow down clogging significantly over cotton or sponges. I could also make a single membrane bowl screen, like a fish net, sitting over the sponge filter to strain larger particles which would be quicker to rinse and return. For larger aquarium you could go with larger diameter pipe, but even the 3 inch has a total volume of 2.7 gallons at 2 x 44" inch water level from the floor. That will hold as many or more bioballs than many of the DIY sumps I have seen (often limited to about a third of a 5 gallon bucket) and also insure that the water must pass through more bioballs per cycle than larger canister sumps, albeit at a mildly faster flow rate. A drip tray is not required to distribute the water over the bioballs either, but may be used under the aquarium return for evaporative cooling.It seems that you may have issues with it clogging quickly. Resulting in having to clean it often. I made an internal filter out of 3 inch pvc http://nativefishkee...canister-filter
It just occurred to me that this filter should have a mild cooling effect on the water also. Warmer water tends to rise. So the water passing through the elbow at the bottom should be cooler than the ambient input water temperature. Though the water on the return side should have the opposite effect the overall ambient temperature should still be lower. It might be interesting to check the temperature difference on the input and out sides with no other cooling.
I also have a nearly new office water cooler I can cannibalize. I might be able to integrate that in with the u-joint filter as a chiller. Since I do not use air conditioners for myself it may give me the option of some species I may otherwise not be able to keep. If the u-joint filter has any cooling effect then the most efficient way to chill the aquarium may be at the filter input.
#13
Guest_gerald_*
Guest_gerald_*
-
- Guests
Posted 21 April 2011 - 10:48 AM
Since the bypass tube is near the top (no water pressure), you could use soft tubing and just squeeze it into the drilled holes without any glue. BTW, Goop or Shoe Goo holds better on most plastics than silicone does.
>> "I should be able to just drill holes and silicone around the cross pipe without fittings. No fittings are going to be perfect tapped into the side of a round pipe anyway."
>> "I should be able to just drill holes and silicone around the cross pipe without fittings. No fittings are going to be perfect tapped into the side of a round pipe anyway."
#14
Guest_mywan_*
Guest_mywan_*
-
- Guests
Posted 21 April 2011 - 11:14 AM
You are right. No part of it except the pump tube will be under any pressure except from water weight at the bottom. I think I even have some clear 1" inch tubing laying around. I have begun assembly with pictures here:
http://forum.nanfa.o...h__1#entry88119
I now have the main U built and the wooden enclosure for it 90% built. I will post pictures of that later today. Then it is a matter of getting the fittings attached. From there I can start adding accessories to taste.
http://forum.nanfa.o...h__1#entry88119
I now have the main U built and the wooden enclosure for it 90% built. I will post pictures of that later today. Then it is a matter of getting the fittings attached. From there I can start adding accessories to taste.
#15
Guest_MrCatfish_*
Guest_MrCatfish_*
-
- Guests
Posted 21 April 2011 - 01:26 PM
I don't know if this may interest you. But pot scrubbies fit into 3 inch pvc perfectly.I don't know if they would provide more surface area than bio-balls or not.
#16
Guest_mywan_*
Guest_mywan_*
-
- Guests
Posted 21 April 2011 - 02:52 PM
Yes, that was a curiosity for me so I did a search. Over at monsterfishkeepers a guy says the bioballs he was using had 160 sq/ft per gallon (volume) of surface area, and the scrub pads he switched to had 370 sq/ft of surface area per gallon. If that holds the scrub pads win by a landslide.You are right. No part of it except the pump tube will be under any pressure except from water weight at the bottom. I think I even have some clear 1" inch tubing laying around. I have begun assembly with pictures here:
http://forum.nanfa.o...h__1#entry88119
I now have the main U built and the wooden enclosure for it 90% built. I will post pictures of that later today. Then it is a matter of getting the fittings attached. From there I can start adding accessories to taste.
Over on aquariacentral a guy says scrub pads have almost 3x as much surface area per gallon compared to bioballs. Anecdotal but I do not think I want to spend that kind of money on bioballs unless they just smoke any other choice.
I see some cheaper bioballs on sale that give a per gallon surface area of only 21.5 sq. ft. Just need to find a reliable source for scrub pad surface area. Any unit will work, I will convert it to gallon volumes. What I call green pads might work even better and mechanically filter smaller particles. I might also be able to experimentally determine surface area per volume if I can get a good consistent measure on the fiber diameters. Or just straight math if I can also get the solid weight of the filter media, without air pockets. I will look into it.
Edited by mywan, 21 April 2011 - 02:54 PM.
#17
Guest_mywan_*
Guest_mywan_*
-
- Guests
Posted 21 April 2011 - 03:49 PM
It seems the guy on monsterfishkeepers mistook cubic foot for gallons. The surface area of Pot Scrubbies is 370 per cubic foot, not per gallon. That comes out to 49.6 per gallon. However, he apparently did the same with bioballs so the ratio should be the same.
Ok, it seems Pot Scrubbies do outperform standard bioballs. However, cannister media made from porous ceramics can have a surface area of 150,000 sq. ft. per cu. ft. That is about 20,000 sq. ft. of surface area per gallon. Filling a few gallons would burn loads of money though. CerMedia runs about $245 per gallon. That is $661.50 to fill up the U-Sump I just put together. Having a small canister of it on the return side of the Pot Scrubbies would still be nice, but for any cheaper alternative the Pot Scrubbies take the win.
Ok, it seems Pot Scrubbies do outperform standard bioballs. However, cannister media made from porous ceramics can have a surface area of 150,000 sq. ft. per cu. ft. That is about 20,000 sq. ft. of surface area per gallon. Filling a few gallons would burn loads of money though. CerMedia runs about $245 per gallon. That is $661.50 to fill up the U-Sump I just put together. Having a small canister of it on the return side of the Pot Scrubbies would still be nice, but for any cheaper alternative the Pot Scrubbies take the win.
#18
Guest_EricaWieser_*
Guest_EricaWieser_*
-
- Guests
Posted 21 April 2011 - 04:25 PM
Fluidized beds have the highest surface area.
Design plans: http://www.cichlid-f...les/diy_fbf.php
Video of the concept:
Basically your flow rate is high enough to make all of the little particles (sand, beads, etc) float, so their entire outer surface is in contact with flow.
Design plans: http://www.cichlid-f...les/diy_fbf.php
Video of the concept:
Basically your flow rate is high enough to make all of the little particles (sand, beads, etc) float, so their entire outer surface is in contact with flow.
Edited by EricaWieser, 21 April 2011 - 04:26 PM.
#19
Guest_mywan_*
Guest_mywan_*
-
- Guests
Posted 21 April 2011 - 06:29 PM
I must look into fluidized bed designs. The numbers I find is 7,800 sq. ft. per cu. ft, which blows pot scrubbers away but not porous ceramic media. I assume that cubic ft means in fluidized form, not settled sand. Of course sand is effectively free compared to ceramic media making it extremely cost effective per cubic foot. In theory it is enough to remove all ammonia at aquarium levels in a single pass. I understand some about optimizing hydrodynamic suspension and flow rates in theory, but need to dig a bit deeper to figure out how that might work in practice on a DIY project. In effect there is an optimum flow rate to suspend a given bed of sand, and going over or under that cuts efficiency. As much as I like overkill it is not necessarily a good a good thing with flow rates on a fluidized bed.
I also got some good numbers on oxygen requirement to remove a given amount of ammonia. It comes to 2 ppm of oxygen per 1 ppm of ammonia removed. This is also applicable to the filter I am in the process of building, since the media is submerged. Providing aeration inside the media chambers (both sides) may greatly increase efficiency if the ammonia concentration goes above some minimal levels, as well as provide all the aeration needed for the fish. Over 40 inches of height for the bubbles to rise greatly increases the per bubble absorption capacity and the rise rate will be slowed a lot by the filter media which needs that oxygen also.
I will have to study the fluidized beds more, but my next filter is the HOB plant filter. That will be my long term standard aquarium filter if it works out close to as well as the numbers look. The U-Sump is a backup, which is another reason it needs to be portable and easily storable.
Edited by mywan, 21 April 2011 - 06:30 PM.
#20
Guest_EricaWieser_*
Guest_EricaWieser_*
-
- Guests
Posted 21 April 2011 - 07:27 PM
Yes, it means fluidized sand. If the sand were to settle and condense, even for a couple hours, the beneficial bacteria would die. That is one downside to a fluidized bed filter; power outages and flow disruptions kill your culture. Even so, it's the filter style I would choose to build, and will, in a couple months.I must look into fluidized bed designs. The numbers I find is 7,800 sq. ft. per cu. ft, which blows pot scrubbers away but not porous ceramic media. I assume that cubic ft means in fluidized form, not settled sand.


0 user(s) are reading this topic
0 members, 0 guests, 0 anonymous users

