Jump to content


LED Tank Lighting Experiment with 1st look at results...


  • Please log in to reply
129 replies to this topic

#41 Guest_frogwhacker_*

Guest_frogwhacker_*
  • Guests

Posted 30 September 2011 - 11:13 PM

If you go to my Fish Cam link this weekend during the day you can see my 55 galon aqauriaum in real time (live).

http://71.170.193.21...ndex.html?cam=0

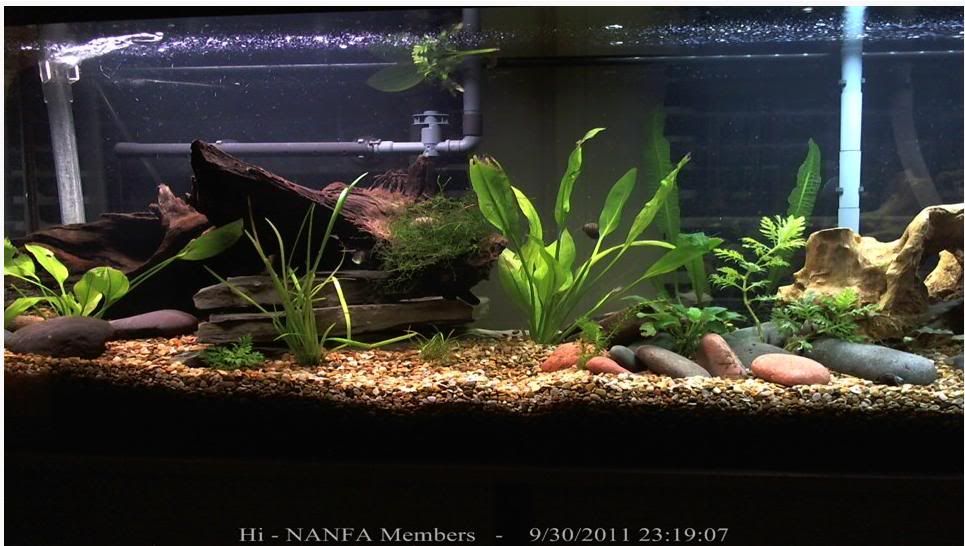
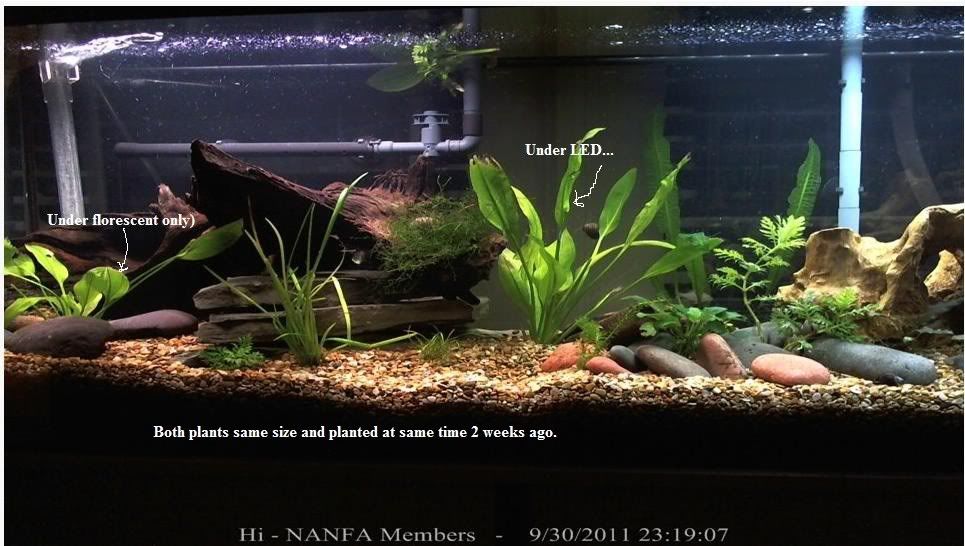
There are live plants in the aquarium. Notice the ones on the right compared to the one on the left. All of these were about 3 to 4 inches tall and planted at the same time. The center and right side of the tank (with the lighter colored wood) has the LED lighting and the left side (darker drift wood) does not. The one plant on the far left is rather sickly compared to all the new growth you see on the plants in the center and on the right which are exposed to the LED light. This is only for a two week period when I first planted them. (The plants next to the slate are newer and have not had the exposure the others have.)

Usil


I'd love to see the fishcam, but with satellite internet service, I've got such limited download capabilities during daylight hours that I can't watch videos. I only have unlimited download from 2:00AM to 7:00AM. We even have to stay up until then to do normal updates for the computers.

That's really great that you've got the physical evidence of better plant growth to confirm your findings.

Thanks again.

Steve.

#42 Guest_Usil_*

Guest_Usil_*
  • Guests

Posted 30 September 2011 - 11:17 PM

I'd love to see the fishcam, but with satellite internet service, I've got such limited download capabilities during daylight hours that I can't watch videos. I only have unlimited download from 2:00AM to 7:00AM. We even have to stay up until then to do normal updates for the computers.

That's really great that you've got the physical evidence of better plant growth to confirm your findings.

Thanks again.

Steve.


I will leave the lights on tonight if you want to check it out.

Here is a current image of the tank:

Posted Image


Usil

Edited by Usil, 30 September 2011 - 11:21 PM.


#43 Guest_frogwhacker_*

Guest_frogwhacker_*
  • Guests

Posted 30 September 2011 - 11:21 PM

I will leave the lights on tonight if you want to check it out.

Usil


Oh Yeah, I'll certainly stay up another couple hours for that. Thank you much.

Steve.

#44 Guest_Usil_*

Guest_Usil_*
  • Guests

Posted 30 September 2011 - 11:23 PM

Oh Yeah, I'll certainly stay up another couple hours for that. Thank you much.

Steve.


I just added a picture of the tank in my last post if you want to get some sleep.


Usil

#45 Guest_frogwhacker_*

Guest_frogwhacker_*
  • Guests

Posted 30 September 2011 - 11:27 PM

I just added a picture of the tank in my last post if you want to get some sleep.


Usil

I'll PM you.

#46 Guest_Usil_*

Guest_Usil_*
  • Guests

Posted 30 September 2011 - 11:40 PM

Maybe this is clearer demonstrating the growth difference for a 2 week period.

Posted Image


Usil

Edited by Usil, 30 September 2011 - 11:41 PM.


#47 Guest_frogwhacker_*

Guest_frogwhacker_*
  • Guests

Posted 01 October 2011 - 01:27 AM

Wow! Seems like I could see an even bigger difference in lighting of each side of your tank in the webcam than the still shots. Very nice looking set up too. Seems like the motion really brings things to life. Incredible work on the experiment and the fish cam. Thanks so much for leaving the lights on for me. I really enjoyed it. I hope your fish don't have to get up too early in the morning.


Thanks again.

Steve.

#48 Guest_EricaWieser_*

Guest_EricaWieser_*
  • Guests

Posted 01 October 2011 - 09:39 AM

Oh dang. I just got a look at the spectrum of your LED versus fluorescent light bulbs, and that LED's spectrum is fantastic. That's an awful fluorescent bulb, even though it was 'designed for plants'. By the way, I took at peek at the spectrum of my full spectrum fluorescent bulbs recently, and they have a spectrum that is similar to your LED's.

Anyway, I'm glad to know there's a low cost LED available for when I set up my next tank. Your experiment is especially useful because as an LED string, it's flexible and you have a lot more options for what sizes of tank it can fit. I have a 10 gallon right now that's rigged with some stupid assortment of 3 different lights because I couldn't find a shop light that would exactly fit it. (10 gallons are 20 inches long, and shop lights are 18 inches long, so the setup involves a bit of tape.) Those LED lights would have been perfect for it, and would have cost a lot less than what I paid. Thank you, Usil. I'm glad you investigated this for us :)

#49 Guest_Usil_*

Guest_Usil_*
  • Guests

Posted 01 October 2011 - 11:04 PM

This was a learning exercise. LED lighting has grown a lot in the past year. I have been watching the 'home' LED light products coming out and they have been expensive, produced poor intensity and had a highly variable 'white' cast. This is from reviewers, which provide valuable insight to what is happening in LED development. The last thing I want in my home is for the light to look like the inside of a Russian stairwell.

But progress is coming and I see it now. The rapid settlement of LED lighting for saltwater environments is universally looking like the new default with all the benefits I have already enumerated. For Freshwater too, commercial availability is here. This all is spilling over into large development programs and the benefits are that they are addressing the older short comings - apparently successfully.

The benefit to us is that these manufacturers are turning to China and the cheap costs are provided back to us in terms of sites like Deal Extream. With better design and materials LED lighting is starting to develop a good standard of light. Add that to the mass production lines and low costs become available to the DIY person. Which - as we can see - can benefit us. Unfortunately, being a relatively new technilogy - if we choose the commercial route it is going to be costly. So, DIY always looks good to me if it is not too complicated. That is why this project appealed to me and I (and others if they so choose) will be able to quickly benefit from the time, which I think, was well spent.

Usil

#50 Guest_Doug_Dame_*

Guest_Doug_Dame_*
  • Guests

Posted 01 October 2011 - 11:11 PM

So, DIY always looks good to me if it is not too complicated. That is why this project appealed to me and I (and others if they so choose) will be able to quickly benefit from the time, which I think, was well spent.

Exactly. Appreciate you working so hard to share this information with us.

#51 Guest_Usil_*

Guest_Usil_*
  • Guests

Posted 01 October 2011 - 11:14 PM

I enjoyed doing it. It felt good to exercise the brain.

Usil

Edited by Usil, 01 October 2011 - 11:17 PM.


#52 Guest_Usil_*

Guest_Usil_*
  • Guests

Posted 03 October 2011 - 09:49 PM

Building a High Wattage LED light system - PART 1:

A.Justification

The experimentation with the low power LED strip light has left me with a quandary. Do I purchase more similar parts and complete this project as is or do I build a more powerful LED system more typical of what is commercially available today (at extremely high costs) which promotes and maintains profuse plant growth in aquaria. I decided to run the numbers to make this decision.

Costs:The current (discussed low wattage) system using low power LED strip lights

2x LED 30 emitter water proof 4.5watts 2=9watt strip lights = 30.00
Powersupply (12 volt/1 amp) Radio Shack = 18.00
Mounting hardware (local purchase) = 5.00

Total installed costs = $53.00

Costs:Higher power (10x8=80 watt) LED Light System


8x 10watt 750-Lumen 7000K White LED emitters = 52.80
Two water proof constant current LED drivers = 26.88
Extruded Aluminum channel (Lowes) = 12.00
Thermal Silicone Glue = 6.99

Total installed price = $98.67

For comparison: Replace bulbs (better models) in my current fluorescent system:

T-Style Fluorescent Tube Lamps are the most popular style of aquarium lighting. There are a wide range of lengths, colors and brands available and fluorescent tube lights are very cost efficient due to the large market for them. The only disadvantage is these bulbs do not have a very high (delivered) wattage output to the bottom of the aquarium compared to other lighting options. These lights are ideal for freshwater and fish only aquariums and may need to be doubled up or more to support high light requirement corals. Normal Output fluorescent lights have wattages of 14 to 40 and are lower light output compared to HO and VHO fluorescent bulbs.

The current 15 watt bulbs (Perfect-A-Lamp F15T8 bulb) 2 x 12.00 =$24.00

These bulbs have been measured as producing inadequate lumen at the bottom of my aquarium (<300 lumen) for reasons already discussed in an earlier write-up.

Since I want to provide a much better light for the aquarium, I need a much better bulb replacement. If I upgrade to a high output bulb that would better suit plant growth like the Aquatic Life 18 Inch 18W 6000k T5HO Bulb, that would be 2x19.00 =$38.00.

Here are thelinks to the parts I have ordered.
http://www.dealextre...dc-9-11v-100852
http://www.dealextre...r-85-265v-42906

Both of these would be mounted inside the current housings to fit above my 55 gallon aquarium.

So, in summary for initial costs:

Replace current fluorescents (30 watt output) = $24.00
High output fluorescent bulbs (36 watts output) = $38.00
Low Wattage LED Strips (9 Watts output) =$53.00
High Wattage LED 6700K emitters (80 watts output) = $98.67

But there is a problem. Fluorescent bulbs don't last a long time or provide continuous optimal light. Fluorescent bulbs usually last 6 to 12 months maximum and they need to be changed out. As the LED systems I am contemplating building will last 5 years I will back all these costs into a 5 year cost outlay to give a fair overall comparison.

Costs for initial and replacements for 5 years:

Replace current fluorescents (30 watt output) = $120.00
Highoutput fluorescent bulbs (36 watts output) = $190.00
LowWattage LED Strips (9 Watts output) =$ 53.00
High Wattage LED 6700K emitters (80 watts output) = $ 98.67

Note the 'no-change' for the LED systems. Now the initial cost for the LED systems suddenly don't look so bad. Our hobbies are long term so we need to thinking long term about the expenses.

We also need to add what it costs to run these lights for 5 years. Looking at an average on cycle of 12 hours a day that would be 4,380 hours a year or 21,900 hours in 5 years. At a cost of 7.57 cents/KWh the operational costs for 5 years would be:

Replacecurrent fluorescents (30 watt output) = $ 49.75
High output fluorescent bulbs (36 watts output) = $ 59.70
Low Wattage LED Strips (9 Watts output) = $ 14.90
High Wattage LED 6700K emitters (80 watts output) = $ 132.65

I am not going to add to the list for metal hallide or halogen or other kinds of lighting. They require special bulbs, housings and are expensive to buy and expensive to run. I just want to keep this simple to probably what most of us use.

Total Cost for installation, replacement bulbs and operational cost for 5 years:

Replace current fluorescents (30 watt output) = $ 169.75
High output fluorescent bulbs (36 watts output) = $ 249.70
Low Wattage LED Strips (9 Watts output) =$ 67.90
High wattage LED 6700K emitters (80 watts output) = $ 231.32

There is something to be said about the low wattage LED system. Cost are low to make and operate. In most situations they maybe sufficient for maintaining most plants in an aquarium. But if plant profusion is a goal on the list then clearly you need a high wattage solution. In this case, the better, high output actinic plant fluorescent bulbs actually cost more at the end of the 5 year period than going to the high wattage LED system.

For me, after doing the analysis, it is too tempting and I love a good DIY project with a big payoff. I have to jump right in to the high wattage LED solution. Clearly a high tech solution but as it is completely cost effective- why not? In the end, I will get 6700K full spectrum white light, it will have almost then entire output directed to the bottom of the aquarium and the costs will be less than maintaining the current system with high output fluorescent bulbs. Better light, better plant growth and lower costs. That seems like a no-brainer to me.

I will continue this project in PART 2. There I will provide discussion and pictures for the disassembly, modifications, installation and wiring for the LED system into my current 55 gallon lighting system. I will also add the measured light readings at 4", 6" and 18" inside the tank so that we can continue our comparison to the last project.

Parts are ordered and it will probably take a few weeks for them to get here. I will pick this up at that time.

Usil

Edited by Usil, 03 October 2011 - 10:40 PM.


#53 Guest_frogwhacker_*

Guest_frogwhacker_*
  • Guests

Posted 05 October 2011 - 10:53 PM

I will continue this project in PART 2. There I will provide discussion and pictures for the disassembly, modifications, installation and wiring for the LED system into my current 55 gallon lighting system. I will also add the measured light readings at 4", 6" and 18" inside the tank so that we can continue our comparison to the last project.
Usil[/size][/font]


I was hoping there would be a sequel. Definitely looking forward to reading about this project. Thanks again for taking the time to do this and posting so we all can learn from it.

Steve.

#54 Guest_Elijah_*

Guest_Elijah_*
  • Guests

Posted 16 October 2011 - 11:34 PM

Aluminum foil provides only minimal increases as reported by others. Actually, the LED project has many reasons I am pursuing but ultimately it will be a more efficient system for me.


Usil

Probably do not need it with LED, but my local LFS sells a mylar background for tanks. I use it in my ghetto light strips. Mylar is super reflective. You can get it at hydroponic stores also, or the inside of some potato chip bags.

#55 Guest_Elijah_*

Guest_Elijah_*
  • Guests

Posted 16 October 2011 - 11:38 PM

So if I were to order some of these leds, which ones do you think would be best for a 75 gallon, heavily planted tank. I am trying to figure it out for myself from your info, but my adhd is making it difficult.
I much appreciate your efforts here!

#56 Guest_Elijah_*

Guest_Elijah_*
  • Guests

Posted 16 October 2011 - 11:41 PM

It is amazing to me how expensive LEDs are at the pet store. My lfs sells little foot long strips of leds for $50 not including the power supply.
I really want to switch over to them because I am using too much electricity which does not jive with my tree hugging ideals. It is also draining my wallet.
The cost is prohibitive to me at this point, but this posting is exactly what I have been looking for.
Thanks so much!

Edited by Elijah, 16 October 2011 - 11:57 PM.


#57 Guest_Usil_*

Guest_Usil_*
  • Guests

Posted 17 October 2011 - 07:26 AM

The parts have been ordered and I should receive them in the next 10 days. Just hold on making any purchase right now and wait for me to complete this project which won't take long after the parts are received. Commercial aquarium LED lighting systems are WAY over priced. You saw my parts list and the costs and it will end up a tiny fraction of what you would pay.

My current low-wattage system which includes the original fluorescent and my low wattage LEDs (on one side); I have been observing for the past three weeks is working but the plants are not what I would call robustly thriving. Robust growth for a well planted aquarium is just going to take more light which is why I decided to go for a higher wattage solution. As I have devised a system to measure and compare outputs and am purchasing full spectrum (6500 - 7000K) 10 watt LEDs this should provide all the light I need. I am going to have four of these LEDs per side of the tank.

I did finally get a spectrophotometer and have measured the low wattage LEDs. They clearly output (visually) a spectrum from 420 to 680nm. PAR light is from 400 to 700 nm but the light in the outer regions is either ultraviolet and infrared so I can not visually see these areas in the scope but can tell that they extend there.

I finally found a good reference that shows exactly how much light aquarium plants need for good growth. This can be helpful for planning stages in tank set up.

http://faq.thekrib.com/plant-list.html

I am anxious to get this project completed myself. As I indicated in an earlier post, this is a DIY project and I will provide full step-by-step instructions and pictures on the assembly of the parts. I will also provide operational comments on the growth of my plants after everything is installed as I now see the growth rates and conditions under my lower wattage system.

Usil

Edited by Usil, 17 October 2011 - 07:29 AM.


#58 Guest_Elijah_*

Guest_Elijah_*
  • Guests

Posted 18 October 2011 - 10:55 PM

The parts have been ordered and I should receive them in the next 10 days. Just hold on making any purchase right now and wait for me to complete this project which won't take long after the parts are received. Commercial aquarium LED lighting systems are WAY over priced. You saw my parts list and the costs and it will end up a tiny fraction of what you would pay.

My current low-wattage system which includes the original fluorescent and my low wattage LEDs (on one side); I have been observing for the past three weeks is working but the plants are not what I would call robustly thriving. Robust growth for a well planted aquarium is just going to take more light which is why I decided to go for a higher wattage solution. As I have devised a system to measure and compare outputs and am purchasing full spectrum (6500 - 7000K) 10 watt LEDs this should provide all the light I need. I am going to have four of these LEDs per side of the tank.

I did finally get a spectrophotometer and have measured the low wattage LEDs. They clearly output (visually) a spectrum from 420 to 680nm. PAR light is from 400 to 700 nm but the light in the outer regions is either ultraviolet and infrared so I can not visually see these areas in the scope but can tell that they extend there.

I finally found a good reference that shows exactly how much light aquarium plants need for good growth. This can be helpful for planning stages in tank set up.

http://faq.thekrib.com/plant-list.html

I am anxious to get this project completed myself. As I indicated in an earlier post, this is a DIY project and I will provide full step-by-step instructions and pictures on the assembly of the parts. I will also provide operational comments on the growth of my plants after everything is installed as I now see the growth rates and conditions under my lower wattage system.

Usil

You are the man!
Thanks.

#59 Guest_Usil_*

Guest_Usil_*
  • Guests

Posted 26 October 2011 - 07:13 PM

Well, I have completed my High Power LED Aquarium Lighting project. I received all the parts this week and put it all together within two hours. Frankly, I was hoping that it was going to be a little more challenging than that but this was one of the easiest projects I have ever completed. That is good news because that means anyone in the forum should have no difficulty in doing this for themselves.

I still need to do the lumen measurement tonight inside the tank and the write-up but I will spend some time tomorrow completing my notes and pictures and have this posted by the end of the day. I did do an air-reading lumen check tonight just to see a quick comparison to the air-reading data I already have from the low power LED lighting system and the Fluorescent lighting system from PART-1 of this project. The results are below,

As you can see the results are vastly different from the previous tests. Over 20 times the lumen output is achieved using these high power LED emitters compared to the Fluorescent bulbs and over 14 times the output compared to the low power LED lights I used in PART-1. This should translate from the current 18 lumen output measured at the bottom of the aquarium (underwater) using the low power LEDs to over 100 lumen using the High Power LEDs. This is a guess and I will have the actual data tomorrow.

The dissasembly and assembly of the project components was very easy and I already have them installed and operating on my aquarium. The results are simply amazing. Anyone who has marveled at the (very high priced) high intensity LED light systems used on Salt Water Aquaria (either in stores or on the WEB) will see an instant similarity on my Very Low Cost - High Power LED DIY system on my fresh water aquarium. All I can say is that visually there is an enormous difference. My aquarium looked like it was inside a cave compared to what it looks like now. One very interesting feature is that you can now see water ripples reflected in the light across the plants and bottom. A very natural day light tank condition now exsits.

The High Power LEDs provide a pure white full spectrum 6500 - 7000K range of light. I confirmed with my spectrophotometer that the LEDs provide a full spectrum including PAR light (400 to 700 nm). Vivid colors are seen everywhere and the colors in the fish stand out exceptionally well. The plants are going to love this set-up.

For those wanting to see what my 55 gallon aquarium looks like right now - I have activated my FISH-CAM. Click on the link below and wait for connection to see it tonight and the rest of this week.

http://71.170.193.21...ndex.html?cam=0

PART-2 of this DIY Aquarium Lighting project using high power LED lights will be posted tomorrow.


Usil

Attached Files


Edited by Usil, 26 October 2011 - 07:37 PM.


#60 Guest_Usil_*

Guest_Usil_*
  • Guests

Posted 27 October 2011 - 09:13 PM

PART-2: DIY - HIGHPOWER LED AQUARIUM LIGHT PROJECT

DIY Project:

The genesis of this project was the desire to provide a good DIY lighting system for my 55 gallon aquarium and as I began the research on all this, it turned into a project to provide good quality PAR light to my aquarium on an economical basis. Somewhere along the line it seemed to be a good idea to measure and compare the light reaching the bottom of the aquarium from the various light set-ups I would be considering with the axiom that, as long as PAR light is provided, more light reaching the bottom of an aquarium is better than less light. Finally, added to the mix is a look at total and operational costs which in the long run is an important factor in the selection process.

A photography light meter providing data results in the form of EV readings as it read how much light fell on a surface from a selected distance form the light source. This was used in the measurement of my existing lighting system and provided basic information which could be used for comparison as I experimented with other light sources. LED lights became the focus for the primary source for this project because:

1. High Luminous efficiency
2. Long life -Generally recognized at least 50,000 hours (10 hrs/day = 13.7 years)
3. Low cost of operation - Low voltage operation
4. Full Spectrum white light - A full spectrum from 400 to 700 nm can easily be obtained from today's white LED lights
5. PAR light requirements - easily provided within the full spectrum
6. Color - 6500k and easily higher obtainable
7. Low cost of operation over it's lifetime compared to all other sources

High priced commercial LED systems exist today but I did not want to spend $600.00 or more on such a system.

Materials:

The basic needs for an DIY LED system include:

1. LED light emitters
2. A constant currentpower source
3. A heat sink

These components I purchased at a Chinese company that provides these same materials to other US companies for commercial use and at a lower cost to DIYers like myself. These components are used in this project:

LED light emitters (10 Watt, 6500k -7000K, White Light -Full spectrum) - http://www.dealextre...dc-9-11v-100852
Constant current LED power source (670 ma, DC 28-45 volts) - http://www.dealextre...r-85-265v-42906
Heat Sink - I went to Ace Hardware and bought an aluminum door plate.


Why these choices:

LED: There are many high powered LEDs available today and I wanted them to fit my requirements at the lowest possible cost. I wanted 10 watts output, light color at 6500 K or above with a full spectrum (including PAR light), mounted on a good copper heat sink mount. In addition, I did not want a single LED emitter with a focused beam so I needed a non-focused LED or one with no plastic/resin collimator included in the mount. The SKU 100852 from Deal Extream fit the bill perfectly. It had the advantage of consisting of not one but nine LEDs per emitter plate which would allow for a diffuse emission of bright light downward into the aquarium rather than a spotlight effect.

Power supply: Many power supplies could have been used for this project but fortunately there are now self contained waterproof constantcurrent LED power supplies at very reasonable costs (SKU 42906). As 10 watt LEDs generate a respectable amountof heat the current needed to power them can vary. These LED power supplies provide for this variation in current needs.

The LEDs are mounted in series formation on the heat sink which means that the total voltage of the power supply is divided through each LED light. So, to drive 4 LEDs needing individually (9 - 11 volts) we need a power supply capable of providing a total of about 45 volts which is the output for this power supply.

While all this may seem complicated, these parts are essentially custom made to be used with each other. One power supply per 4 (10 Watt LEDs) is all we need to know.

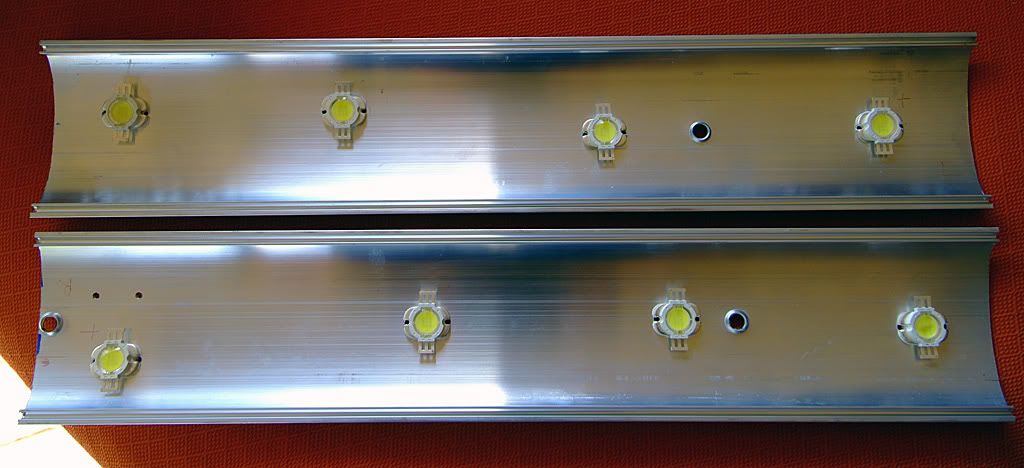
Heat Sink: A heat sink is needed for this light source. Each 10 watt LED generates heat and this needs to be 'sinked' to some piece of metal capable of dissipating that heat when operational. The process is similar to the need for a heat sink on a computer microprocessor. There are many commercial heat sinks that could have been purchased but as this is a DIY project I chose to be creative. Any piece of aluminum that is about 1/16th inch thick could have been used and if you go to your local hardware store there are a lots of extruded aluminum pieces around the store that will work fine as a heat sink. I chose a doorplate because I could cut it into two parts and provide for my needs for both sides of my aquarium, it was thick enough and it had a slight concave undersurface which provided for a slight diffuse focusing of any side light created by the LEDs to be redirected downward into the aquarium.

Costs:
Cost are very low any way you look at it. Cost of materials is low and spread over 13years of operation become nominal.

LEDs - $6.60 each x 8 LEDs = $52.80 (4 used per side of the aquarium x 2 sides)
LED Power supply - $13.40 each x 2 = $26.80 (One power supply per 4 LEDs)
Thermal Heat Sink Glue - $6.99
Aluminum Door Plate - $13.00

Total parts = $99.59

Assembly:
LED lighting systems for Aquariums are generally mounted hanging or suspended above the aquarium. I already had a fluorescent bulb system designed to fit lying on top ofthe aquarium (one per side). My plan was to disassemble the fluorescent systems and mount the LED system fully within these housings. Based on the size of the components this seemed entirely possible.

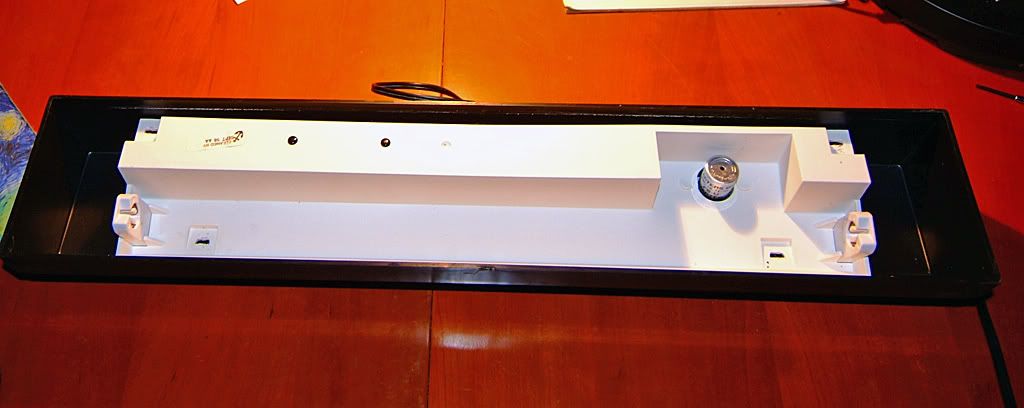
Existing Fluorescent light assembly:
Posted Image

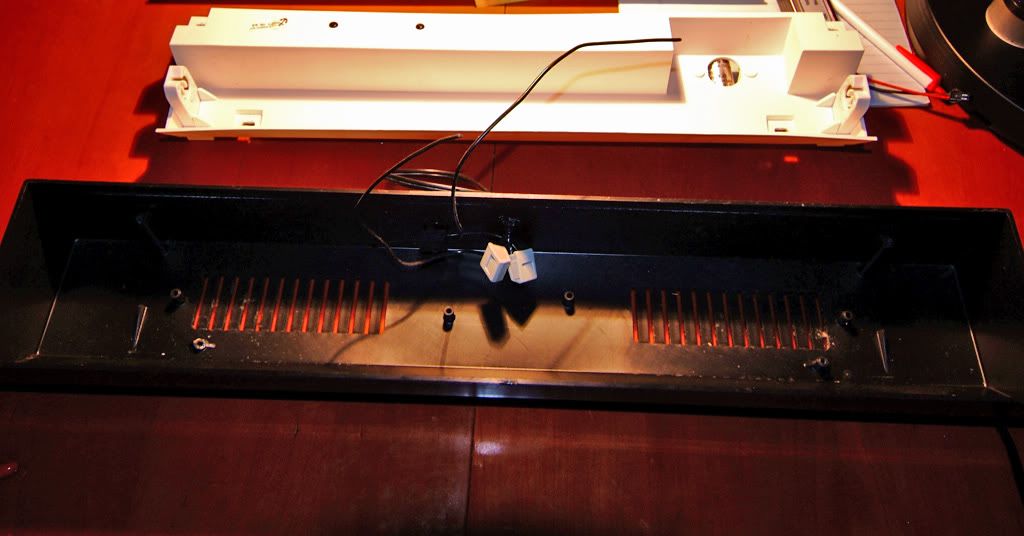
Removal of fluorescent light assembly:
Posted Image

The Heat Sink: (Aluminum Door Plate)
Posted Image


Door Plate cut in two parts - placement of LEDs:
Posted Image


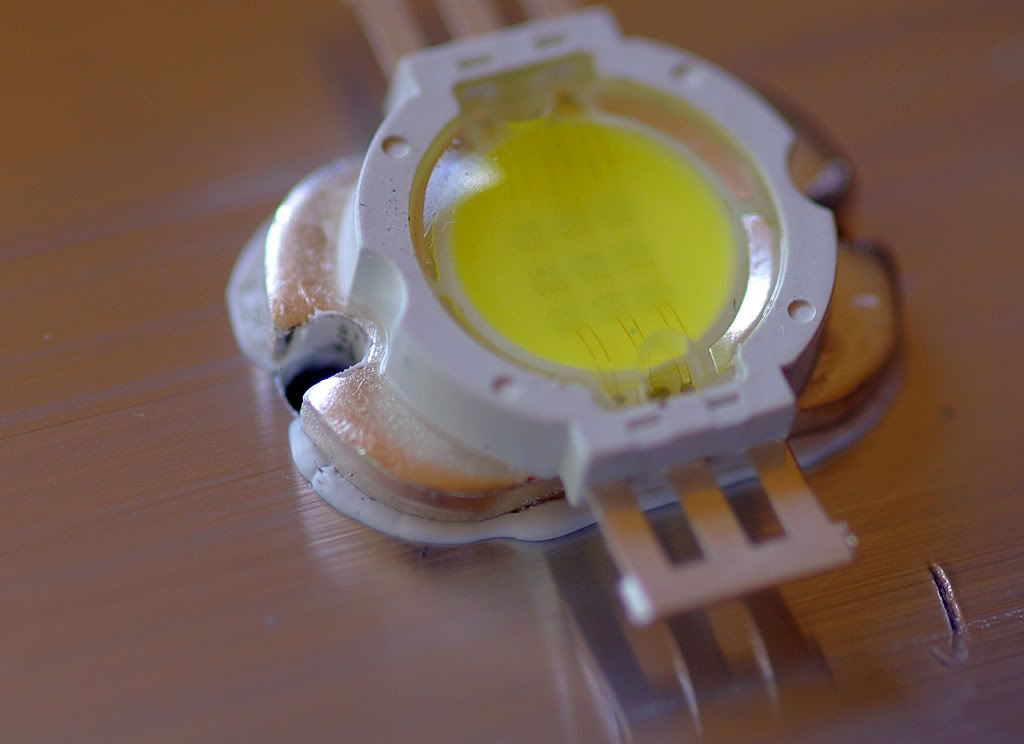
Attachment of LEDs to Aluminum Heat Sink using Thermal Glue:
Posted Image


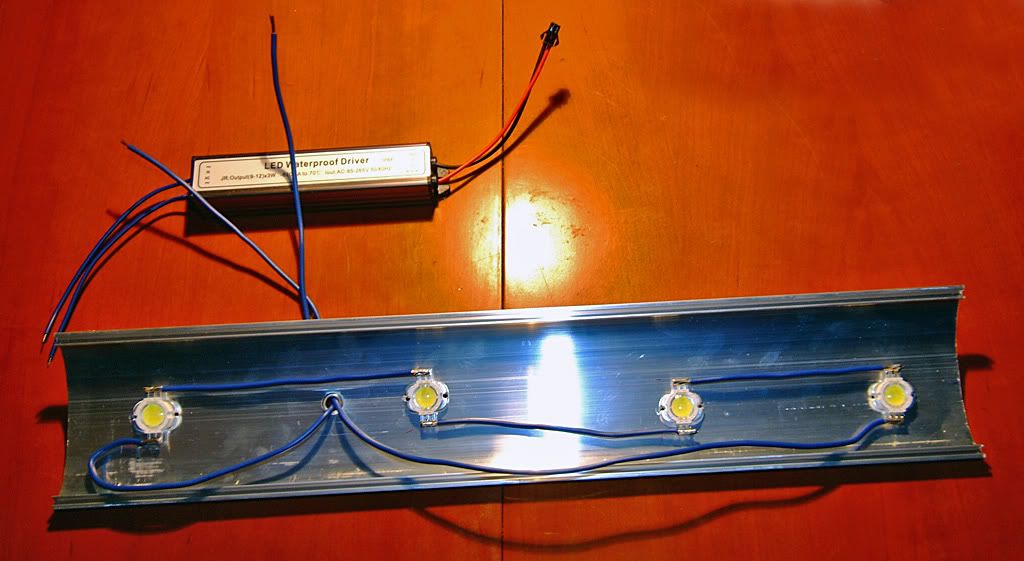
Wiring LEDs in Series formation:
Posted Image


Note that each LED is soldered together with 12 gauge wire from positive to negative. This leaves two wires coming from the LEDs (one positive and one negative). These are soldered to the +/- output of the power supply which is clearly labeled on the supply unit.

The other two wires out of the power supply are for the 120 voltage input. As I was using the existing fluorescent housing I hooked these two wires to the on/off switch mechanism. The power cord from the housing was left intact so that when all was connected the unit turned on and off just as it had when it was a functioning fluorescent light assembly.

When all was assembled I mounted the heat sink with the LEDs hanging from the inside of the housing assembly so air would flow around the heat sink and not touch anything inside the assembly.


What the aquarium looked like before and after:
Before HIGH Power LED:
Posted Image

After HIGH Power LED:
Posted Image


Measuring theResults:
I am going to modify my table of results from Part-1 and just stick to using Lux values for comparison between the various light set-ups I have used instead of going further and also representing Lumen values. I have tried used several calculators to obtain this Lumen value and find it provides for confusion as it provides for different values with different calculators and this only confuses thecomparison we wish to make.

I think that this needs to be a simpler comparison in that with my Light meter, I am directly measuring the amount of light falling on a surface from a selected distance from the light source. Lux is defined as the light energy density striking a surface and as such, Lux is a measure of the illumination of a surface from a light source. This is exactly what we are trying to measure and compare for the various light sources in this experiment. By using and comparing the Lux values in the table we can make our comparison on how much light reaches the bottom of the aquarium using the different light set-ups. I don't want to go further than this as it was only the intention of making this comparison to measure relative efficienciesof each system in delivering light to the bottom of the aquarium.

So, based on this formula; Lux=2.5*2^EV I can directly convert my EV readings I obtain from my light meter to Lux.

My Comparison Table:
Posted Image

Summary:
As I said, this turned out to be a very simple project. Researching the LED light systems showed that they had many benefits over conventional light systems. As I had purchased a holographic light diffraction grating and spectrophotometer I was able to confirm that a full spectrum of light is easily provided by the LED system which includes PAR light. Further measurements showed by comparison that the LED light is very capable of delivering considerably more light to the bottom of the aquarium than conventional lights and that the cost of operation if very low. In addition, the natural white light provided is evenly distributed throughout the aquarium and provides for a reflectivewave/ripple light/shadow flowing effect at the bottom of the aquarium which is a very pleasing effect to observe and replicates similar natural transient shadows observed in clear water in creeksand ponds.

My set-up will be on-line during the day for the next few weeks and you can observe the aquarium directly by clicking on the following link.

http://71.170.193.212:8888/java/index.html?cam=0


If you have any questions please let me know.


Usil


Edited by Usil, 27 October 2011 - 09:42 PM.


2 user(s) are reading this topic

0 members, 2 guests, 0 anonymous users