Jump to content


Photo

75 Gallon Native Stream Tank Build


  • Please log in to reply
392 replies to this topic

#1 Chasmodes

Chasmodes
  • NANFA Member
  • Central Maryland

Posted 24 October 2016 - 09:04 AM

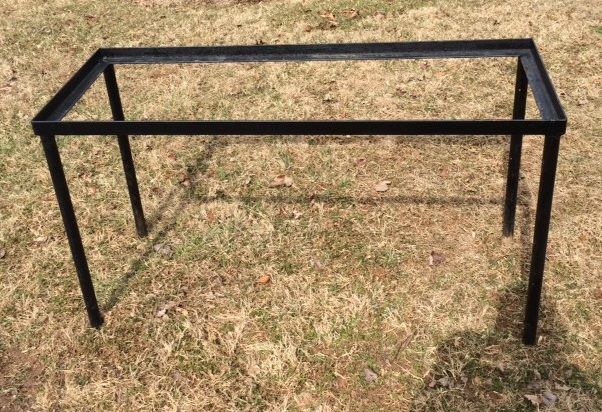
A while back, a friend gave me a 75 gallon aquarium, fluorescent light fixture, and a cannister filter.  He also gave me a 10 gallon set up that I'll use as a quarantine tank.  I then found a steel stand on Craigslist but determined it wasn't stable enough and I was worried about it racking with the weight of a tank and perhaps my fat belly up against it while cleaning algae and such.  


Here is the steel stand that I bought for cheap:
75%20stand_zpsu7hz7l25.jpg


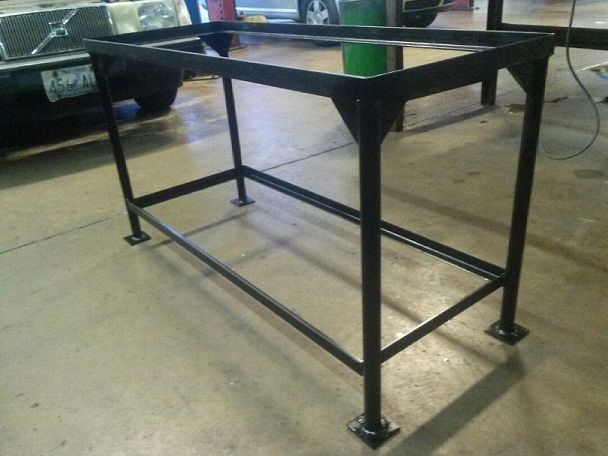
I took the stand to a buddy of mine who hooked me up and made it much sturdier, adding bracing to the bottom along with nice flat feet instead of the ends of the tubular steel that might have dug into my floor tiles:
IMG_4989_zpsl2wucj4m.jpg


My plan is to use the cannister filter to also provide directional flow along with a power head.  My vision is to create a stream tank with the flow moving from right to left.  I don't want any equipment showing in the final tank, and want it to look as natural as possible, mimicking my local river to have an Upper Potomac River Biotope aquarium.  My goal is to keep peaceful minnow and darter species.


As far as the rock or aquascaping goes, my vision is to create an undercut bank with the current flowing along the front of the tank, left to right past an undercut bank with roots (hiding equipment), with the flow toward the back of the tank flowing right to left along a stratified DIY fake rock wall, forming an eddy.  I might include some stargrass in the tank eventually.  


Species that I definitely want to keep eventually include fantail, rainbow, tessellated, and perhaps greenside darters, spotfin and/or satinfin shiners, rosyside dace, and rosyface shiners along with some longnose and blacknose dace.  I will avoid keeping cutlips minnows, but other than that, if they're small and peaceful (and legal to keep), then I'll add a few more species if I can catch them.


Setbacks:  I have most of the equipment, but still need a powerhead, so I'm almost set there.  But, my well pump is on it's last legs.  I can't have an aquarium this size without a good water supply, so financially, that is where my money needs to go first, but probably not until after the first of the year.  Still, I hope to have the tank up and running and cycled soon.


Right before filling my tank, I'll add rock from the river and sand from a river or perhaps a tributary and cycle the tank fishless.  I'll run the tank fallow until spring to kill off as many parasites that I can that my enter via the sand and rocks.


Anyway, that's the concept.  I'll post about my aquascaping attempts and progress in the next post.


Kevin Wilson


#2 Chasmodes

Chasmodes
  • NANFA Member
  • Central Maryland

Posted 24 October 2016 - 09:48 AM

Aquascaping Plan - Rock Wall Section


I'm building a 3D DIY styrofoam background where 3/4 of the tank (toward the right side of the tank) will be a stratified rock outcropping, and the left 1/4 of the tank will be an undercut bank complete with DIY fake roots.  I'll supplement this with real rocks from the river along with some sand and gravel.


I'm too much of a perfectionist, a fault of mine, but I'll be the person watching this tank the most, so I want it a certain way.  I want this to look like my personal cut of the Potomac River.  I want a realistic rock face and a realistic looking undercut bank, and no equipment showing at all (if I can).  The fish probably don't care and will do fine as long as I maintain good water quality and give them what they need, which I will do.


What I don't want is this to look man made.  I don't want my background to look like artificial rip rap where every rock fits like a puzzle piece with every other rock.  I don't want rock imitations that look like someone took a hatchet to them, or have unnatural looking cracks in them.  Nor do I want imitation stratified rock that looks like a slate fireplace or porch wall.  Again, the fish don't care, but I am the one that has to view it.  This isn't about what anyone else does, and it isn't a knock on their tanks.  That said, there are some tanks that are a real inspiration to me.


Hx67's work is pretty awesome.  If I can accomplish anything near what this aquarist has done, then my tank will be a success artistically:  https://planethx.com...udarium-reborn/


This is another impressive build.  What makes the one above and this one unique is that they'd captured the texture and what rock formations actually look like in nature:  http://www.monsterfi...d-rocks.452727/


This is about something that I'm creating, and if I fail in the end in my mind, then I have to see it every day.  I doubt that I'll be 100% satisfied, because I'll see the mistakes I make, rather, it's what I can live with in the end.  So, this paranoia about having a natural looking tank has been my downfall in my attempts this far.


Failed Attempts

I found a few nice DIY background techniques on-line and will use some of them in my own way, but my attempts to do them so far haven't worked out.  One is to use the inherent traits of styrofoam to create layers by chipping off bits of it to resemble natural slate in the wild.  The problem is that most people that have done backgrounds like this haven't done it with the orientation of the rocks that match my vision of what I want.  My attempts just didn't look realistic.  Straight lines don't exist often in nature, and I couldn't avoid them.  Most rock walls in aquaria have a more vertical look than what I am imagining for my tank.  And, if they look stratified, their perfectly horizontal, almost to the point of looking like brick work.  My goal is to avoid that. 


There are some really cool styrofoam rock cliff imitations made by train hobbiests, some have inspired me.


What I'm looking for:

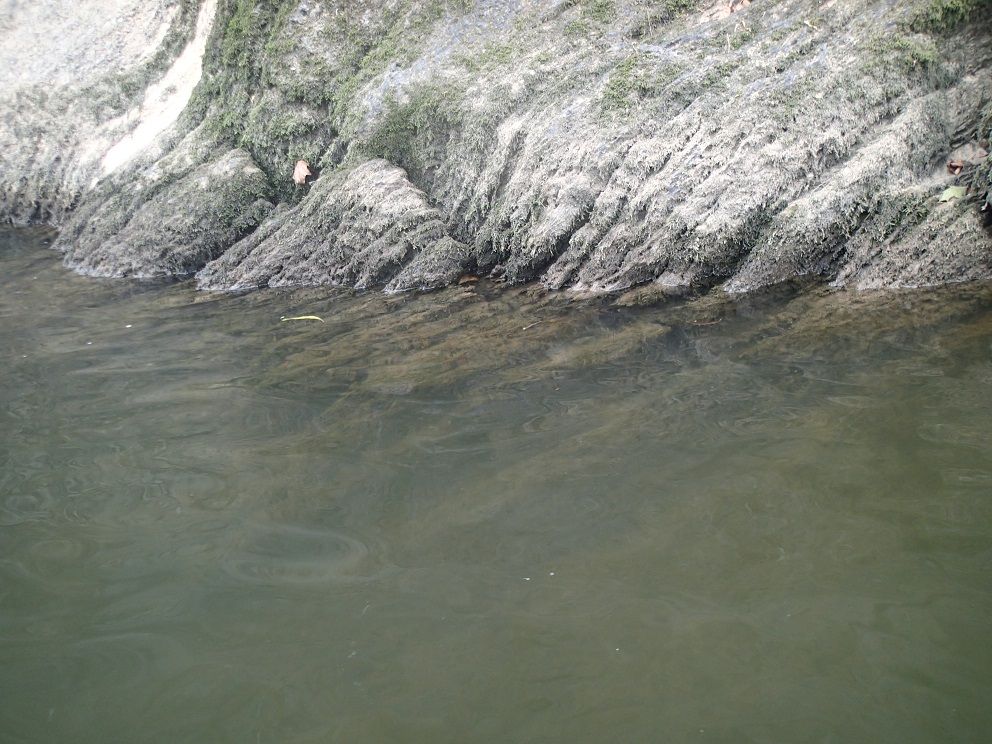
As far as the rock wall goes, the following two pictures aren't a model, but it does represent what I'd like to see.  This picture shows stratifications along a Potomac River cliff that are not uniform, not level, even slanted at an angle not 90 degrees to the viewer.  And, unlike train hobbiest cliffs, this cliff shows signs of water erosion.:

PA171380_zpsxb52jfxy.jpg


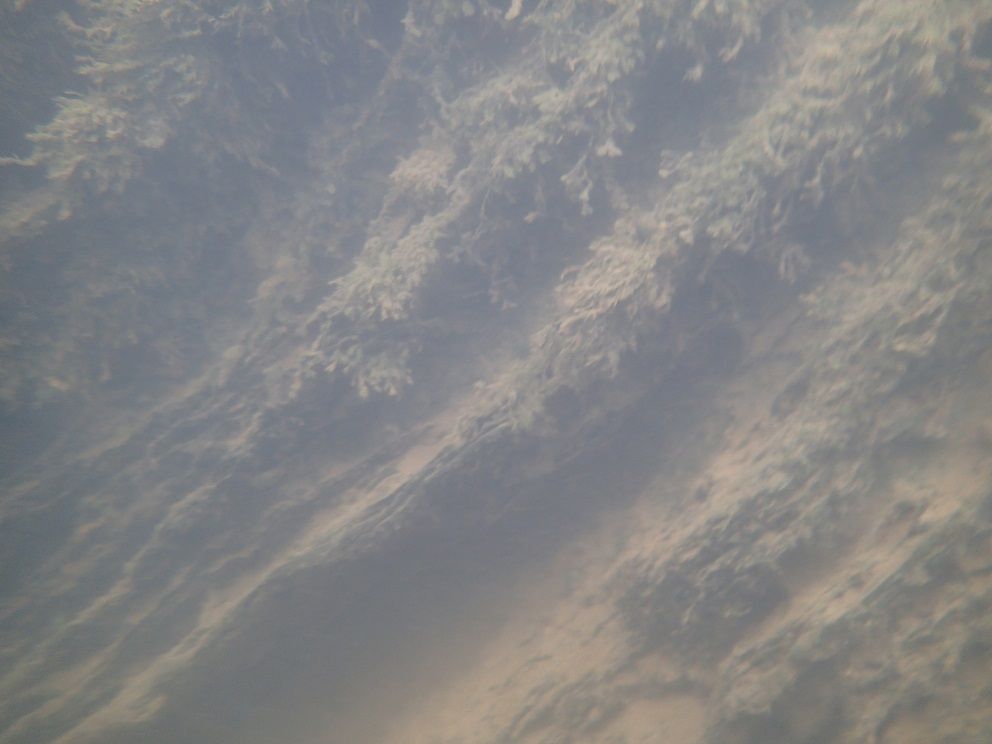
The next picture is an underwater view of the same area.  I also want to capture the texture evident in this picture:

PA171383_zpsznlnxwya.jpg


So that lays out the plan.  The next posts will detail specifics on how to do this, along with my progress.  In the end, I'll probably spend as much money as if I just ordered a pre-made one.  But hopefully, after I'm done, I can savor my piece of the river with the feeling that I did it.  After that, it's all about the husbandry and care that I owe the tank residents.


Kevin Wilson


#3 Chasmodes

Chasmodes
  • NANFA Member
  • Central Maryland

Posted 24 October 2016 - 10:03 AM

Aquascaping - Rock Wall Construction


My plan is to construct the rock wall out of closed cell polystyrene (styrofoam), carve it to the shape that I want, and use spray foam to attach the pieces together.  I may use spray foam to attach it to the tank also, or perhaps silicone.  I'll worry about that when I get there.  After carving the wall into shape, I'll use Drylok mixed with concrete colorant to paint the rocks and bring them to life.  To get this creation to fit in the tank, I'll have to construct it in sections with the goal of not being able to see that in the final product. 


But first, I have to create the skeletal structure of this wall, to have something to carve.  I can't just start cutting foam board to shape and gluing them as I go, because the spray foam (Great Stuff) has to be used once you open the can for that first spray within two hours, or it seals itself shut.  So, that's where I am today, cutting foam board to fit into the shapes that I want.


Why not just use silicone to glue my pieces together?  I could.  But, spray foam fills in gaps and hides those artificial looking straight lines.  Plus, the foam board will be a rough shape of what I want, and the spray foam added should provide me a more eroded look when combined with the foam board.  At least, that's what I see in my head.


The first step is to create a frame to work with, then fit pieces of styrofoam board together.  Since I'm not gluing yet, I'm using Gorilla tape and pieces of wood grilling skewers to hold the foam frame together:

IMG_7487_zpsringsbpx.jpg


As this first section fits in the tank.  That was my first test, to make sure that what I build actually fits.  The tank cross bar presents a bit of a problem:

IMG_7486_zpsmz0j2hlz.jpg

IMG_7485_zpscnclttqz.jpg


Kevin Wilson


#4 Chasmodes

Chasmodes
  • NANFA Member
  • Central Maryland

Posted 24 October 2016 - 10:07 AM

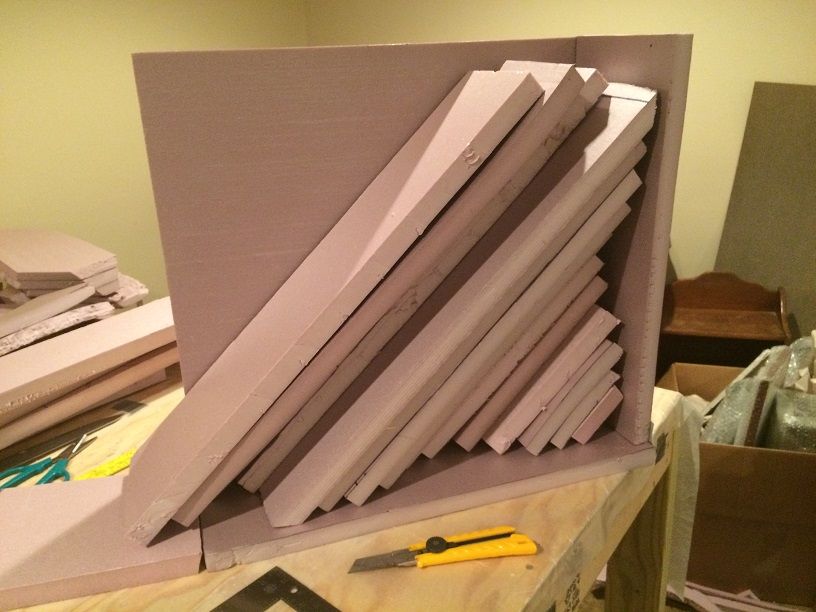
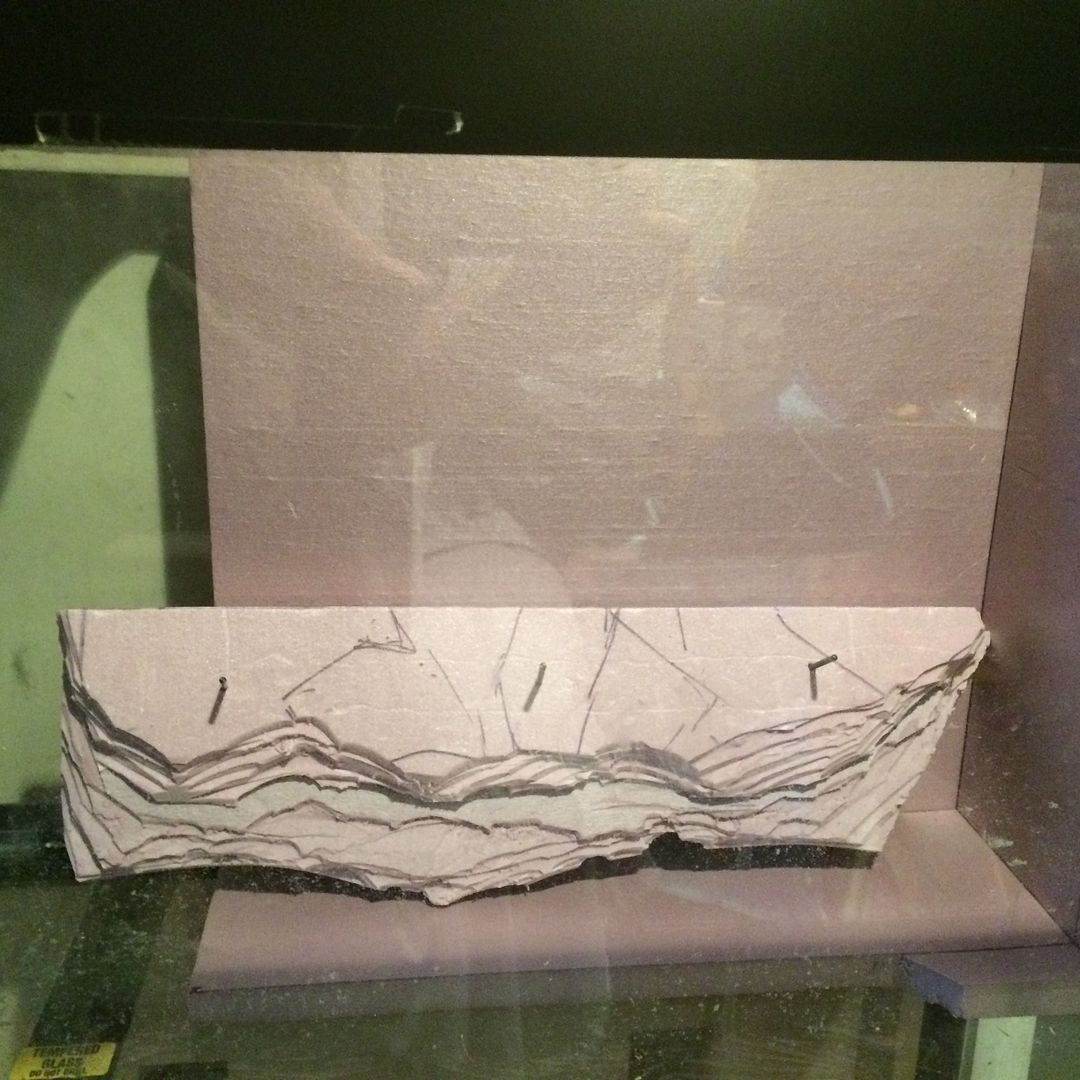
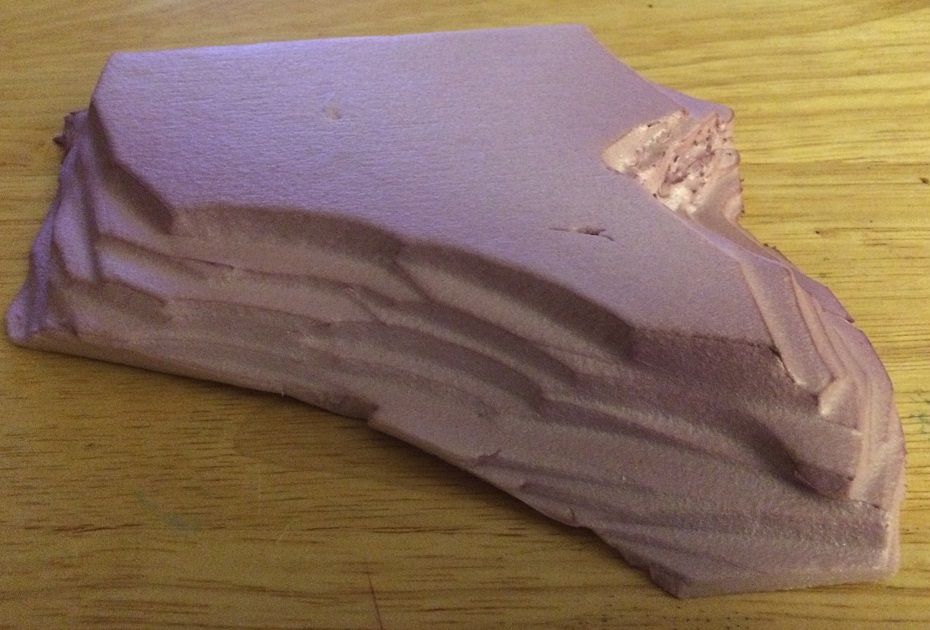
Last night, I was using pieces of my previous failed attempts to stack and see what this might look like.  The two drawbacks that I see are converting this from the strata at a 90 degree angle to the viewer, to offsetting them a bit.  I think that I can carve them after finally sticking them all together.  I need to get them from looking like this:

IMG_7488_zpsefpczxrq.jpg


To looking like this:

PA171383_zpsznlnxwya.jpg


The first pic above has pieces of foam randomly added.  One thought of how to do this is to take one layer at a time, and carve it into shape.  Or, perhaps finish the overall skeleton with more thought on strata thickness, then begin the spray foam process to create an overall structure, then carve it.  Once I'm satisified with that, it's on to the next section.  More to come on my failures and progresses.  I hope the fish like it in the end  :D/


Thanks for following!


Kevin Wilson


#5 FishGuyJosh

FishGuyJosh
  • Regional Rep

Posted 24 October 2016 - 11:51 AM

Can't wait to see how the rock shaping comes out! My wife has wanted to try this for some of her herp tanks.


FishGuyJosh

#6 brackishdude

brackishdude
  • NANFA Member

Posted 24 October 2016 - 12:28 PM

there are a great many threads at reefcentral and monsterfishkeepers using foam and/or concrete (manmade rock) that can give further great ideas/techniques.  I look forward to seei ng your finished product!


As your fellow, I can demand of you no more, and accept no less, than I allow to be demanded of myself

#7 MtFallsTodd

MtFallsTodd
  • NANFA Member
  • Mountain Falls, Virginia

Posted 24 October 2016 - 03:01 PM

looks like you are off to a good start. Looking forward to following this build.
Deep in the hills of Great North Mountain

#8 Guest_BTDarters_*

Guest_BTDarters_*
  • Guests

Posted 25 October 2016 - 11:29 PM

That's pretty cool!  Hope you can pull it off!


Brian


#9 Chasmodes

Chasmodes
  • NANFA Member
  • Central Maryland

Posted 27 October 2016 - 07:54 AM

Thank you everyone.


Sorry about the pics not showing up in the 2nd post.  I cropped them to make them look better and replaced them in my photo storage.  Don't need them here after all because the last post pretty much shows what is going on.


I'll be working on this on maybe Friday evening, and definitely on Saturday.  Next steps:

  1. carve each board or groups of boards into the shapes that I need to get the rough overall cliff structure.  What you see in the picture above is the right most section.  I'll need to make at least one more section, maybe two, so that I can fit them in the tank.  They will fit together like puzzle pieces, and if I do them correctly, those joints will blend in with the overall structure and be unnoticed.  This won't be easy.
  2. label each board in the order that they'll form the strata.  These first two steps might take up most of my time this weekend, but I'd like to get past step 3 if I can.
  3. Once everything looks good, arrange the pieces based on the labels and then glue them all together with the spray foam.  
  4. After the spray foam dries and cures, then I'll work on carving the finer details.
  5. Mix the Drylok and paint colorant to the overall darkest color that I want and apply to make sure that the cracks and crevices look as natural as possible and show depth.
  6. Mix a slightly lighter shade for dry brush application for the dominant color of the rock.
  7. Mix a light shade of that color for some highlighting.
  8. Assemble the sections in the tank and use the spray foam to attach them to the tank (or maybe silicone).
  9. Begin construction of the overhanging bank that will be on the left side of the tank, to be documented later.

I apologize if this seems boring right now, but documenting it in advance helps me plan and make sure I don't get too excited and miss an important step.  I need to take it slow to get it right.


So, what happens if you try and use a can of Great Stuff once it's sealed?  From what I've read on-line... BOOM!  Foam all over the place.  I need to work fast, within about 2 hours, to make the progress that I need.  If I don't, then I'll have to visit the store to buy more cans of Great Stuff.  I'm hoping that I can use the can that I have for the cliff face, and then use my can of Beckett's pond foam for the overhanging cliff.


Kevin Wilson


#10 Chasmodes

Chasmodes
  • NANFA Member
  • Central Maryland

Posted 28 November 2016 - 08:40 AM

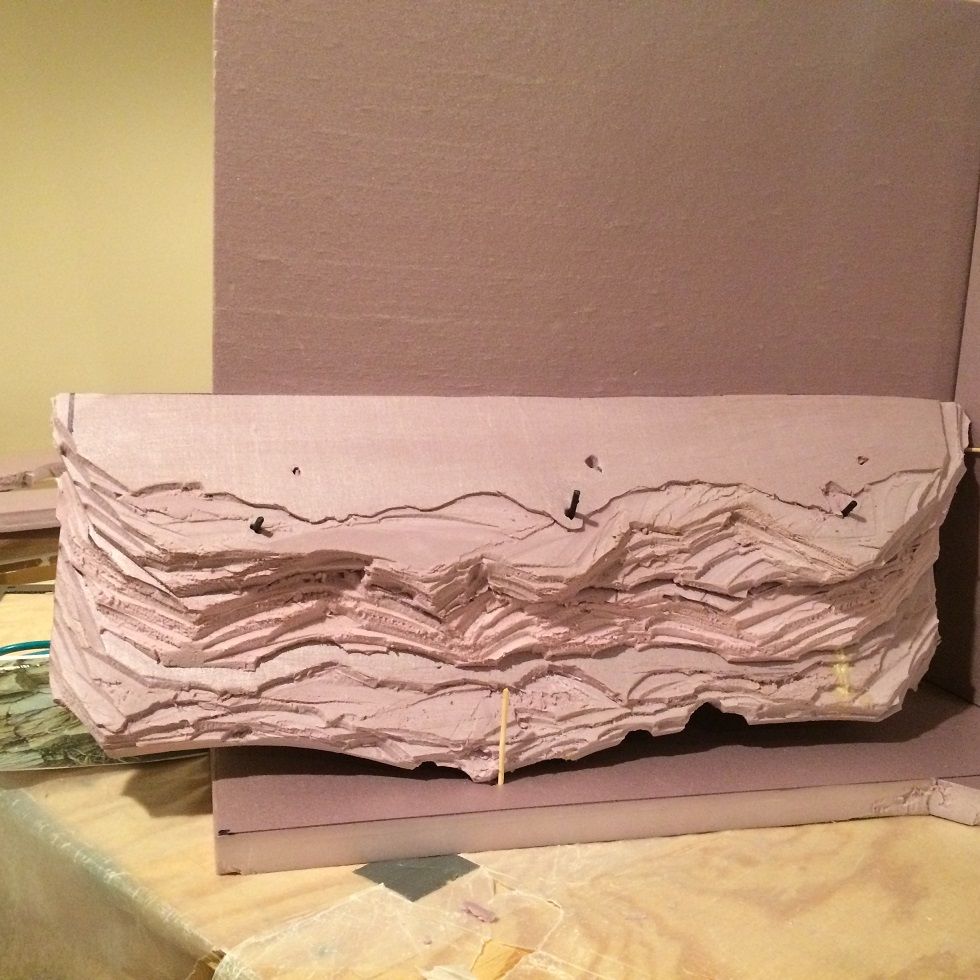
After a few failed attempts to get what I wanted carved into styrofoam, I think that I've found a path to get it right.  I first created a frame of the entire tank.  You've seen part of it in my earlier pics.  I am building three sections.  Each section joint will be hidden, at least that is my goal.  This is necessary to get the background in the tank for final attachment.  I'm building it entirely outside of the tank, but will test for fitting as I go.   I don't want to do any of the finishing work inside the tank.


I found a technique that intrigued me on-line on another forum, where the aquarist used the natural layering properties of the foam board to cut and break off small pieces of foam to achieve a slate like look.  The difference in what I'm doing is that the slate won't be in the same plane as the back glass.  Instead, I'm trying to replicate a slate/shale rock wall that you might encounter along a stream, where the plane of the stratification looks more natural.  The cool thing by doing that is that when attaching carved boards this way, you can hide the angle of that seam and you can't see those artificial looking straight lines.


Here's a picture of the middle section, although it's placed toward the right side for now, it gives you an idea of the direction that I'm going with this.  I've since carved one more board and attached it to the top making it about an inch higher than what you see in this picture.  I've also modified the sides.  These layers plus one additional layer took about two hours to do, so this is a long process, but hopefully worth it.

IMG_7534_zpsxgiokndo.jpg


Of course, the next steps are to finish carving the entire piece.  After carving, finishing will include using a heat gun to smooth some edges to give it a more eroded look as you'd see underwater, some additional texturing of a few layers, and creating some natural looking vertical cracks in the rock.  I may use grout in places, and the final painting will be several Drylok layers of various colors to make it look as natural as possible.  After that, it is a matter of gluing it all together and installing it in the tank.  The slate/shale wall will take up about 3/4 of the back glass, and the other 1/4 will be my best effort at an undercut bank with roots to hide equipment.


Thanks for looking.


I'll post an update after I add the next layer.


Kevin Wilson


#11 Evan P

Evan P
  • NANFA Guest
  • Knoxville, TN

Posted 29 November 2016 - 12:12 AM

That looks great. It reminds me of the Holston River in Southwest Virginia. Watching Cyprinella dance across those crevices as a Percina swims along in the flow would really work to transport you right into a stream. I can't wait to see more.


3,000-4,000 Gallon Pond Full of all sorts of spawning fishes! http://forum.nanfa.org/index.php/topic/13811-3560-gallon-native-fish-pond/page-3 
 

#12 Chasmodes

Chasmodes
  • NANFA Member
  • Central Maryland

Posted 29 November 2016 - 08:29 AM

:)  Thanks Yeahson!  


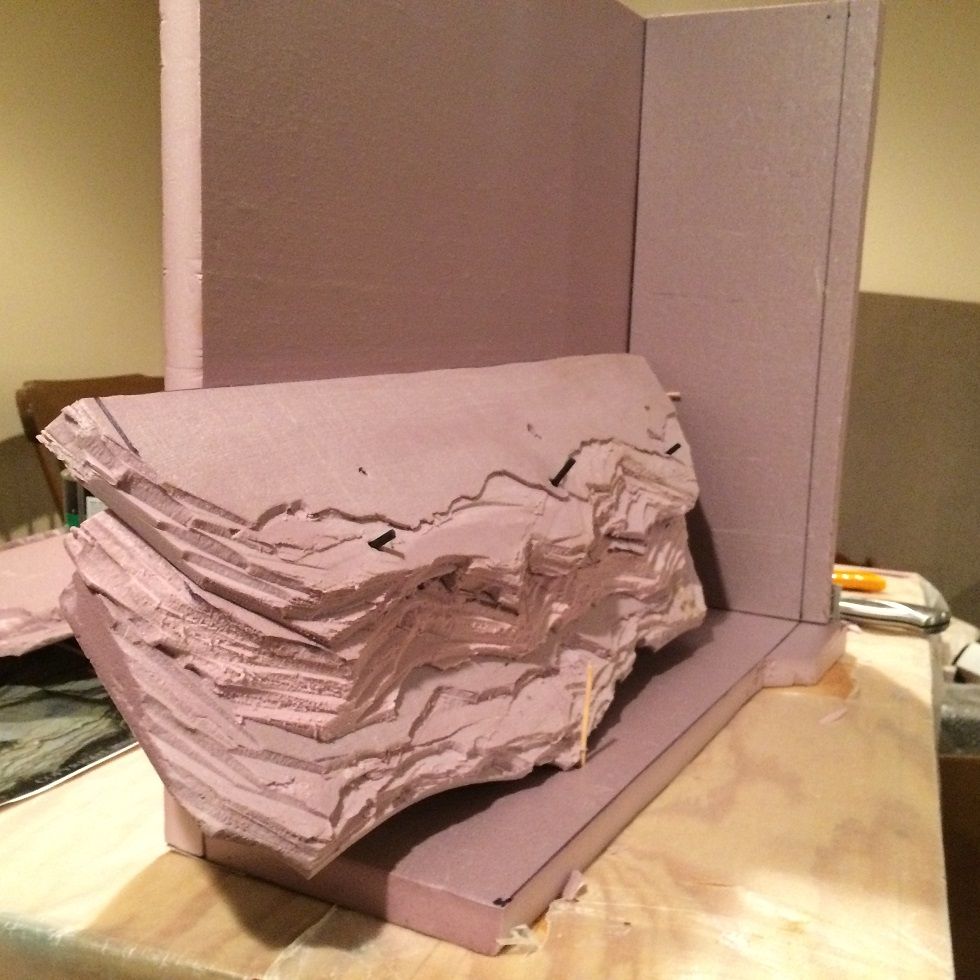
Here are the pics with the next layer.  The second one shows you how I'm arranging them on the back side.  When I finally attach everything into the 3 solid unit sections, I'll use spray foam to bring it all together.  I haven't decided yet if I'll use foam or silicone to attach the background to the tank.  I'll cross that bridge when I get to it.  Before installation, I'll cut access for my equipment.  The goal, again is to have very little evidence of equipment showing to the viewer of the tank, at least from the front of the tank.  It's funny, after months of frustration on the direction that I wanted to go with this aquascape, I'm now at the point that I can't wait to get home and do some more work on it!


IMG_7536_zps1jp4u91q.jpg


IMG_7537_zpsdekquz18.jpg


Kevin Wilson


#13 Chasmodes

Chasmodes
  • NANFA Member
  • Central Maryland

Posted 12 December 2016 - 10:08 AM

I purchased a heat gun and am pleased with the results.  I think that the pictures in my previous posts resemble slate/shale formations pretty well.  But I think that the heat gun gives it a nice look with regard to water erosion.  I'm getting this done piece by piece, but it's proving difficult to meet my picky standards.  My hope is that in the long run, it will turn out OK.  I also picked up a styrofoam cutter but haven't tried it out yet.  I will most likely use that to fit pieces together with cuts that will be out of sight from the viewer of the tank, cuts that would aid separate foam sections to fit properly in the final construction of the background.


IMG_7542_zpsoyybrtu5.jpg


Kevin Wilson


#14 Josh Blaylock

Josh Blaylock
  • Board of Directors
  • Central Kentucky

Posted 13 December 2016 - 08:54 AM

Looks like you're heading in the right direction.  I'd consider using the River Manifold system to help achieve the directional flow you want.


Josh Blaylock - Central KY
NANFA on Facebook

KYCREEKS - KRWW - KWA


I hope to have God on my side, but I must have Kentucky.

- Abraham Lincoln, 1861


#15 Chasmodes

Chasmodes
  • NANFA Member
  • Central Maryland

Posted 17 December 2016 - 01:17 PM

Thanks Josh.  I won't rule out using a manifold, but it would be much tougher to hide the equipment.  


I have a canister filter and will use powerheads, and hide the flow devices along the left side of the tank in diy fake tree roots (undercut bank).  My vision for this is to create an eddy, with the flow moving left to right along the front of the tank, and letting it swirl back right to left along the wall to complete the eddy circulation.  My revelation for this was simple, to duplicate nature with what I have and not have any equipment showing.  I don't think that I've gone into that part of the build, and I haven't started any work on that.  What do you all think?


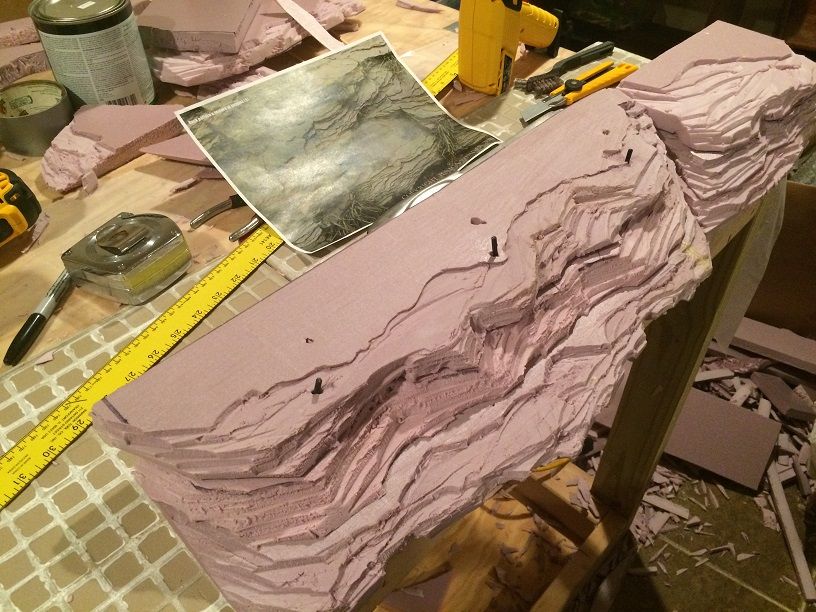
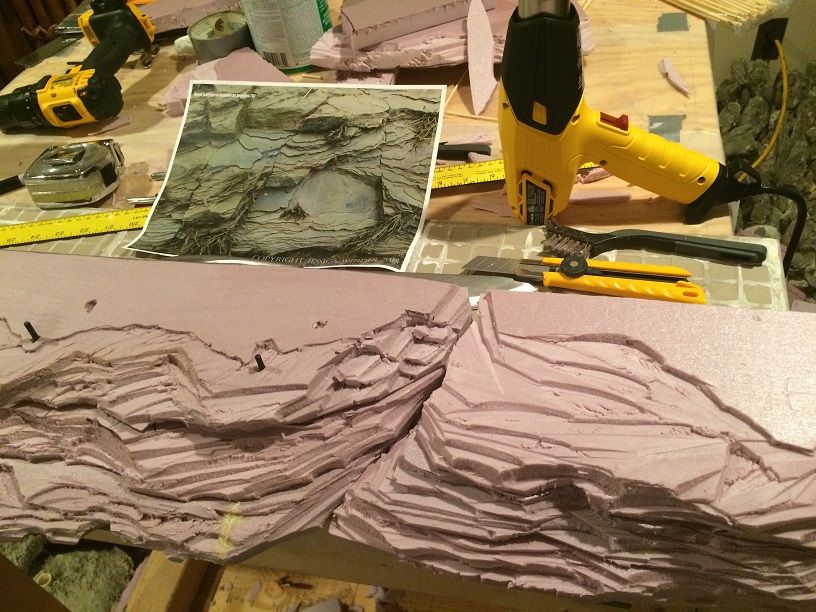
I worked on the rock wall again.  The two pics below show my progress, along with a picture of the inspiration and various tools that I'm using. Where the crack in the formation is, the layers on top will follow a crack in a different direction, just like the picture.  That is my goal, anyway.


IMG_7561_zpsblbgqykb.jpg

IMG_7560_zpsxxhsijzy.jpg


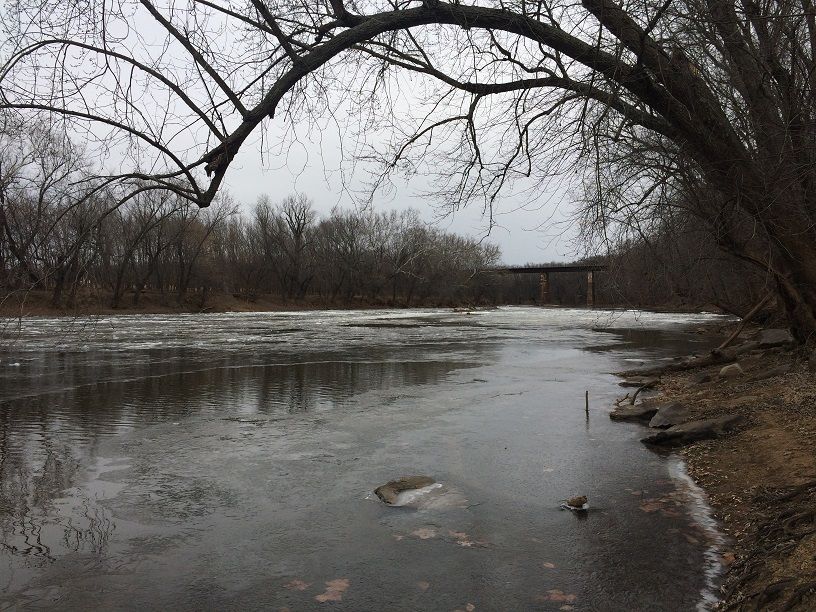
Here is a picture of the river that I plan to collect from.  Not good collecting weather  [-(

IMG_7559_zpsxo1rtaj1.jpg


Kevin Wilson


#16 Bulldarter

Bulldarter
  • NANFA Guest
  • NoVa

Posted 18 December 2016 - 10:41 AM

I love the look of your rock wall. Can't wait to see the final product!


#17 Josh Blaylock

Josh Blaylock
  • Board of Directors
  • Central Kentucky

Posted 19 December 2016 - 08:44 AM

Looks amazing!


Josh Blaylock - Central KY
NANFA on Facebook

KYCREEKS - KRWW - KWA


I hope to have God on my side, but I must have Kentucky.

- Abraham Lincoln, 1861


#18 Chasmodes

Chasmodes
  • NANFA Member
  • Central Maryland

Posted 27 December 2016 - 12:02 PM

Thanks guys.  


I carved a few more layers and it is looking OK to me.  The background doesn't look much like my inspiration, but it sort of resembles the effect that I want.  I am just going to wing it from here on out and not try and stick to the inspiration unless I can figure out how to do that as I go..  The heat gun will soften the edges and give the wall a water eroded look.  I will add some finer details later with an exacto knife so it doesn't look so uniform.  I have some challenges ahead with piecing it all together, but it will work out in the end.


I did learn a lesson about carving styrofoam with a sharp butcher knife.  It does a great job, but sometimes the foam binds.  If the foam binds, stop the cut because thumbs cut as easily as styrofoam. I spent Christmas Eve at the ER and received four stitches and a tetanus shot, and that wasn't fun.  I will either buy a filet or oyster steel mesh glove or make a wood guard (similar to the guards on power saws) to prevent further bloodshed before continuing, or maybe do both.  Another idea is to use a 2x4 and clamps to secure the foam boards on my work bench.  If I do that, then I'll also make sure to use the mesh glove.  I really don't want to look like I have Frankenstein arms by the time that I finish this build.


How did this happen?  I was working a bit too fast and a bit too confident.  Whoops... I'm happy that my thumb is still intact, albeit swollen, sore, and all bandaged up.  I can't get it wet for a few days.  It's amazing how much use that thumb gets and how helpless I feel when trying to button my pants, left sleeve buttons, or put on my belt.  


Kevin Wilson


#19 Chasmodes

Chasmodes
  • NANFA Member
  • Central Maryland

Posted 30 December 2016 - 10:30 AM

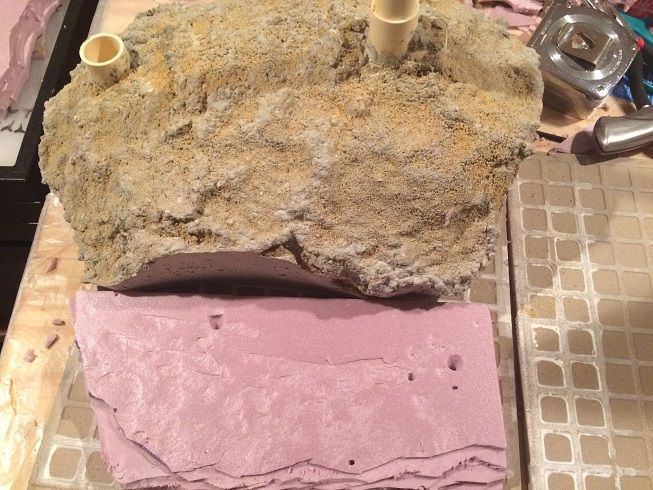
I discovered something by accident that will help me with a bit more realism.  After slicing my thumb open on Christmas Eve resulting in 4 stitches, I just couldn't stay away.  Until now, I've been semi satisfied with the progress, but not entirely happy with the results.  But things are starting to move toward my vision.  In my other build, I made some concrete "live rock" bases for my oyster cultches, but decided to not use them.  Now they're like 20 pound paperweights.  So, I figured I could use them to hold down the foam board as I carved it instead of holding down the foam with my other hand, putting at risk of losing a digit.  After I was done carving, I removed the concrete and pleasantly discovered that it left a cool realistic texture on the top surface of the foam.  One of my boards has a large exposed top layer, so I pulled it apart, turned over the concrete to the rockier side, and pressed it on the foam.  I was really excited with the result.  It looks a lot like the real slate!  Here's a pic of the concrete block and the foam that I tested it on:

background%204_zpsr2z4huef.jpg


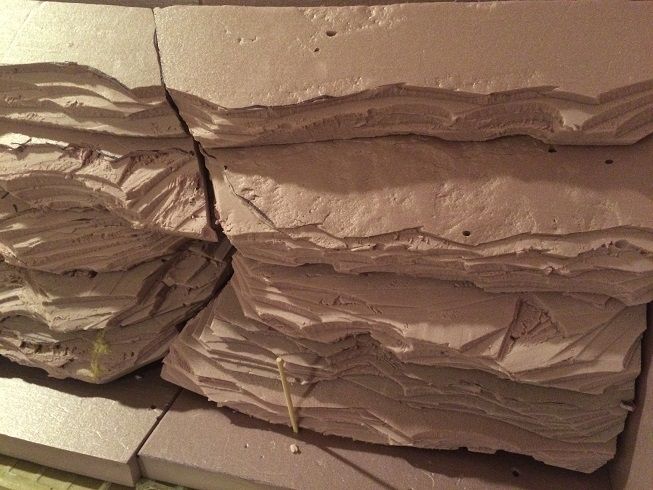
Here are some pics of my progress when I put it all together, starting with a close up of the foam above assembled in the entire structure:

background%203_zpsh7wvaizc.jpg


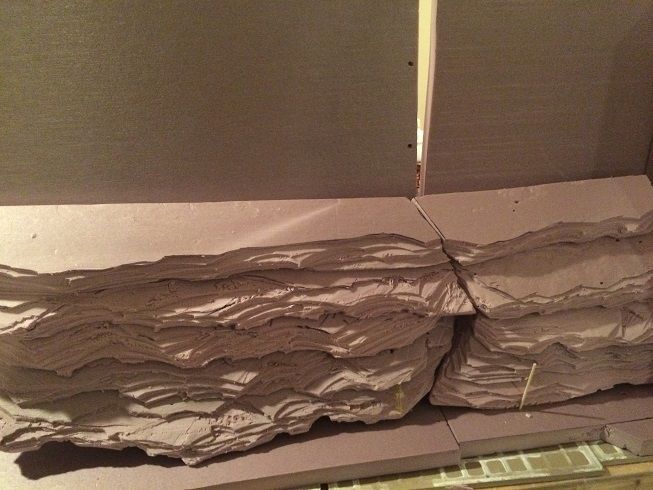
I wasn't happy with the crack separating the two sections, but I'm starting to like it better as I move forward with the top layers.

background%201_zpshuseim1x.jpg


background%202_zpsp69waa30.jpg


I'm half way to the top.  It's going slower than I thought it would, but I'll just keep plugging away.  The layers aren't glued down yet.  For now, I'm using plastic rods and wooden cooking skewers to hold it together so I can work on the carving.  I'm not sure yet how I'll glue it all together into the three sections of the structure.  I'll play it by ear.  Thanks for following!


Kevin Wilson


#20 Chasmodes

Chasmodes
  • NANFA Member
  • Central Maryland

Posted 30 December 2016 - 01:23 PM

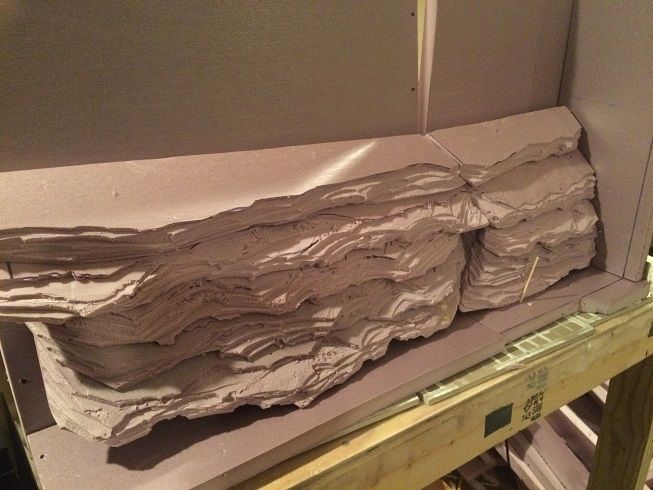
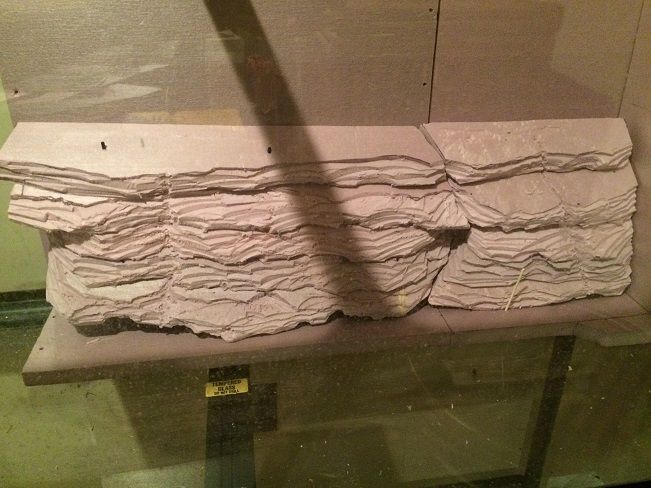
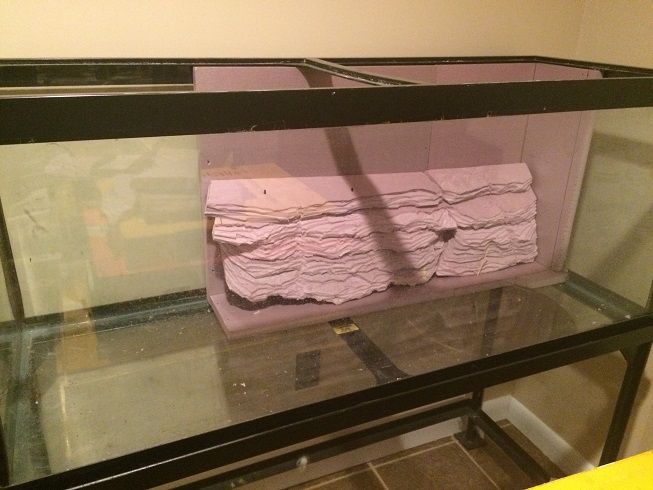
I fitted the structure in the tank for a test look.  It looks better in the tank, I think.  The two sections fit together like a puzzle piece.  The future third section will have to be a cleaner split so as to be able to get it to fit properly.


The pink foam board that is now against the glass will not exist on the right side, and the rest will be hidden by the rock cliff.  The base will be trimmed back where you can't see it.

background%205_zps2emcpjem.jpg


background%206_zpsha1hptme.jpg


Kevin Wilson


5 user(s) are reading this topic

0 members, 5 guests, 0 anonymous users