I've seen two ways, one with taking thick thread and coating them in silicone then putting substrate on them and the other is using spray foam then doing the same this as the other technique
Sent from my iPhone using Tapatalk
75 Gallon Native Stream Tank Build
Started by
Chasmodes
, Oct 24 2016 09:04 AM
392 replies to this topic
#42

Chasmodes
-
- NANFA Member
- Central Maryland
Posted 29 January 2017 - 06:50 PM
Thanks 9darlingcalvi, I'll check into it. Thanks also for the positive feedback earlier.
Kevin Wilson
#43
Chasmodes
-
- NANFA Member
- Central Maryland
Posted 29 January 2017 - 07:48 PM
I think that I'm going to try an experiment for the undercut bank. Mix sand in with my Drylok/paint mix to see if I can get a sedimentary texture. My logic is to try and make it look wet and smooth, but still earthy underwater.
Anyone ever try that?
Kevin Wilson
#44
Chasmodes
-
- NANFA Member
- Central Maryland
Posted 31 January 2017 - 07:33 AM
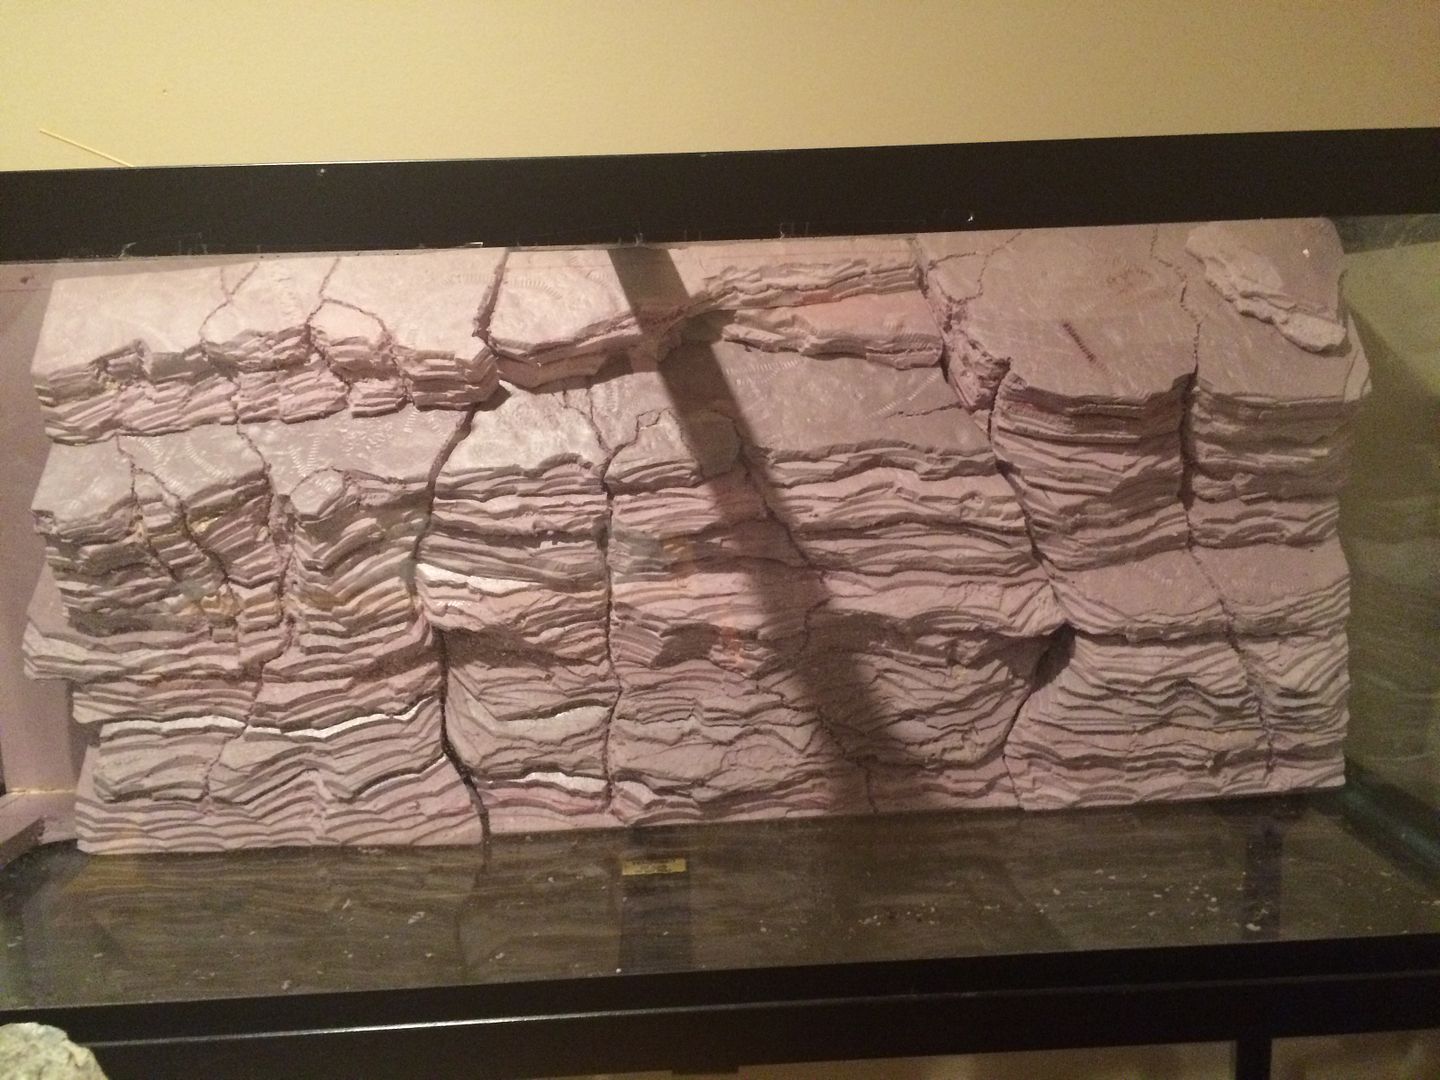
Quick update. I'm working on the third section. The left side will be finished with an overhanging bank/root system. I'm not sure how far the rock work will stick out yet. I decided To create a carved base that fits flush to the tank on the bottom, straight across, so there won't be any caves as I initially planned. The positive side of that is that fish will be easier to catch if I need to break down the tank in case of some sort of emergency.
Instead, I may bring the base out a bit with a small section glued to the bottom of the tank, so the rock has more of a 3D look (we'll see how that experiment works out). There is obviously some space for me to work with at the bottom. I need it all to come together to fit into the tank nicely, and that's my solution. As you can see, the three sections fit pretty well, but until their secured, I won't be able to complete the third section (overhang). It's just two difficult to work with and design as I go when I spend as much time thinking about fit as actually getting anything done.
After that, I need to carry the fossils over onto the top layer of the third section, then do a couple more layers. I decided to add one or two more layers to bring the cliff to the surface.
Kevin Wilson
#45
Chasmodes
-
- NANFA Member
- Central Maryland
Posted 02 February 2017 - 08:12 AM
I've tightened things up a bit to help the fit and make it appear as one unit. I've since changed the left side of the base and trimmed the flat base so that the rock seats flush to the tank bottom. I have two layers to go. The right section has been secured to the frame with the plastic pegs and Gorilla Glue. I need to do the same thing for the middle and left sections. I had to be careful that it fit the tank and together the way that I wanted, so it involved some minor carving/trimming. I also added some faux fossil crinoid stems, brachiopods and bryozoans.
About the left side, I may have mentioned it some in earlier posts, but I'm going to attempt to create an overhanging bank with faux roots to hide my equipment. The roots will be made out of a mix of materials (PVC pipe of various sizes, foam tubing, latex tubing, and spray foam). I hope that the spray bar blends in with the roots and that I can completely hide the powerhead from the front view of the tank. The dirt wall will be made out of spray foam. All of this will be created outside of the tank. Then, I'll paint it all with Drylok using cement dye for various colors.
After that, I will install it by applying spray foam to each section to the tank glass and bottom (and each section together). Based on my research, it seems that the spray foam is about as good or better than anything else to attach these things, and adheres well to glass, so much so that it's difficult to remove it. Honestly, I can't see why I'd ever break down and sell this tank once set up.
I have a Fluval 405 and wish to make a spray bar for it rather than the stock return. I will also carve a spot for my intake into the foam on the right side. I plan to make it all accessible for cleaning and/or repair...haven't figured that out quite yet.
Kevin Wilson
#46
Chasmodes
-
- NANFA Member
- Central Maryland
Posted 02 February 2017 - 08:17 AM
I am having second thoughts about using the heat gun over the carved rock. I like the way it looks now. I'm thinking that the Drylok will give it a smoother river worn appearance. I will use the heat gun for the roots and undercut bank though to get rid of carved straight lines.
Kevin Wilson
#47
UncleWillie
-

- NANFA Member
- Georgia
Posted 02 February 2017 - 02:25 PM
I agree about ditching the heat gun. I would think the Drylok alone would smooth things out for you. I would hate to see that beautiful work you've done to get smoothed down too much, blend together, and lose that layered look you are going for.
Willie P
#48
Chasmodes
-
- NANFA Member
- Central Maryland
Posted 02 February 2017 - 04:25 PM
Thanks UncleWillie!
Kevin Wilson
#49
Doug_Dame
-

- NANFA Member
Posted 02 February 2017 - 05:50 PM
I concur about not using the heat gun. Your masterpiece is already remarkably like the photo of the real thing you posted a while back, so I can't see where softening or rounding edges has much upside.
And I'm really looking forward to the postings on Version 2. You know, the one with 98% of the curb appeal, but only 20% of the effort.
(Is this a good time to ask if you've been thinking of starting a sideline business? Say in the aquatic products manufacturing home-based industry segment. [That's an ugly mouthful.])
Doug Dame
Floridian now back in Florida
#50
Matt DeLaVega
-

- Forum Staff
- Ohio
Posted 02 February 2017 - 07:28 PM
I didn't realize Drylok was safe. I am not a fan of it for foundation waterproofing, as it just doesn't work, but maybe it is good for something after all.
The member formerly known as Skipjack
#51
Chasmodes
-
- NANFA Member
- Central Maryland
Posted 03 February 2017 - 08:25 AM
Thanks Doug!
And I'm really looking forward to the postings on Version 2. You know, the one with 98% of the curb appeal, but only 20% of the effort.
(Is this a good time to ask if you've been thinking of starting a sideline business? Say in the aquatic products manufacturing home-based industry segment. [That's an ugly mouthful.])
Ha! I've been learning as I go. I think I could do it with 50% of the effort. Once I got started and saw that it might work, things went faster. Gorilla Glue is great, but it's slow...you need to wait 2-3 hours for it to set and harden. Also, it's harder to carve than foam, but not that bad, so I think that if I had to do it over again, I'd build the bigger structure, glue it all together, then carve. I'd also buy thicker board of foam insulation along with these so that you could get the effect of thicker rocks without seams. As far as a separate business...it would be a long time between paychecks!!!
I didn't realize Drylok was safe. I am not a fan of it for foundation waterproofing, as it just doesn't work, but maybe it is good for something after all.
Yeah Matt, there are lots of builds on some of the other forums that have worked out well using Drylok instead of cement. Many of those tanks were up for years without any problems. The main advantages are that you don't have to worry about pH like you do with using cement, and also that if you like details in your carving, Drylok shows them while cement covers them up (fills them in). MFK, and the Cichlid-Forum members, as well as from other forums, have the most builds using Drylok. The only disadvantage that I've heard of is that fish that tend to forage on rocks (like plecos) can pick away the Drylok off the foam, exposing the pink coloration, but that usually gets covered with algae. Still, it looks like specs all over your work. The solution that I read about was to use more coats of Drylok on your first layer, and that helps. My tank probably won't have those types of fish.
Here are my two of my favorite builds that inspired me that use Drylok:
Incredible job, this was the one that I first wanted to try. I trashed a couple boards of foam trying!
https://www.monsterf...d-rocks.452727/
This one ultimately got me thinking that I could get the effect that I wanted. I just didn't want to have the carving in the same plane:
http://www.fishlore....kground.161057/
This guy has several builds, all of them are incredible. He doesn't use Drylok, just tile grout and paint. He's a true artist! I hope that my roots turn out half as good.
https://planethx.com.../uncategorized/
Kevin Wilson
#52
littlen
-
- NANFA Member
- Washington, D.C.
Posted 03 February 2017 - 09:39 AM

Again, very cool stuff. I'm going to take a month or so nap, or whenever you finish. It's becoming too difficult to remain calm waiting to see what the tank will look like when it is up and running! Kudos, sir.
Nick L.
#53
Matt DeLaVega
-
- Forum Staff
- Ohio
Posted 03 February 2017 - 09:43 AM
They are awesome looking. I used to make mountains for HO scale trains in a similar fashion. Very cool.
The member formerly known as Skipjack
#54
Chasmodes
-
- NANFA Member
- Central Maryland
Posted 03 February 2017 - 09:49 AM
Thanks Nick! I can't wait either. But the way I figure, I got one shot to get it right! My wife will be happy too. Not only is she looking forward to my tanks being set up, but she'll have her rec-room floor back without foam shavings everywhere! I haven't shop vac'd them up yet because those shavings come in handy sometimes.
I know that I'm posting a lot of updates, but I think that it may help others if they try to do something similar as they go through their build. I had a ton of questions going into this, and I found answers all across the web, but really not all in one place. An example would be about using a spring to make faux crinoid fossils. I read it a long time ago, not sure where, and when I was making mine out of plastic worms, I remembered that post as I found a spring in my junk hardware box...thought, hmmm...wouldn't hurt to give it a try! I think I'll try and find more springs, maybe steal some out of my wife's pens ![]() , and make different size crinoids...
, and make different size crinoids...
Thanks Matt! I read a lot about foam carving and rock building on some of the HO scale train forums too. Some good YouTube vids too.
Kevin Wilson
#55
Chasmodes
-
- NANFA Member
- Central Maryland
Posted 06 February 2017 - 10:45 AM
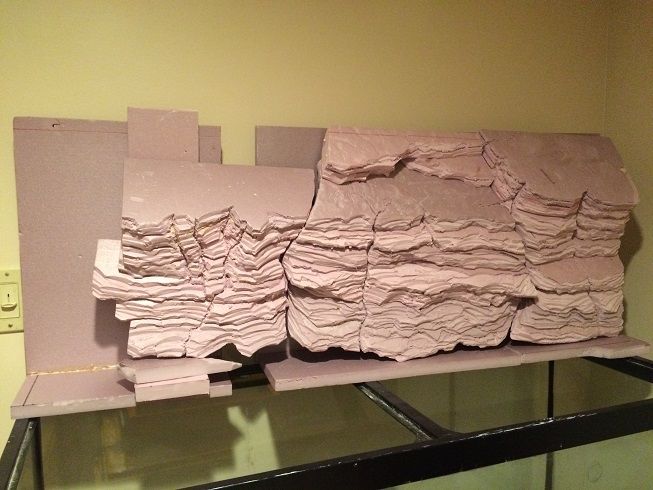
The rock work is pretty much done except for painting. I still need to glue and secure the rock faces to the base structure/frame for the middle and left sections (will do that tonight). I added another layer on the right side because I thought that rock looked to fake/boxy, added some cracks too. I also finished all of the fake fossils on the fossil layers. I'm pretty happy with it so far. Now on to making the roots and overhang. I found a cool picture of sycamore roots along a river bank that I'm going to model after...I'm pretty excited!
Kevin Wilson
#56
MtFallsTodd
-

- NANFA Member
- Mountain Falls, Virginia
Posted 06 February 2017 - 11:19 AM
It looks great!!!!! Very realistic.
Deep in the hills of Great North Mountain
#57
Chasmodes
-
- NANFA Member
- Central Maryland
Posted 06 February 2017 - 09:56 PM
Thank you Todd!!!
Kevin Wilson
#58
Chasmodes
-
- NANFA Member
- Central Maryland
Posted 12 February 2017 - 09:07 AM
Quick update:
I decided to pick up some stones from HD and help fill in the gaps using Great Stuff expanding spray foam. This morning, I filled in the gaps behind the rock carving. Although I've used spray foam before for around the house, it's a different story when you're trying to be precise, and man is this stuff messy. make sure that you have some acetone around the house in case you get it on your skin (will remove it before it sets) because once it sets, you have to manually remove it (carve or wear it off). So, rubber gloves are a must. I also have wax paper down on my work space, so I don't think that the foam will stick to it.
Anyway, here are a couple pics:
My first pass on the right section of the wall. You can see the bag or rocks that I used in the pic background, and the gloves.

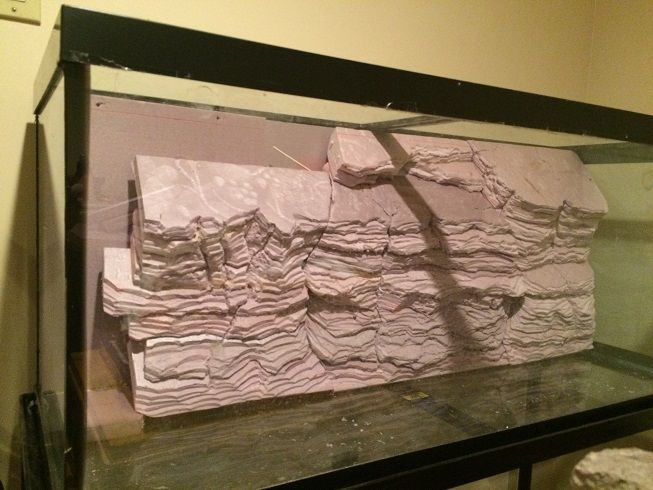
In the next pic, you can see that it expanded a lot more, as expected. I still tried to scrape off excess. After spraying the middle section and filling with rocks. The way that I did it was to alternate layering rocks with spraying, which worked OK, but that was the messiest part. I decided to add rocks to help counter buoyancy.

The other side of both. Looks like I'll have more carving and fitting to do. When all is said and done, I don't want any place that fish can get in there.
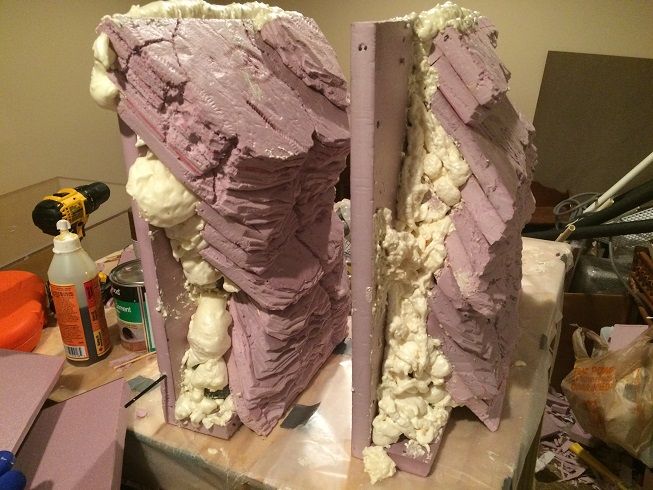
I did these steps with the background sections standing vertically. If I had to do it again, I'd be more patient and do one section at a time and lay them flat on the back, because I think that I could have stuffed more stones in there. Gravity became an issue especially on the larger middle section. Overall, I'm pleased with the process so far. Now sections one and two are all one unit, not an assembly of parts. Section three will be more difficult because I have to find a way to incorporate the roots. After all that, it's painting time, then securing to the tank.
Thank you for following!
Kevin Wilson

#60
Chasmodes
-
- NANFA Member
- Central Maryland
Posted 13 February 2017 - 12:57 PM
Thanks NIck, and for the laugh. I needed it.
Kevin Wilson


0 user(s) are reading this topic
0 members, 0 guests, 0 anonymous users

