Jump to content


Photo

75 Gallon Native Stream Tank Build


  • Please log in to reply
392 replies to this topic

#21 Doug_Dame

Doug_Dame
  • NANFA Member

Posted 30 December 2016 - 06:07 PM

Was sorry to hear of your thumb injury.


But it's looking really nice. If you build it up almost to the surface level, that crack on the top level isn't going to be easily visible unless you duck your head down lower than the water level. Get some java fern anchored in there and it'll just look like plants opportunistically taking advantage of a little crevice. The seam in the stack just looks like a natural fracture line to me.


You probably don't need to cut back the bottom base either. Surely it'll be covered up by your substrate. If fact, if this whole thing floats, having a bottom shelf that you can load up with a heavy substrate would probably help keep the whole thing in place.


Doug Dame

Floridian now back in Florida


#22 Chasmodes

Chasmodes
  • NANFA Member
  • Central Maryland

Posted 30 December 2016 - 08:42 PM

Thanks Doug.  Good idea about the plants.  I was thinking siliconing the structure to the tank bottom, then putting some rocks on the base for added weight, then substrate, just for that reason. 


Kevin Wilson


#23 Chasmodes

Chasmodes
  • NANFA Member
  • Central Maryland

Posted 02 January 2017 - 10:38 PM

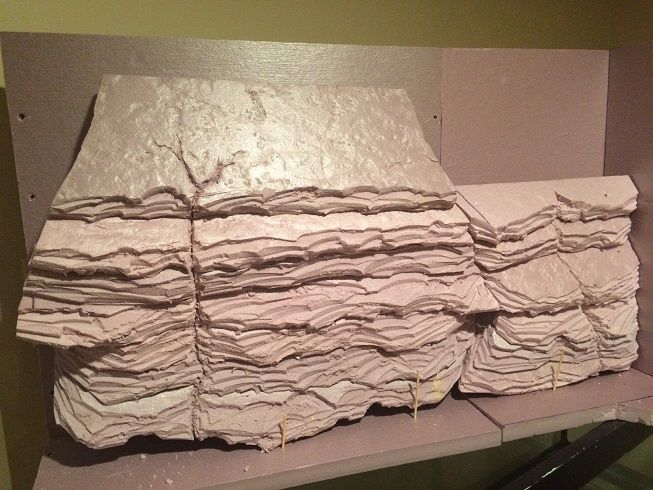
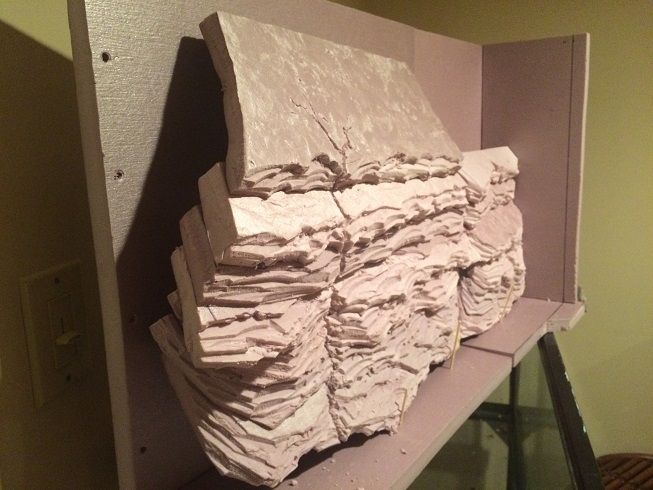
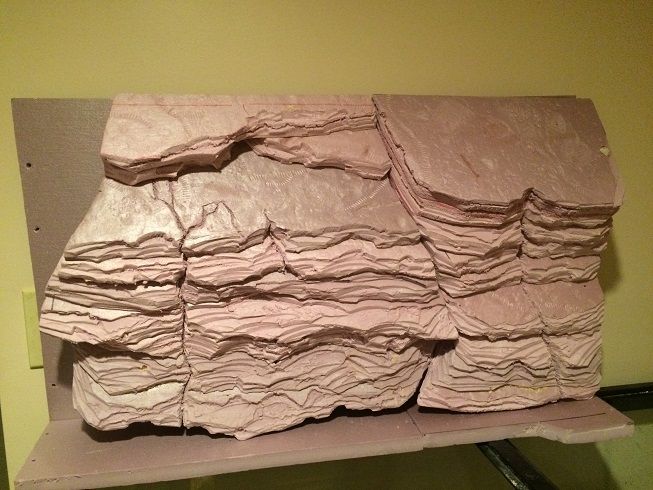
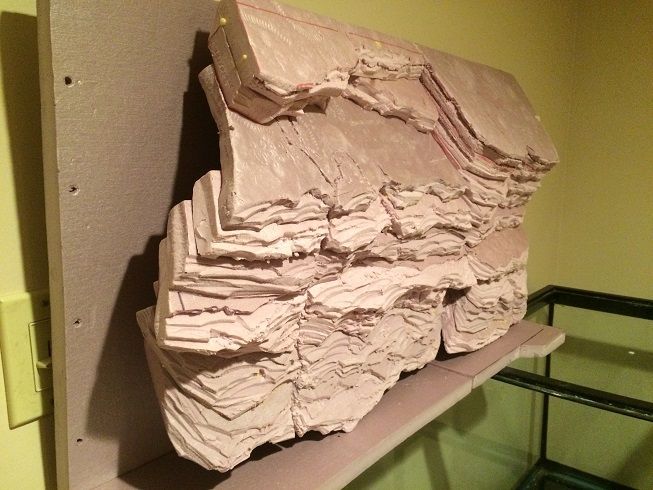
I've been carving a bit more.  I decided to add a larger plate to show off my new technique (to the future tank viewer, LOL), otherwise, it would be lost buried with the tighter layers of slate.  I picked up a Rapala filet glove to give me a little more protection.  I think that by the time that I finish, I'll use Gorilla Glue to put together the structure, and then expanding spray foam to attach it to the tank and fill in gaps that I don't want.  My next layers will go to the right section, with a final thicker rock layer as the top and final layer.  After that, I'll work on carving the left section (which will only go part way to the other edge of the tank, the rest will be an overhanging ledge with roots).  It's ambitious, but will soon be over, but I'm not in a hurry.  I'm kinda having fun with it now.  After carving the rock, I'll add finishing touches with some finer carving by exacto knife, to get those layers a bit more realistic.  After that, I'll apply the heat gun to round some of those sharp edges off, to give it a water eroded look.  Then, off to building the overhanging roots.


Here's a pic of my progress from today:

background%208_zpsufkdx7kf.jpg


Here's more of a side view.  The larger plate at the top takes up more room, creating more space behind the structure.  I will have it at a much steeper angle to keep the structure tighter to the glass and provide more tank room.  I'm not sure if I'll use the space behind the structure for equipment or not, or fill it all in with expanding foam.  The bottom line is that I have to make sure that it stays secure and not separate or float to the top of the tank.

background%207_zpsepis9hsd.jpg


Kevin Wilson


#24 9darlingcalvi

9darlingcalvi
  • NANFA Guest
  • Northern Minnesota

Posted 03 January 2017 - 12:06 AM

Cool


Sent from my iPhone using Tapatalk

#25 Chasmodes

Chasmodes
  • NANFA Member
  • Central Maryland

Posted 19 January 2017 - 10:35 AM

I'm still working on the background.  It's coming along slowly mostly due to my being picky when trying things to make it more realistic.  I've been experimenting with how I'd like the surface of some of the faux rock to look, and I'm kind of excited about my preliminary results.  As far as putting it all together, it's been kind of like trial and error converting the pieces into sections of an entire structure.  I finally decided on exactly how I'd do that.  


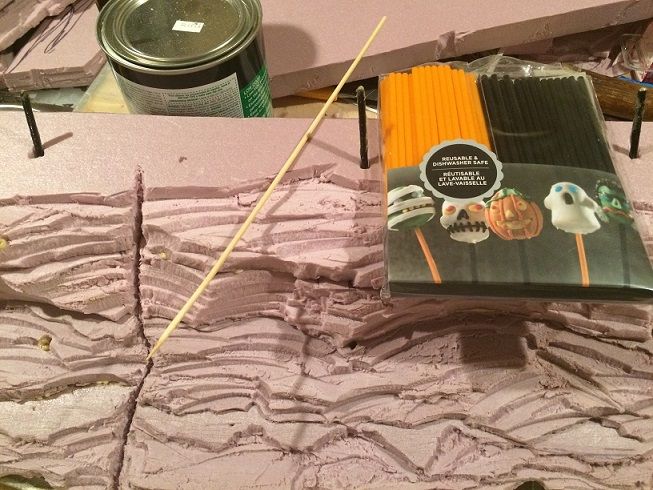
While carving, I used wood cooking skewers to punch holes, but I'm not going to use them in the final structure because I don't want that wood in the tank, even if buried in the structure.  My wife and daughter found these Halloween plastic popsicle sticks that will work great.   The problem with them is that they don't punch holes well in this foam.  So, I use the wood skewers to punch holes and the plastic rods to piece the parts together.  It's helped me carve and shape, but as the structure grows, it's a little difficult to keep it together so that further carving follows the design.  So, it's time to begin gluing what I have together.


Showing the rods and skewers that I used.  The orange and black plastic rods will remain in the structure to help keep it together.  The glue will bind the foam boards pieces together but also vertically with the rods. 

IMG_7590_zpsduzpczge.jpg


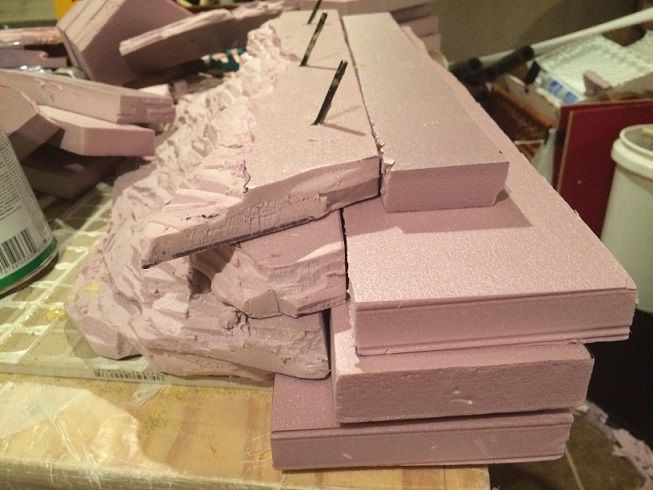
A couple challenges to having the faux slate layers in a different plane is how the back of the structure will attach to the tank (TBD) but also later in the process of carving and gluing (adding weight to prevent glue expansion).  The structure looks like stair steps but can't support weight.  So, I used loose foam board pieces to fill in the those gaps temporarily when I carve the structure (before gluing and after) and also for gluing to support that weight to press the foam boards together.  You can also see how the plastic rods form additional support for attaching it all together along with glue.

IMG_7591_zpsibqbfzoz.jpg


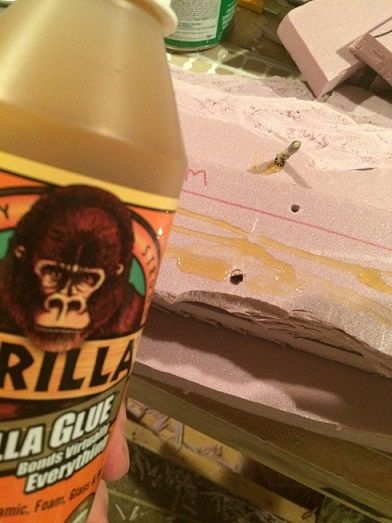
Gorilla glue is great (and is inert after fully cured), and holds the foam boards and plastic rods strongly.  It's almost impossible to separate them by hand when the glue finally cures.  Shown in this pic is my application of the glue from the bottle and also the type that I'm using.

IMG_7592_zps5rsle69c.jpg


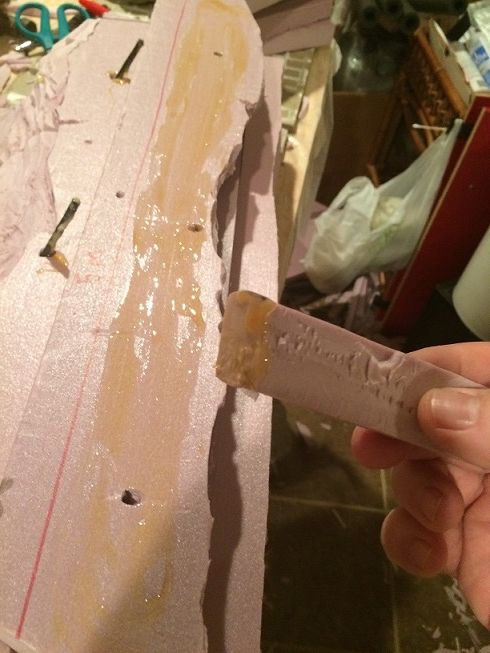
As you can imagine while carving, shavings of various sizes will make a mess all over the floor and anything else.  I haven't been cleaning as I go, not exactly making my wife happy, but the larger shavings come in handy to make for nice disposable glue spreaders.

IMG_7594_zpswgcxpzdy.jpg


Kevin Wilson


#26 Chasmodes

Chasmodes
  • NANFA Member
  • Central Maryland

Posted 19 January 2017 - 10:39 AM

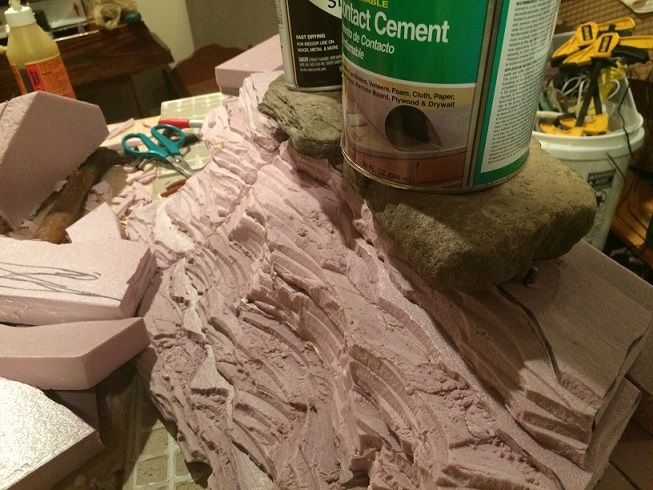
In this pic, I'm adding weight to the structure so that the foam boards glue tightly together, to reduce the appearance of that edge between boards and make it much like one rock structure.  The additional imprints from the rocks on the top of the foam boards also result in a more rock like look on the foam board surface.  And for those indentations that will be covered by the next foam board, it adds surface area for additional gluing strength.  It takes about 2 hours for the glue to dry, set and form a strong bond, and a few more hours for it to fully cure (you can get that info off the bottle).

IMG_7595_zpscld7xgwv.jpg


Kevin Wilson


#27 Chasmodes

Chasmodes
  • NANFA Member
  • Central Maryland

Posted 19 January 2017 - 10:56 AM

And now some experiments and results that I spoke of earlier.  I tried some things on foam board pieces to see if I can get even more realism.  Previously, I found that by pressing concrete stuff that I made for another purpose or stream rocks produce cool internal molds of those rocks in the foam.  So my next experiment was to try and emulate fossils.  I found that by cutting a section of a ribbed plastic worm and adding heavy weight on top of it resting on the board created a pretty cool effect, emulating a Devonian crinoid stem.  I'm still experimenting with this concept to see if leaving it for 24 hours makes for a larger internal mold.  I am not sure, but I suspect that the soft plastic might "melt" the foam in a favorable way.  I'll post results tomorrow.
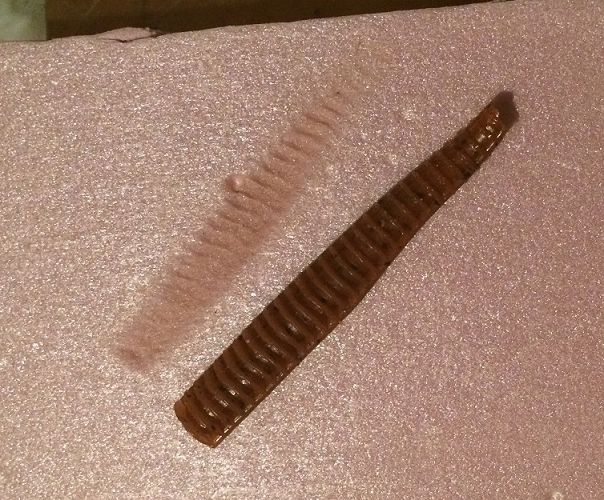
IMG_7596_zpsew0jywmm.jpg


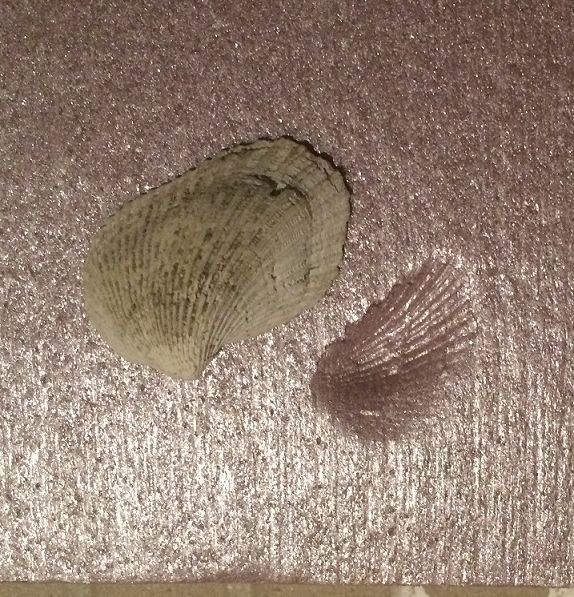
I tried this concept with a small clam shell found from the Chesapeake Bay and it looks pretty good.  I think that I may try a large section of Devonian rock full of brachiopods to get an entire rock fossil effect.  The rock that I have in mind is plenty heavy, but I'm hoping that if I add weight that it won't destroy my fossil specimens.  But, if it does, then it gives me more incentive to go fossil collecting again :).  I'll  post results of that experiment when I'm done.  If that works, then I may use that foam board as my top section or faux rock for added realism.  
IMG_7597_zpsddygvufy.jpg


The cool thing about these experiments is that if I can achieve that realism of rock and fossil rock impressions, along with my attempts at carving, when applying the Drylok/cement dye mixture, the textures of the foam board and any work done on them will show through.  That's why I didn't go with a cement coating (and also because those tend to chip away and don't show the level of detail from foam carving and other work that direct Drylok coating does, plus there are pH issues that you have to worry about with using concrete).


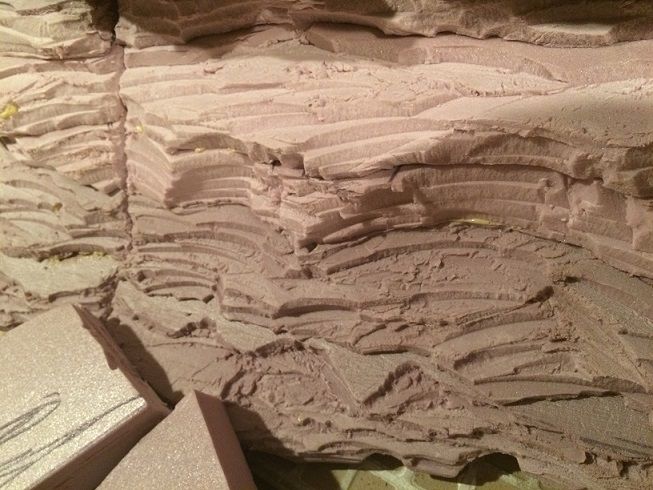
Finally, a picture along the way of the structure after gluing.  I will have to chip or carve away glue that expanded between foam layers.  But, I'm satisfied that the amount of weight that I'm using to press the foam boards together is resulting in very little space between boards, adding to the "one rock" realism.  
IMG_7600_zpsxobnryao.jpg33


I hope to have everything that I carved glued together into their respective structural sections by the end of the weekend or sooner.  Then, I can proceed with more carving and working on that third section (more faux cliff rock along with an undercut bank and roots).  I'm starting to get excited about how it's turning out.


By the time I finish the background, then it will time to move forward with setting up and cycling the tank.  Those steps include collecting "live" substrate in the form of sand an gravel from the stream that I plan to emulate along with additional rocks.  Assembling all equipment into the background so it is hidden by the faux roots and/or faux rocks.  Then, filling with water and cycling.  By then, I'll be ready to collect the tank inhabitants.  My goal for collection time would be late March or early April.


Kevin Wilson


#28 brackishdude

brackishdude
  • NANFA Member

Posted 19 January 2017 - 12:44 PM

coming along very nicely!


As your fellow, I can demand of you no more, and accept no less, than I allow to be demanded of myself

#29 mattknepley

mattknepley
  • NANFA Member
  • Smack-dab between the Savannah and the Saluda.

Posted 19 January 2017 - 05:10 PM

You are equal parts artist, engineer, and mad scientist! Look forward to seeing more!
Matt Knepley
"No thanks, a third of a gopher would merely arouse my appetite..."

#30 littlen

littlen
  • NANFA Member
  • Washington, D.C.

Posted 19 January 2017 - 08:22 PM

I have to admit-before I ask my question, that I haven't read every post word-for-word since the start of this post.  However, I am still interested in the development of the project!  My question is, how will you anchor/attach that foam/rockwork (once covered in some form of concrete) to the sides/bottom such that it won't peel off and float up?  It seems like it will be very buoyant with all the foam.  Will a tube or two of silicone make a good bond between the foam and the glass?

Good work all around.  I'm very impressed!


Nick L.

#31 Chasmodes

Chasmodes
  • NANFA Member
  • Central Maryland

Posted 20 January 2017 - 09:55 AM

Thank you Nick!  


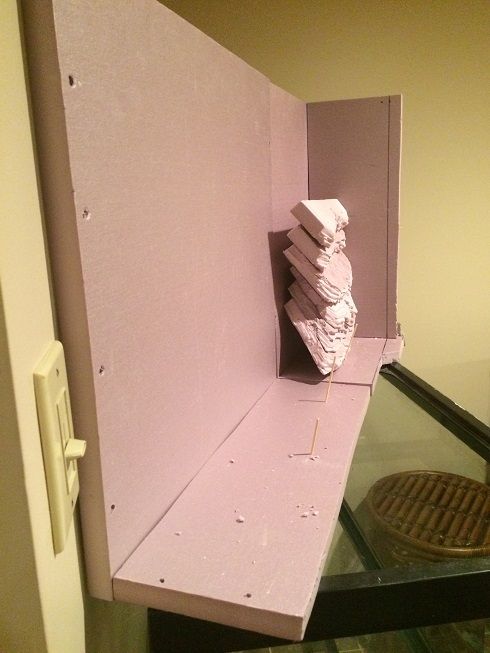
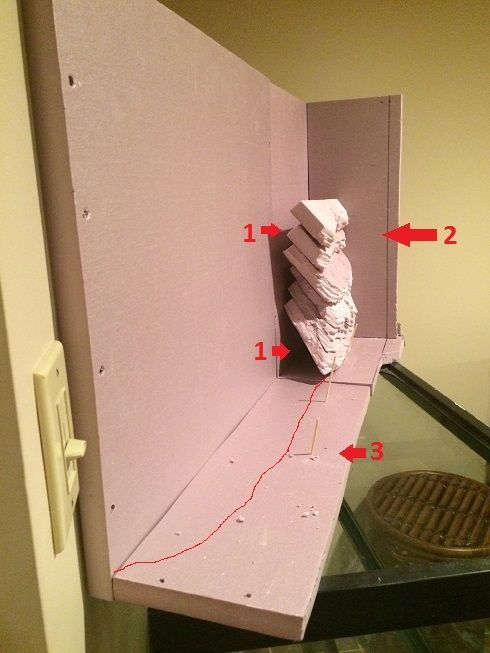
Yes, someone from another forum had a similar concern.  I think that I have it covered, but it is an experiment and is certainly a concern.  My plan to counter the buoyancy is simply to use spray foam and Gorilla Glue as my adherants.  Both create excellent bonds with foam boards.  I'm using Gorilla Glue to bond the faux slate layers together, and then Great Stuff foam for bonding the internal side of the rock wall to the foam boards that will be glued to the tank (the entire structure), which will be bonded to the glass with Great Stuff.  Great Stuff is very difficult to remove from glass once cured.  I'm also considering adding some rock to the internal structure for weight and to fill up some of the gap where spray foam will be (to reduce some of the foam volume).  Here is a pic of the side view showing the backbone of the structure being the foam boards in the shape of the tank, which will be bonded to the glass at the end with the Great Stuff.  The right side of the rock wall is shown here too for illustration.  Each of those boards will be glued with Gorilla Glue, and the spray foam will be between the rock wall and the backbone.  The foam board at the far end will not be part of the structure, but the one on the bottom will be bonded with Great Stuff to the bottom of the tank.  It will be trimmed so it's not visible to the viewer from the front or the side, trimmed back enough to form some small caves for fish to hide in.  I hope that I articulated my plan enough, it's kind of hard to explain what I envision.  Oh, and the foam board backgrounds are trimmed to the exact inside glass dimensions and will fit tightly between the lip on the top of the tank and the bottom.


background%209_zpsj7ukcvba.jpg


Kevin Wilson


#32 Chasmodes

Chasmodes
  • NANFA Member
  • Central Maryland

Posted 20 January 2017 - 10:25 AM

I'm better with visuals, so maybe this will help, LOL, at least with my explaining it.


1 - the gap that will be filled with Great Stuff spray foam, and near the bottom, used with layers of river rock small stone layers for added weight.  Great Stuff makes great glue and a terrific bond between closed cell foam boards.


2 - this board won't exist.  It's only there because the entire structure originally was built so I could work outside of the tank while carving, so when I was done, I could put it all together and then glue it to the glass.  


3 - the bottom will be trimmed so that it will out of view (forming a cave in some cases) and also hidden by substrate.  Again, Great Stuff along with river rocks will fill that lower gap.  It will be bonded to the bottom of the tank with Great Stuff.


When the structure if finished, it will be one unit (well, three sections) before adhering it to the glass with Great Stuff.  I may carve away some foam from the back to make room to hide equipment prior to the final gluing to the glass.


background%209%20-%20Copy_zpsgweptlx7.jp


That's my plan.  Maybe it will work maybe not.  I think that it will.  In the end, the final wall and structure will not be any larger than commonly built styrofoam rock walls.  The biggest difference is the way that the rock wall layers are arranged to provide a different plane or angle of the faux slate.  I won't use concrete, but rather, it will be covered with Drylok mixed with cement coloring and painted on.  


Kevin Wilson


#33 littlen

littlen
  • NANFA Member
  • Washington, D.C.

Posted 20 January 2017 - 03:27 PM

=D>


Nick L.

#34 Chasmodes

Chasmodes
  • NANFA Member
  • Central Maryland

Posted 20 January 2017 - 08:17 PM

Thanks also Matt and brackishdude, much appreciated.  Sorry about not saying so sooner.


Kevin Wilson


#35 Chasmodes

Chasmodes
  • NANFA Member
  • Central Maryland

Posted 23 January 2017 - 11:37 AM

I did a few experiments on working with foam and learned the following:


Experiment 1:  Gorilla Glue - I glued two foam scraps together using water (as recommended by the company) and also two scraps not using water.  When I tried to separate them, the foam broke and the glued sections were still stuck together.  I could not pry either of them apart with a tool.  So, using water, not using water, about the same results.


Experiment 2:  I took several pieces of fossil rock and tried to get detailed external molds, added weight, let them sit overnight, etc.  I wasn't impressed with the results.  They looked OK, but no better than pressing the concrete on the foam.  I had a heavy rock with worm burrow trace fossils that looked the best, but not that much different than the concrete or other rocks pressed on the foam.  The best faux fossils were the plastic worm and individual clam fossils pressed into the foam, as pictured in earlier posts.


I documented the above with pics, but since the results weren't that impressive, I opted to not waste the bandwidth.


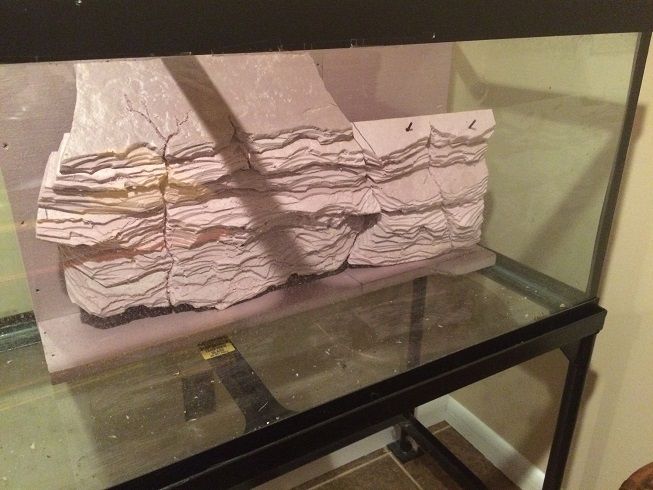
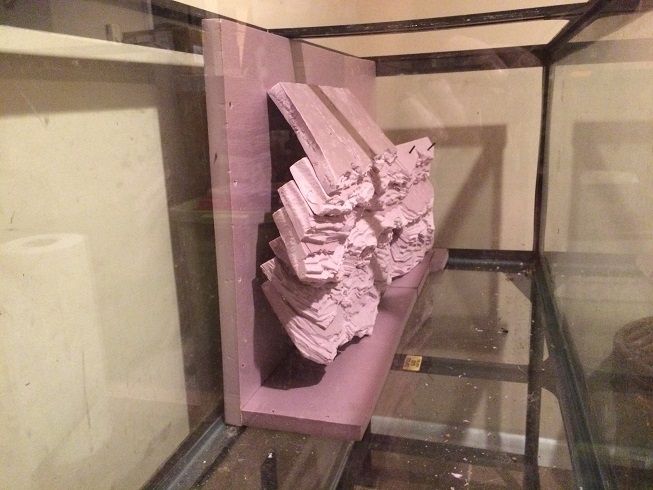
I also glued all of the pieces together in sections one and two, along with the frames for those sections.  They turned out pretty good, I think.  It took all day Friday to finish gluing everything, because it takes 2 hours for the Gorilla Glue to set (about 80% cured).  I've since carved a few more pieces for the right most section, so you'll see that in my next update, after I finish sections one and two getting the final slate layers to the top.  


Here are my latest pics:

IMG_7609_zpshlnvncde.jpg


Side view:

IMG_7611_zpsxsaamygu.jpg


Kevin Wilson


#36 Chasmodes

Chasmodes
  • NANFA Member
  • Central Maryland

Posted 25 January 2017 - 08:17 AM

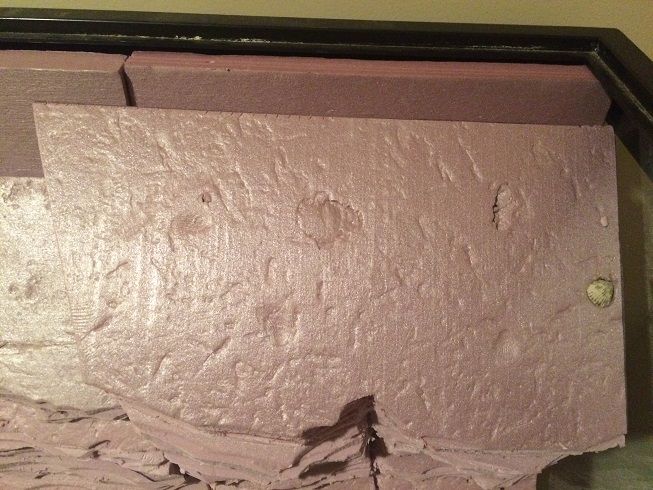
Quick update:  I implemented some of my fossil impressions experiment techniques and nearly finished the first section.  I need to add some sort of "trim" rock layer at the top.  Forgive me for all of these updates...I'm kinda getting excited about it.  :biggrin:  :D/


Latest:

IMG_7613_zpstmixphqw.jpg


Close up of the top fossil layer.  I used a rock with trace fossils for most of it and pushed it into the foam, then added some shells.  I may do more later before I paint.

IMG_7614_zpsovnd1hgi.jpg


Kevin Wilson


#37 Chasmodes

Chasmodes
  • NANFA Member
  • Central Maryland

Posted 28 January 2017 - 11:57 AM

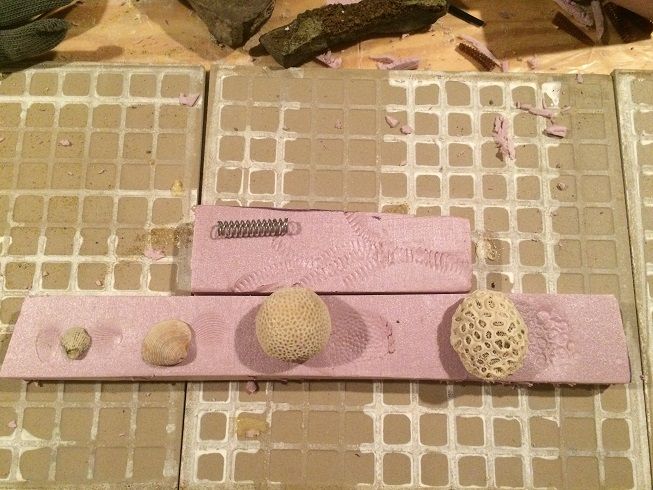
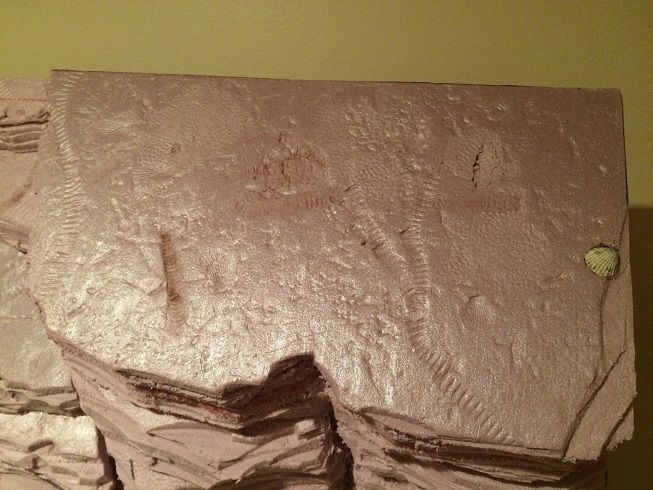
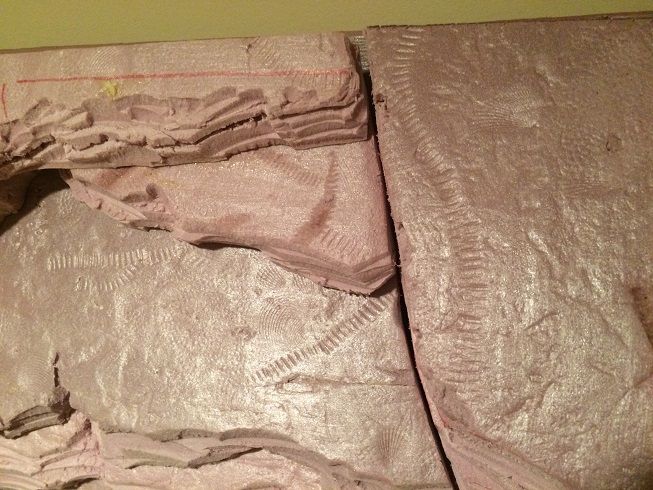
OK, I learn more and more as I work on this project.  For making fossils, sometimes odds and ends type objects work better than the real thing.  I found that using a spring, that I can bend, makes for more realistic crinoid stem replicas than the plastic worm did, or even the real fossils.  You can bend the spring as you press it into the foam.  Also, small pieces of coral make for great texture.  The first picture below shows some examples of the impression that each object leaves.  The round coral with the smallest polyp skeletons leaves impressions that look a lot like a bryozoan colony.

background%2011_zpssdhguspp.jpg


Some results on my background:

background%2010_zpsflqbvxic.jpg


background%2012_zps8auauxhr.jpg


Kevin Wilson


#38 Chasmodes

Chasmodes
  • NANFA Member
  • Central Maryland

Posted 28 January 2017 - 12:01 PM

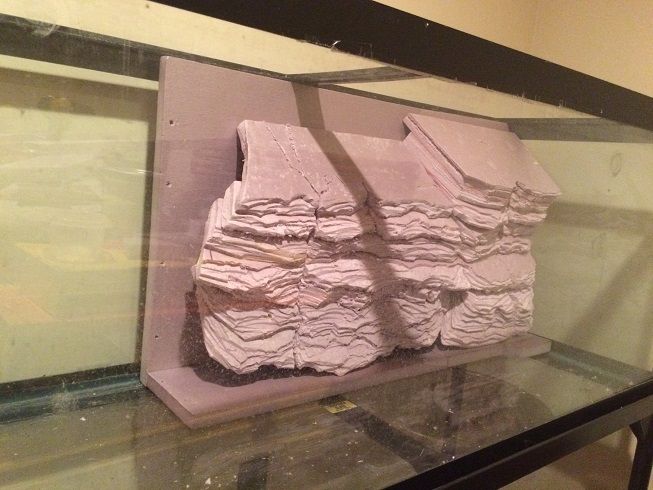
The first two sections have been carved and glued.  I may add some finishing touches before applying the Drylok later.  I'm beginning the third section now, more rock cliff, a mud/dirt overhanging bank with roots (to hide my spray bar and powerhead.  Here are some pics of the overall progress:

background%2013_zpspx9oxkfu.jpg


background%2014_zpsjxboc9jr.jpg


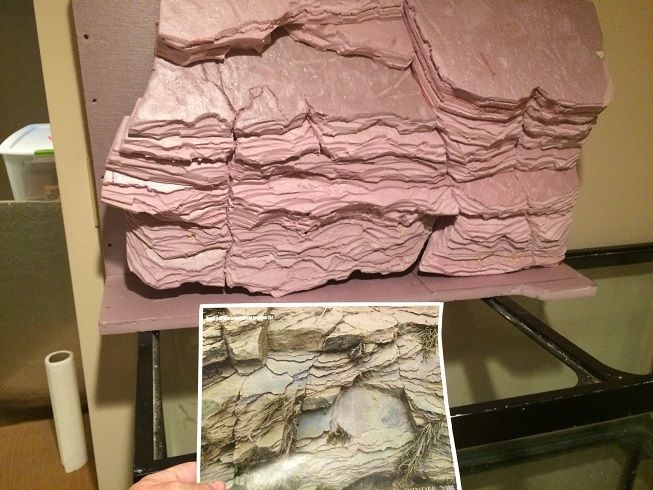
And a comparison to the picture that inspired me...not exact, but I took was able to incorporate some of the look:

background%2015_zpsk5vbdwbt.jpg


Kevin Wilson


#39 mattknepley

mattknepley
  • NANFA Member
  • Smack-dab between the Savannah and the Saluda.

Posted 28 January 2017 - 03:02 PM

Exact or not, you have the effect down solid; looks great!


Matt Knepley
"No thanks, a third of a gopher would merely arouse my appetite..."

#40 Chasmodes

Chasmodes
  • NANFA Member
  • Central Maryland

Posted 28 January 2017 - 10:31 PM

Thank you Matt!  


I'm about half way done with the rock wall part of the third (left) section.  After that, I start making roots, then finally do the spray foam for the undercut bank.  At first, I thought of a mud bank, but maybe better would try to make it look sedimentary, a bit sandy/soily, by using epoxy on the spray foam and coat it with sand.  Another positive thing about that is that the pond spray foam supposedly is safe from UV light, but this will give me one more layer of a sense of security.  I have time to consider my options.  It might take me a while to get the hang of making fake roots.  Anyone ever made fake roots before?


Kevin Wilson


1 user(s) are reading this topic

0 members, 1 guests, 0 anonymous users