
This is such gorgeous work, and you've clearly put a lot of time into it. Have you considered making a mold of the finished product for future reproduction?
75 Gallon Native Stream Tank Build
Started by
Chasmodes
, Oct 24 2016 09:04 AM
392 replies to this topic
#62

Chasmodes
-
- NANFA Member
- Central Maryland
Posted 13 February 2017 - 05:01 PM
This is such gorgeous work, and you've clearly put a lot of time into it. Have you considered making a mold of the finished product for future reproduction?
Thank you so much! Honestly, I haven't considered doing anything other than trying to get this finished. Sometimes, days like today make me want to --> ](http://forum.nanfa.org/public/style_emoticons/default/eusa_wall.gif)
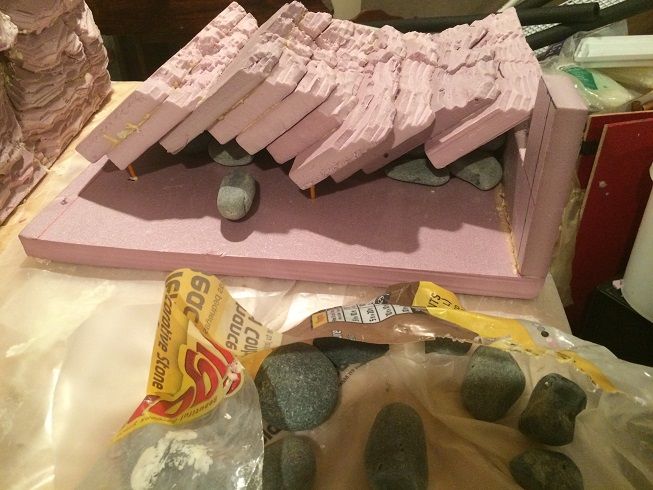
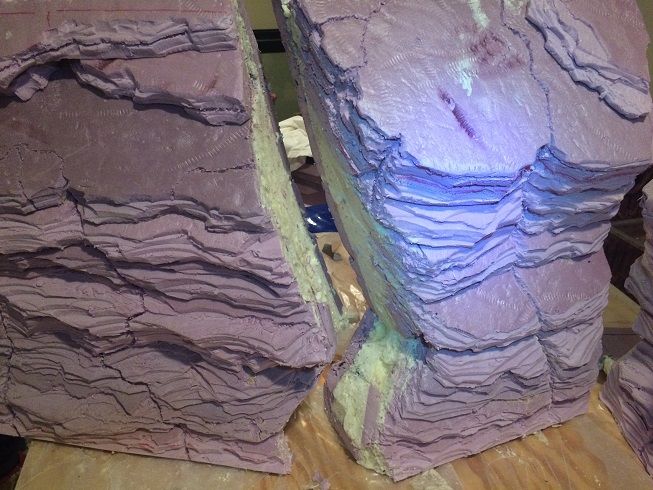
Well, I don't know if I messed it up or not. The problem was that, after carving excess spray foam, I had too much of a gap where fish could get in there. So, I pressed the pieces together and shot some of the spray foam in there. I hope that I didn't ruin the piece by doing that...we will see. Another problem is that I need those pieces to be separate so they can fit into the tank. Previously, I had them connect via plastic popsicle sticks on one side fitting into a hole on another. So, I cut them off. Now, I'll have to carve the pieces apart later, but at least there won't be any gaps. After that, I'll set up the popsicle stick thing again.
While hoping that I didn't mess that all up, I decided to not waste any spray foam and move on to filling in the gaps behind the third section. First, stuffing with rocks. This time, I figured out it's best to lay the piece on the back as you can get more rocks in there:
Foaming the last section:
I'm documenting all of this so if I ever do it again, I can remember my mistakes  , plus, if anyone crazy enough like me tries it, they can see how I did it.
Thanks for following!
Kevin Wilson
#63
truecrimson
-

- NANFA Guest
- Leb-A-non, PA
Posted 13 February 2017 - 08:33 PM
That does look amazing.
I second the idea of making a mold of it.
#64
Chasmodes
-
- NANFA Member
- Central Maryland
Posted 14 February 2017 - 10:06 AM
That does look amazing.
I second the idea of making a mold of it.
Thank you truecrimson! I'll consider it perhaps. I don't know much about how to do that, so I'd need to do some research.
By the way, I was in your neck of the woods on Sunday. I ate at the Golden Corral for lunch with a friend of mine, stopping on our way to visit the Cabela's in Hamburg! I saw lots of cool collecting/fishing spots along the way 
Kevin Wilson
#65
littlen
-
- NANFA Member
- Washington, D.C.
Posted 14 February 2017 - 11:06 AM
Wait a minute,....did you BUY rocks??  (Playful ribbing, of course).
Nick L.
#66
truecrimson
-
- NANFA Guest
- Leb-A-non, PA
Posted 14 February 2017 - 01:41 PM
Thank you truecrimson! I'll consider it perhaps. I don't know much about how to do that, so I'd need to do some research.
By the way, I was in your neck of the woods on Sunday. I ate at the Golden Corral for lunch with a friend of mine, stopping on our way to visit the Cabela's in Hamburg! I saw lots of cool collecting/fishing spots along the way
lol, I live, literally, right around the corner from Golden Coral. I could walk there. In fact when my wife and I walk for exercise we go around that shopping center. But I was working down in Hanover Sunday. I think I got home about 4 something. If you passed by in ether direction after I was home I would have loved to meet up. Let me know next time you're going to be in the area. Though my wife would never let me eat at Golden Corral for health reasons.
Snitz Creek is right around the corner. Quittapahilla is close by. Swatara is a little farther. There are lots of places to fish around here, so I am sure there are lots of places to collect. Given the small size of many non game natives I'm sure you could collect in waters I would not try to fish in.
As for the mold, I am no expert but guys who make their own soft plastics using generic containers from Wal Mart and Plaster of Paris. Of course you would have to scale up in container size and volume of Plaster of Paris. I have always wanted to do it. However, like a number of other things, living in a compartment makes it almost impossible. Though PoP molding soft plastics is more likely than casting lead jigs or bullets indoors.
This guy has a bunch of videos on bait making and mold making. You're going to have to wade through all the bait making. But he has a ton of videos on making different molds and baits. I know 2 sided injection should be in there somewhere as well as all the single sided open pours.
This guy shows how to make a 2 part silicone mold
This one shows making a mold for casting ceramics. Same basic principles apply
A simple youtube search will return hours upon hours of mold making videos for all sorts of applications. The work you have done so far clearly indicates a skill level far more than sufficient for mold making.
#67
Chasmodes
-
- NANFA Member
- Central Maryland
Posted 14 February 2017 - 04:56 PM
Thanks for the compliment TC! I'll check your links out and give the mold making some thought.
Next time I head up your way, I'll give you a shout on here first.
Wait a minute,....did you BUY rocks??
That is exactly what my wife said, except she had a very emphatic "WHAT?" in in front of that sentence.  LOL. I was going to go collect some at my local creek. But, while I was in HD strolling around, looking for ideas, I saw them and said, what the heck. Impulse buying...yeah, that's it!
Kevin Wilson
#68
Chasmodes
-
- NANFA Member
- Central Maryland
Posted 15 February 2017 - 08:10 AM
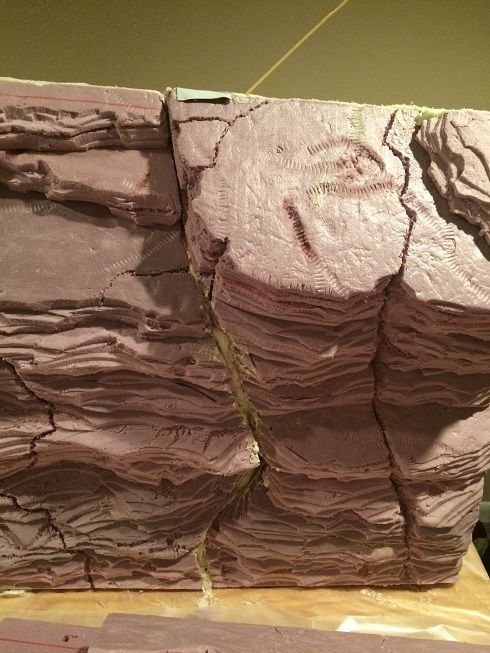
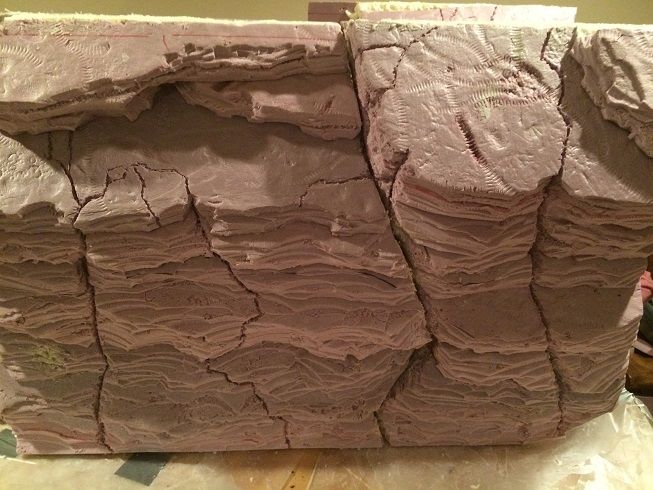
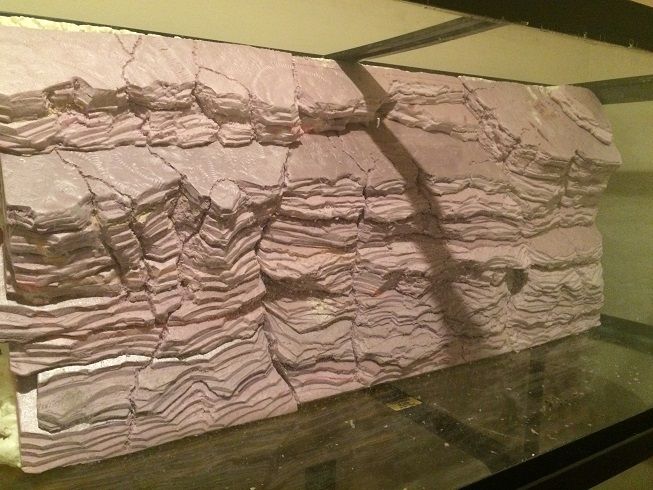
I was worried that I messed it up, but after cleaning it up a but, a little more carving, and then cutting sections 1 & 2 to separate them, I'm fairly pleased with the outcome. I had used the plastic popsicle sticks to temporarily join the two sections while I worked with them, and eventually glued them into place. Prior to using the Great Stuff foam, I cut them off. But, I couldn't separate the two sections exactly as I had before, so I just cut along the fissure. The only problem that I had was when I encountered the old popsicle stick. So, I had to use a hack saw blade to cut through them to finally separate the two section. As you can see, Great Stuff does indeed fill gaps:
After cleaning and some detailing, it fits much better and looks pretty good, especially when viewing from the center or left:
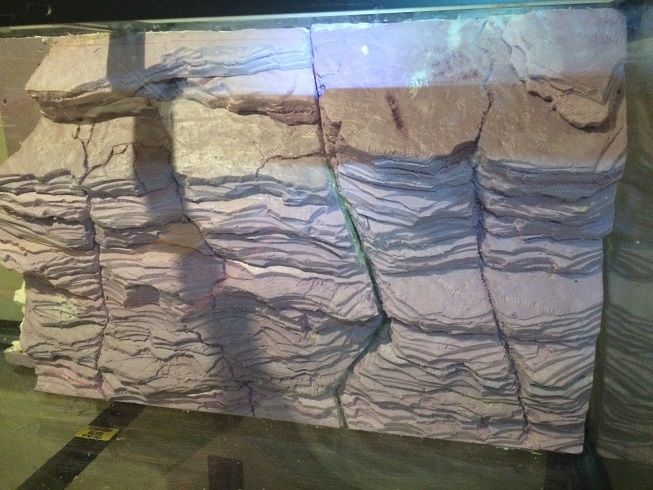
I checked for the fit in the tank and everything fit perfectly, both together and in the tank, view from the center/left of the tank:

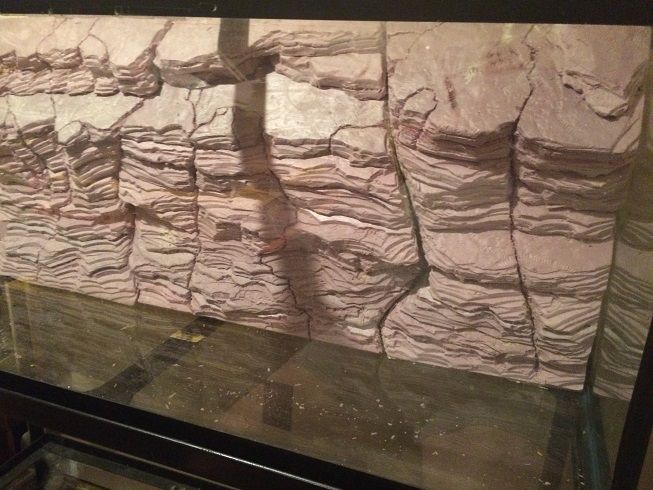
Below is the view from the right side of the tank. I'm not as happy about this view because IMO the fissure looks man made, so I think I need to do a little more detailing/carving to get it to look more random. It's not bad, and I know that I'm being picky, but now is the time to get it right:
I can't wait to get home from work every day to work on this thing. It's kind of fun now. I still need to carve and detail the third section, and I think that I'll do the same thing as far as filling the gaps between the sections, but I won't use so much foam and will spray the back panel more so that it doesn't protrude through the fissure. It should be much easier to cut too, because there are no glued popsicle sticks in between these sections:.
Then, after that, it's on to finishing the left side with the roots and mud bank.
Thanks for following!
Kevin Wilson
#69
Chasmodes
-
- NANFA Member
- Central Maryland
Posted 15 February 2017 - 11:33 AM
One other tip that I figured out. When working with Gorilla Glue or Great Stuff, it doesn't stick well to wax paper, so that is a good surface to work on. I haven't tried a drop cloth yet. But, wax paper is pretty cheap.
Also, Great Stuff once dried bonds extremely well to fingernails... 
Kevin Wilson
#70
Chasmodes
-
- NANFA Member
- Central Maryland
Posted 16 February 2017 - 11:42 AM
One of my biggest concerns is that foam is so buoyant. I've read about other aquarist's accounts of horror stories about foam backgrounds separating from the tank glass and rocket out of the water, even breaking glass tops and lights. I'm not worried about breaking equipment, but I don't want my time, materials, efforts and money wasted on a failed project.
I want this to be a permanent background to the tank. So, I'm running a couple of experiments. I don't have any more Great Stuff and I don't want to waste my pond foam for this, but Gorilla Glue pretty much bonds the same way.
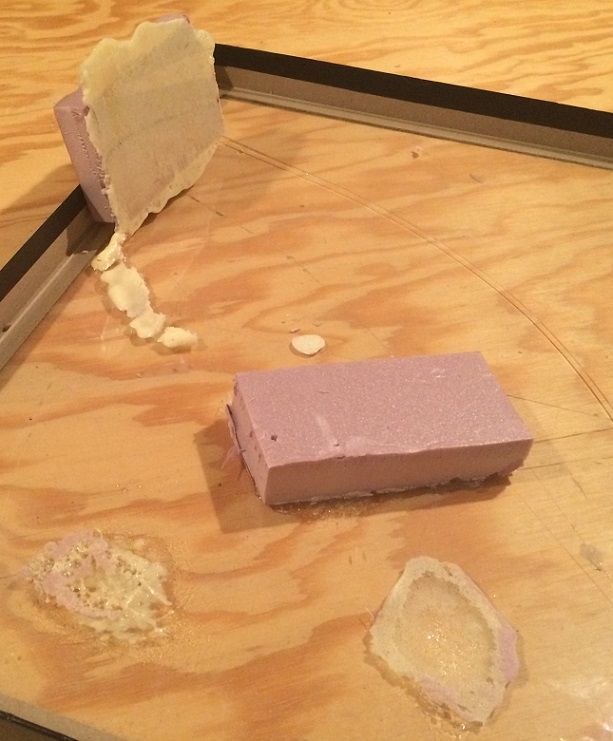
Experiment 1: Last night, I roughed one scrap piece of foam board a little, and didn't rough up the other test piece, and glued them both to the glass of a broken riker mount. The bonding strength was pretty good this morning. I had to put some effort into separating it from the glass (for fear of breaking the glass too). I was able to pull the foam away from the glue in both cases, but the glue remained bonded to the glass and did not come off! There wasn't much difference between the two tests, pretty much the same result.
Experiment 2: This morning, I roughed up two pieces of foam board quite a bit more to get more gaps and such for the glue to hold, and with one piece, used GG to glue to the glass, and the other I used silicone. I will give it 24 hours before trying to remove each from the glass. We will see which one provides the best bonding strength, and that will be what I go with. I leaning to not to using GS because it's too messy and I don't want to do any in tank carving or painting of the background due to foam expansion.
Kevin Wilson
#71
littlen
-
- NANFA Member
- Washington, D.C.
Posted 16 February 2017 - 02:08 PM
I was going to say that a liberal amount of silicone on all surfaces that touch the glass (sides and bottom) will make a very good bond. Not that you'll get any useful information out of my suggestion, other than piece of mind, is to float your insert in your bathtub. See how much force it takes you to submerge it. That way you'll have a good idea that your added ballast (STORE BOUGHT rocks) have offset a little/some/most of the buoyancy of the foam and Great Stuff.
From the pictures, it appears that you'll have the entire back surface of your insert to bond to the back pane of glass. And the additional contact between the bottom and side panes. I have a lot of faith in silicone, and would hope that if you've offset a good amount of buoyancy that you'll be ok. And any that squirts out the sides can just be used to seal the edges? Remember too that the weight of the water will also be pushing down/against the insert and also offsetting some of the "flotational"-force.
P.S. your 75 should have 1/4" glass. If anything were to happen, it would be a separation, but I doubt your tank will crack. And most 75's have a cross-brace on the rim so that should prevent it from rocketing up and smashing your lids/lights.
Good luck.
Nick L.
#72
Chasmodes
-
- NANFA Member
- Central Maryland
Posted 16 February 2017 - 02:51 PM
Thank you Nick.
(STORE BOUGHT rocks)

![]()
I know, right? That's what I think when I see people buy Negaprion eurybathrodon teeth!
...not that there's anything wrong with that  #160;
#160;
Kevin Wilson
#73
Chasmodes
-
- NANFA Member
- Central Maryland
Posted 17 February 2017 - 07:50 AM
Nick, you were absolutely correct. My experiment backed it up. The Gorilla Glue separated from the glass, not easily, but easier than I thought it would. It's interesting that the thinner layer used in the first experiment stuck better to the glass than the more liberal amount applied this time. With the same, or even more effort, I could not separate the siliconed foam from the glass. So, I'm going with silicone to secure the structures to the tank. I'm a bit relieved too, because it will look cleaner and I won't have to do any in tank refinishing of any of the background sections.
Views from the left and right:
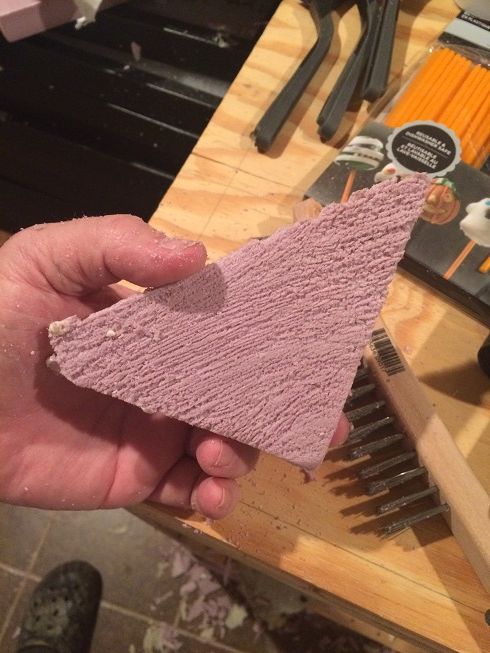
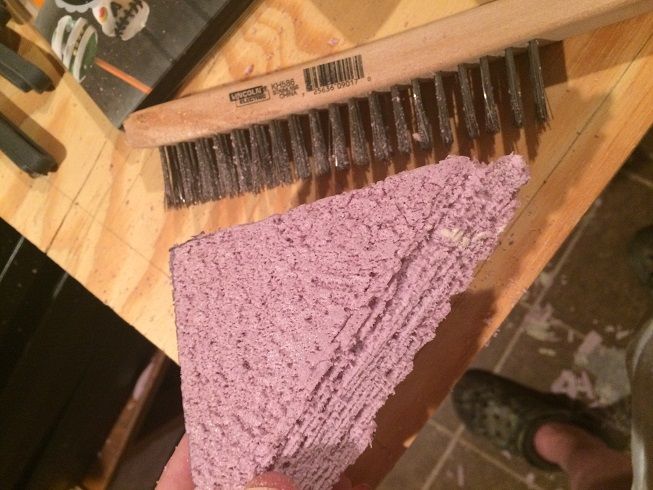
I experimented with using a large wire brush on a scrap piece of foam board, looking for another way to apply texture. I was thinking about applying it to the roots or wood, but I might even do this with some of the rock. It's too cool not to use. Scraping provides a layering texture, hammering provides a porous texture. The brush will also be the best way to rough up the back of the background before applying the silicone. I will also create some holes to fill with silicone that will help to secure it all in place.
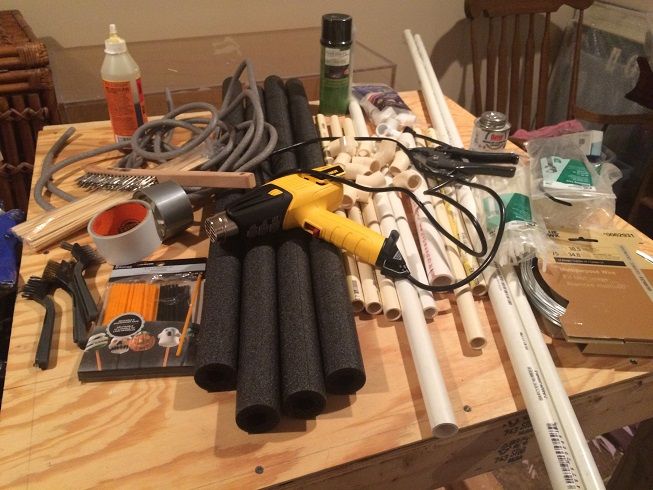
I'm ready to convert this to roots for the left side. They're expecting nice weather this weekend, so I'll be able to use my heat gun to start bending PVC pipe into the shapes that I want. I read somewhere that doing that indoors isn't a good idea because of toxic fumes. Likewise, I have a little more spray foam work to do and I'll do that outside as well.
Why do I experiment and not just trust everything that I read? I guess I have to see it before I believe it, especially this late in the game when I could risk it all being ruined. It also doesn't hurt to make sure that what I think will work will actually work. I had faith in the Gorilla Glue or foam for bonding to the glass, and maybe some people have had positive experiences with that. But, I'm searching for the best options. Yesterday, Nick had me convinced about the silicone being the best option, but my experiment was already in place...and it confirmed it. Thanks Nick again!
Thank you all for the wonderful suggestions, input, encouragement and compliments. It pushes me to work harder to reach my goals, and I really appreciate that.
Kevin Wilson
#74
brackishdude
-

- NANFA Member
Posted 17 February 2017 - 10:02 AM
my concern with the glass/foam bond is not the with bonding agent, but the internal cohesiveness of the foam itself.
I like the wire brush to increase surface area and "keying" the bond, but if it's still to buoyant, it may just shear the foam itself.
Depending on how much weight the rocks added, you may wan to consider pushing/drilling plastic, pvc or stainless rods through from the top/back down to the bottom/front, with some sort of projection on either end that would allow the silicone to grab onto it too. Sort of an underlying superstructure.
This is looking Fine!
As your fellow, I can demand of you no more, and accept no less, than I allow to be demanded of myself
#75
Chasmodes
-
- NANFA Member
- Central Maryland
Posted 19 February 2017 - 09:55 PM
Thanks for the suggestions and compliment brackishdude! I have a good many rocks in there, not to sink it but definitely to counter act it.
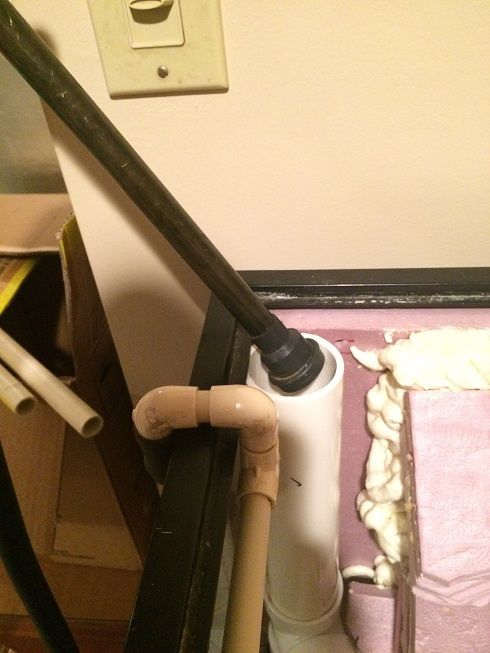
I haven't done any aquascaping the past couple days because now is the time to think about my equipment placement, to add that element into my design to build around. So, I created a place to put my Fluval 405 intake. I built a compartment with a strainer to allow me to place the intake into, and be able to remove it for maintenance and cleaning. I have to paint it still. I will eventually have the intake completely hidden from view, except from the right side of the tank. I also built a spray bar for the cannister filter on the left side of the tank for surface current to mimic stream current going over the soon to be created roots.
Showing how my intake fits into the structure:
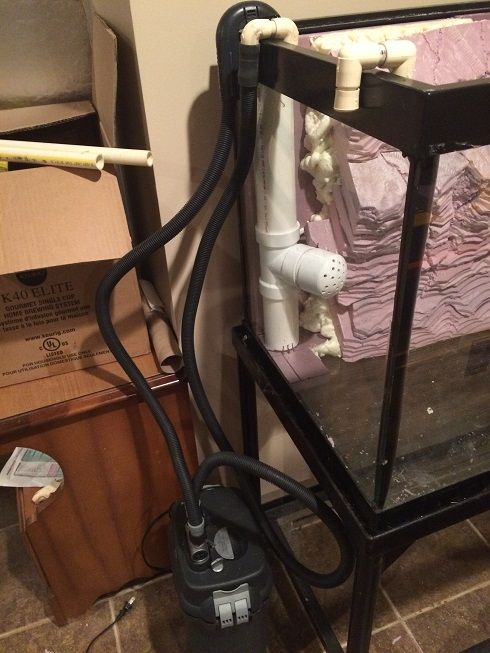
Left side view of the spray bar and intake compartment and my filter (below). The filter will be under the tank. Once I get the tank up and running, I may build a facade to hide all of the equipment. Very little of the equipment will be visible in the tank when I'm done. All of the PVC will be painted black, by the way.
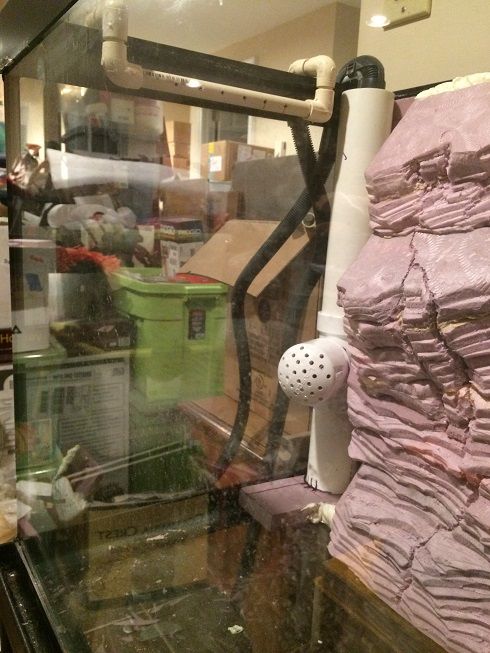
Right side view of the tank. Some of the intake may be visible from this view when I'm done, but not easily seen. It will be hidden by faux rock work, faux roots, and stream bank.
Now that I've got my basic in-tank structure in place, I'm ready to start creating roots and finish the stream bank. I'll glue the spray bar together later once I start filling the tank and put the filter into action.
Thanks for following!
Kevin Wilson
#76
9darlingcalvi
-
- NANFA Guest
- Northern Minnesota
Posted 20 February 2017 - 11:45 AM
I finally finished my tank, it's okay looking. Waiting for plants to grow then I'll go collect some
Sent from my iPhone using Tapatalk
Sent from my iPhone using Tapatalk
#77
littlen
-
- NANFA Member
- Washington, D.C.
Posted 21 February 2017 - 07:41 AM
Something to consider is to add a bulk head strainer, rather than your drilled cap, to the "T". I think you'd find that the drilled holes and slits in the bottom of the stand pipe will get clogged quickly. After a short time, your intake line for the canister filter will pull the water out of the stand pipe faster than it can be replenished through the [clogged] holes. Using the strainer will give you more surface area from which the stand pipe receives water, AND it can be removed easily and rinsed off.

I really like the spray bar idea for the supply and how you adapted the PVC parts to the canister filter.
Nick L.
#78
Chasmodes
-
- NANFA Member
- Central Maryland
Posted 21 February 2017 - 09:17 AM
Thank you Nick.
The cap on the T is not glued on and is removable, and will be accessible for cleaning. It will sit behind roots/rock/bank and accessible from the right side. I was going to dril more holes to increase the flow, but wanted to get everything painted so I could get back to work on the rest of the background. Do you think that would work? I also have been considering using 1/4" or 1/8" plastic mesh instead of the drilled cap instead.
I considered a strainer and just leave the pipe open, but I don't want fish getting back there.
Kevin Wilson
#79
littlen
-
- NANFA Member
- Washington, D.C.
Posted 21 February 2017 - 10:20 AM
So the drilled cap will be protruding from the front of the rockwork? I think it will work if you add more holes and clean as needed. Just look down the length of the vertical pipe...if the water is significantly lower than the water level of the tank, I'd add more holes. Regardless of what you have, it will act as a pre-filter and will catch large pieces of detritus/dead fish/uneaten food. A strainer inserted inside of a block of filter sponge would make a nice pre-filter. Your options are vast, depending on how permanent your piping is in regards to the rock wall.
Remember too that the water needs to get behind the rockwork so that it can get to the filter intake. So will you be drilling holes through the wall where the filtration will be hidden?
Nick L.
#80
Chasmodes
-
- NANFA Member
- Central Maryland
Posted 21 February 2017 - 10:52 AM
So the drilled cap will be protruding from the front of the rockwork? I think it will work if you add more holes and clean as needed. Just look down the length of the vertical pipe...if the water is significantly lower than the water level of the tank, I'd add more holes. Regardless of what you have, it will act as a pre-filter and will catch large pieces of detritus/dead fish/uneaten food. A strainer inserted inside of a block of filter sponge would make a nice pre-filter. Your options are vast, depending on how permanent your piping is in regards to the rock wall.
Remember too that the water needs to get behind the rockwork so that it can get to the filter intake. So will you be drilling holes through the wall where the filtration will be hidden?
OK, kewl.
The pipe will be hidden, but the drilled cap will be exposed to the water from the right side of future to be faux roots, so I can access it for cleaning, etc. The actual pipe other than the cap will be foamed into the structure as part of the aquascape. Meanwhile, the input tube of the cannister filter slips down the pipe from the top and will be easily removable for cleaning, etc. If something happens down the road where I can't use the pipe, then I can simply place the filter input somewhere else outside of the aquascape.
I'll make sure to test it out prior to adding substrate, river rocks and cycling. If it doesn't work out, I will try a screen instead. I may do that anyway and not used the drilled cap. I had the cap on hand anyway, so it didn't cost me anything ![]()
Kevin Wilson


0 user(s) are reading this topic
0 members, 0 guests, 0 anonymous users

