Jump to content


Photo

75 Gallon Native Stream Tank Build


  • Please log in to reply
392 replies to this topic

#201 Chasmodes

Chasmodes
  • NANFA Member
  • Central Maryland

Posted 24 June 2019 - 07:00 AM

Yesterday afternoon, I had some time to work on the roots.  However, when I went downstairs, I remembered that my paintbrushes were all ruined.  Also, I opened up my can of Drylok and it was solid as a rock.  When I first bought the can a couple years ago, it fell out of my truck, opened up, and spilled white Drylok on my driveway.  Apparently, when I put the lid back on, I didn't put it on tight enough, and air got in there.  I was also out of the charcoal color cement dye, which is necessary to bring out the deeper nooks and crannies of the work.  So, I went to HD and they had everything that I needed in stock.
 
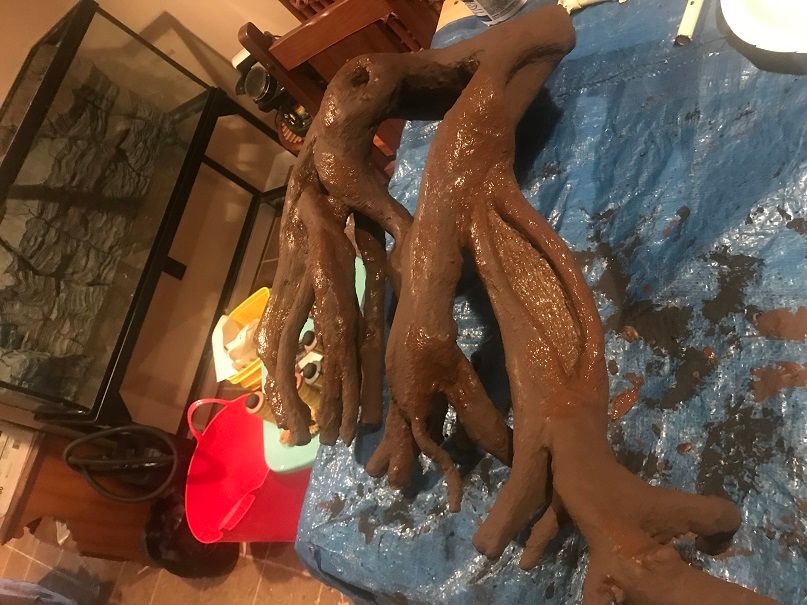
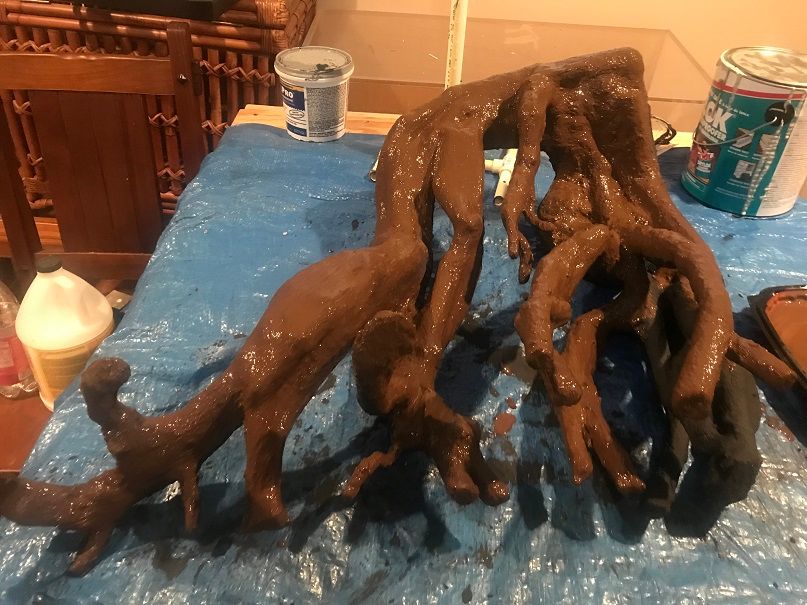
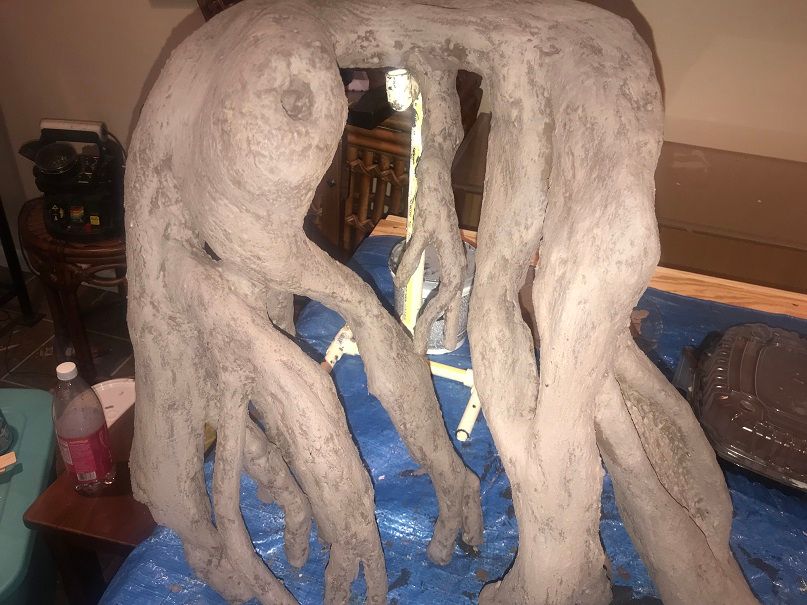
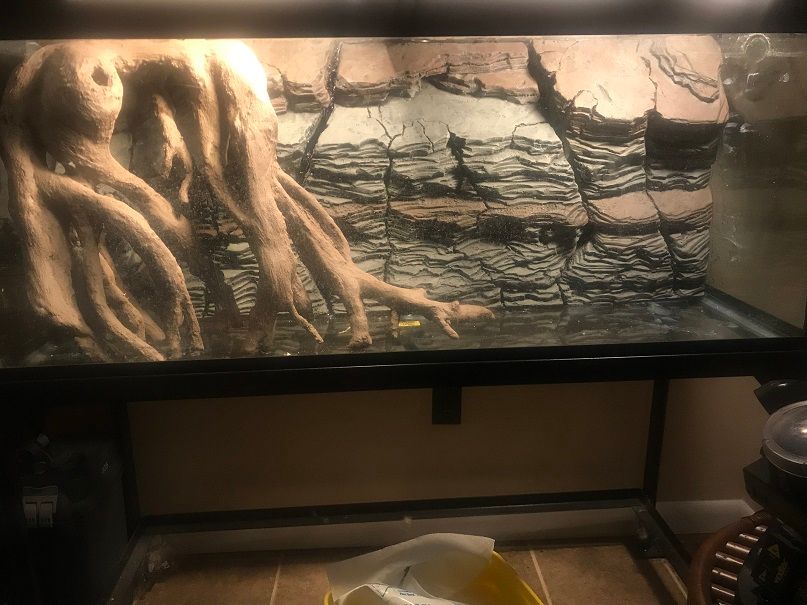
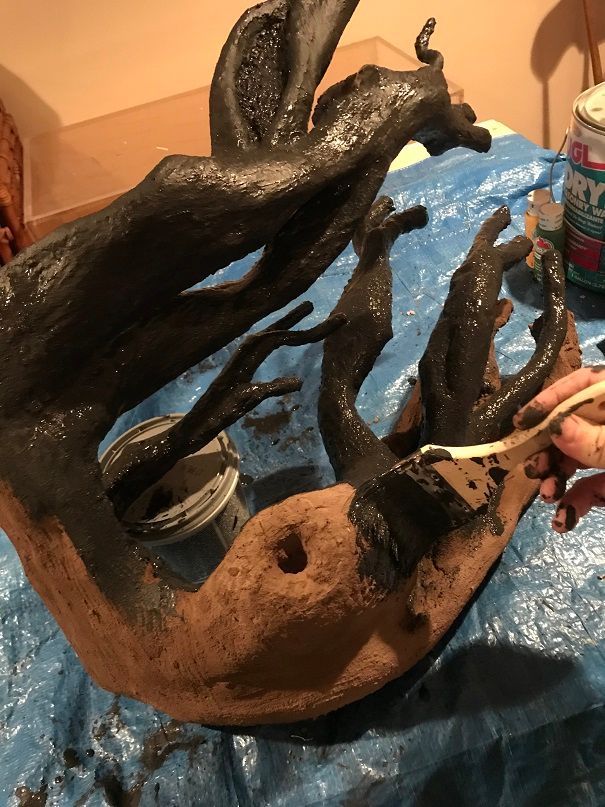
When I got home, I slapped on the first coat a Drylok, pretty thick too, to make sure that all of the root surface was covered, to seal everything in.  Drylok tends to shrink when it dries, I think, because sometimes, small holes in your work tend to open up when it dries and they require a touch up.  I only found two of those last night, so I'm really happy about how this coat went on.  The roots look pretty good now, as the pink foam is finally covered, but, they aren't the rootsy color that I want.  I will add a few new coats of Drylok to add color and try and bring out some realism.  I may add a few tricks to do that too, regarding texture.  I need to think about how to do that, and if I can pull it off, I'll review the how afterward.
 
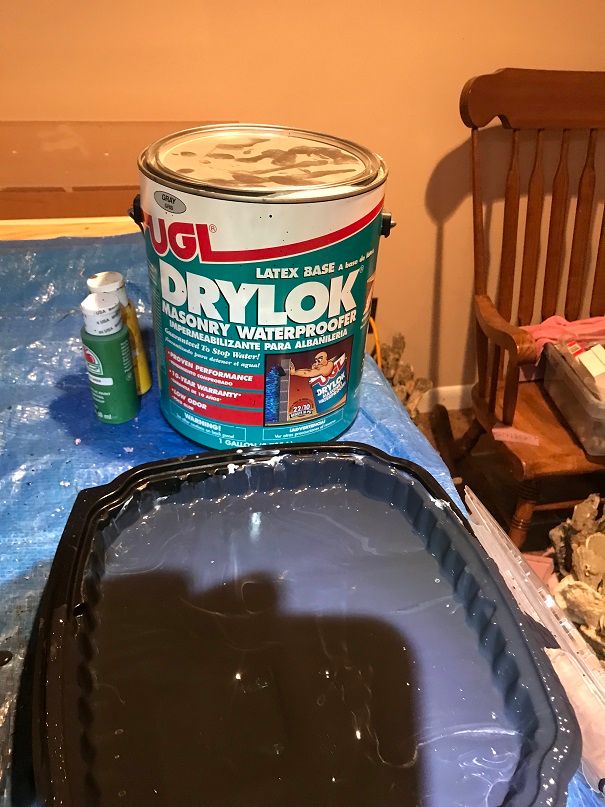
Here is the Drylok that I used.  I prefer the Gray.  It's important not to get the "extreme" Drylok product because it has mold inhibitors and other chemicals that could be harmful to the tank.  This is latex based Drylok.  I mixed it with Quikrete charcoal color cement dye.  It's easy, just pull out some paint, pour in the liquid dye, and stir it in.
IMG_1288_zps3nysxzsf.jpg
 
I painted the first coat on thick because I really want to seal everything in to prevent pH issues from happening.
IMG_1287_zpsdkohsqwk.jpg
 
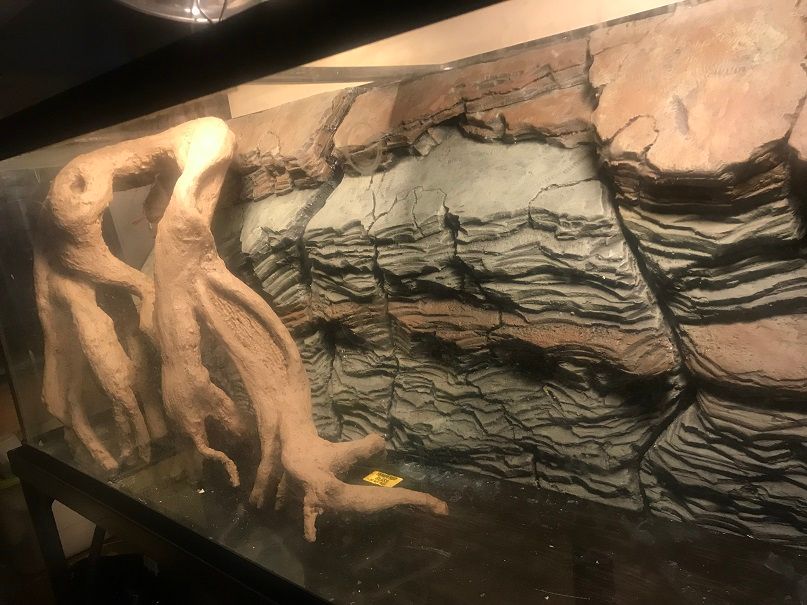
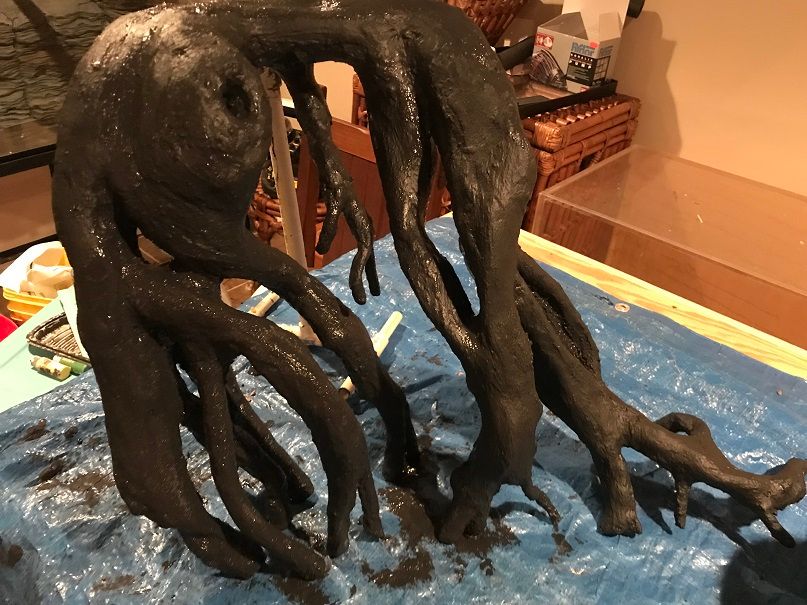
First coat finished, from the front left side.
IMG_1289_zpsnzwz608f.jpg
 
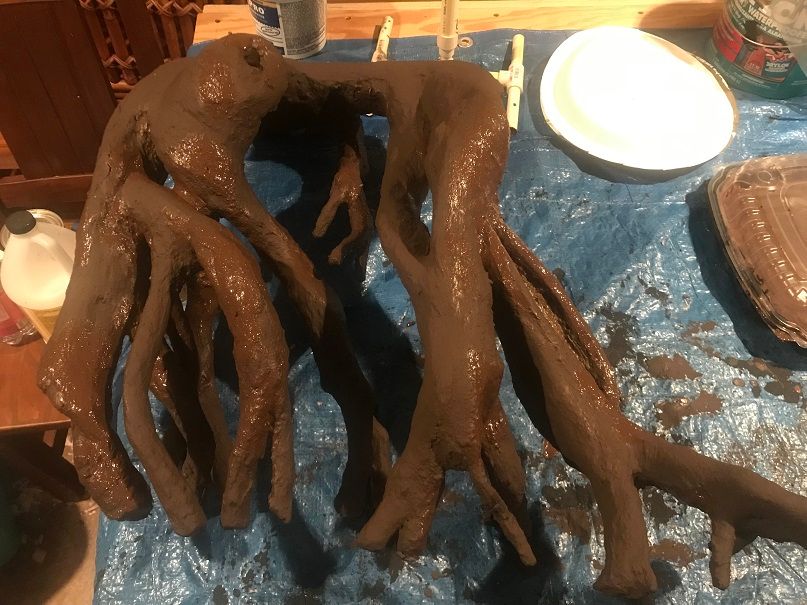
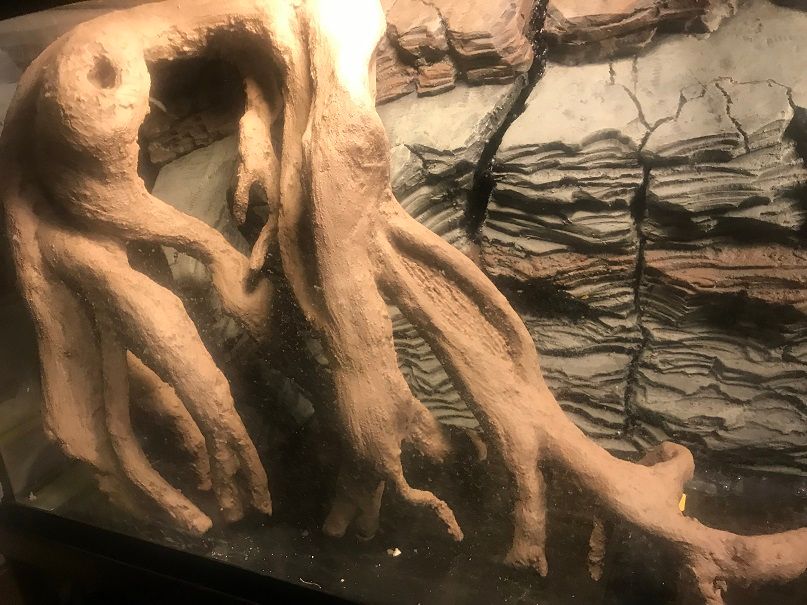
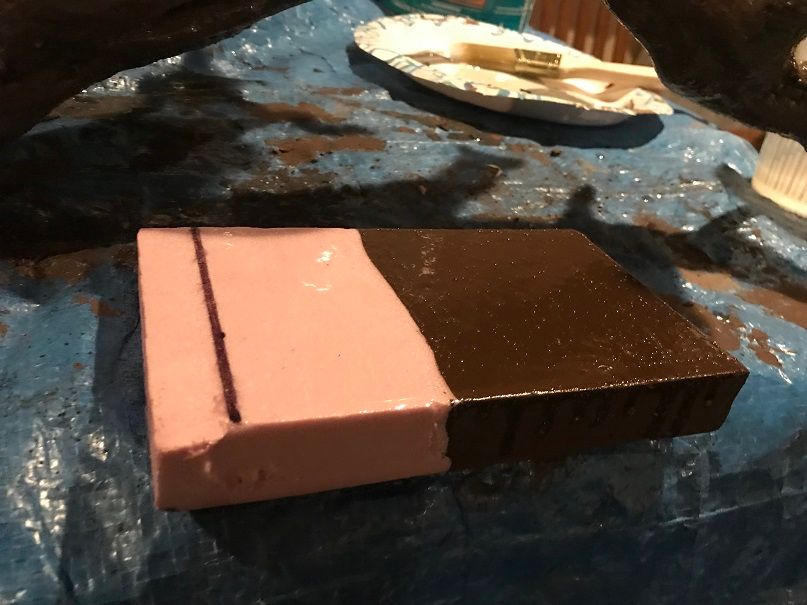
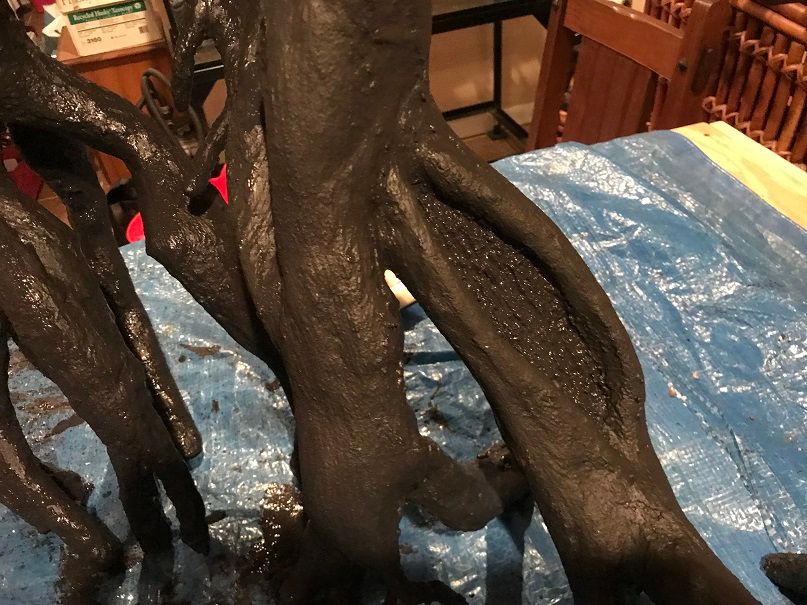
A close up of the split bark section.  It looks much nicer with the pink foam board finally covered up.  I'm really happy with how this turned out.  Drylok is great because if you have detail carved into your work, it does not fill in the gaps and cover it up.  This is the only exposed foam after the grout coating.
IMG_1290_zpsppsvdthf.jpg
 
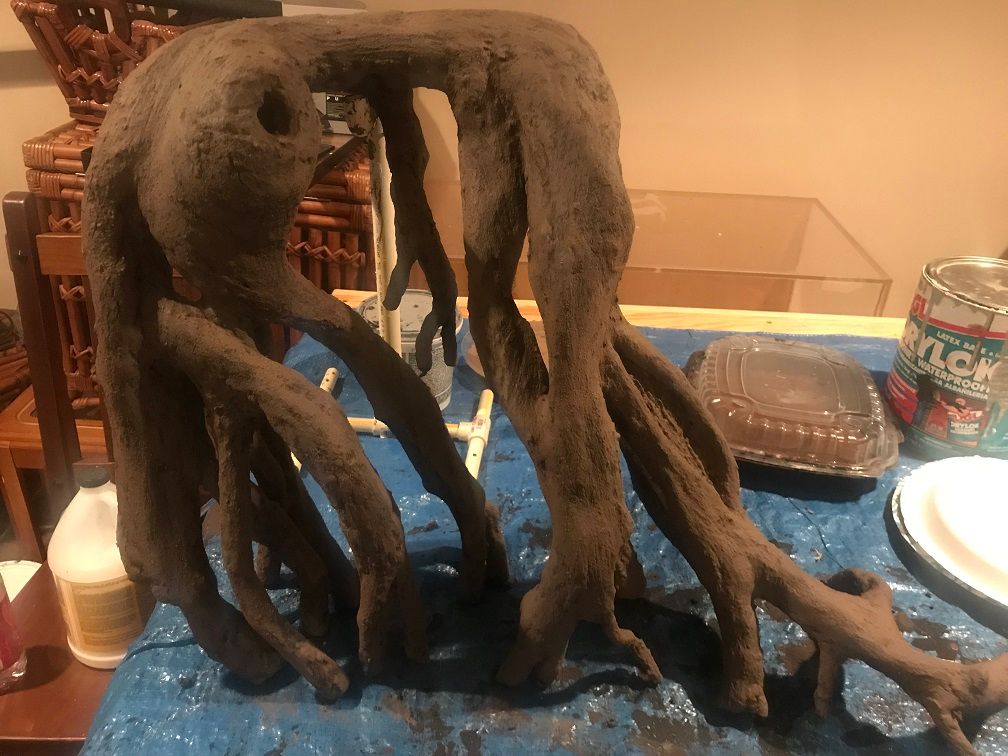
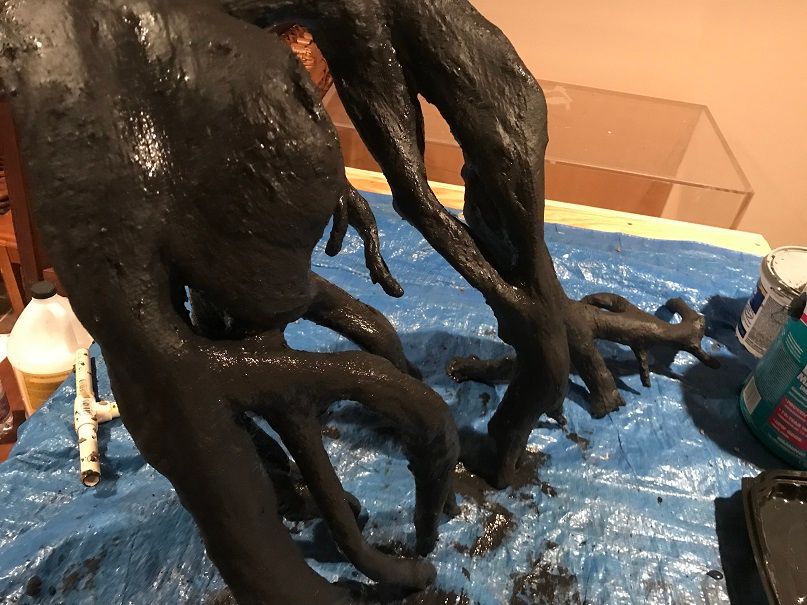
Showing the knot and hole.  I think it turned out too big, but I can live with it.
IMG_1291_zpsva6k0ahf.jpg
 
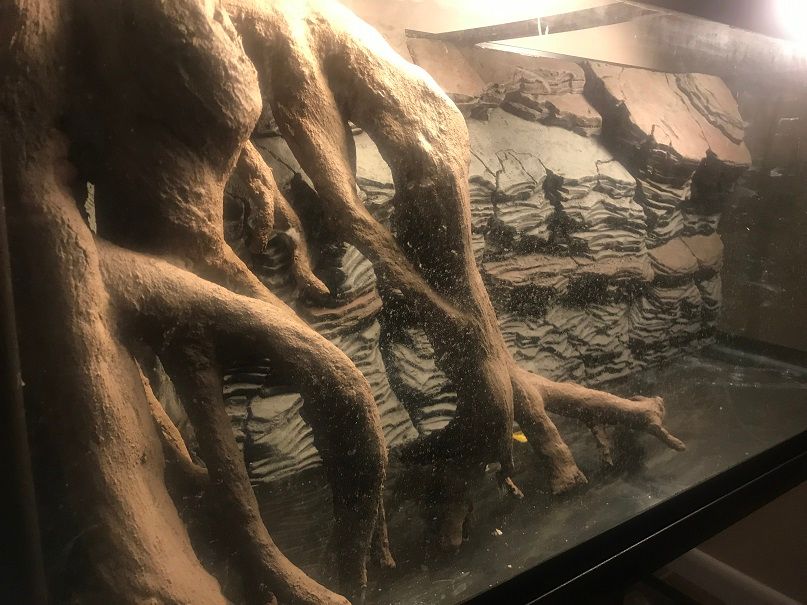
More of a left side view.
IMG_1292_zpsb8dlqoaj.jpg
 
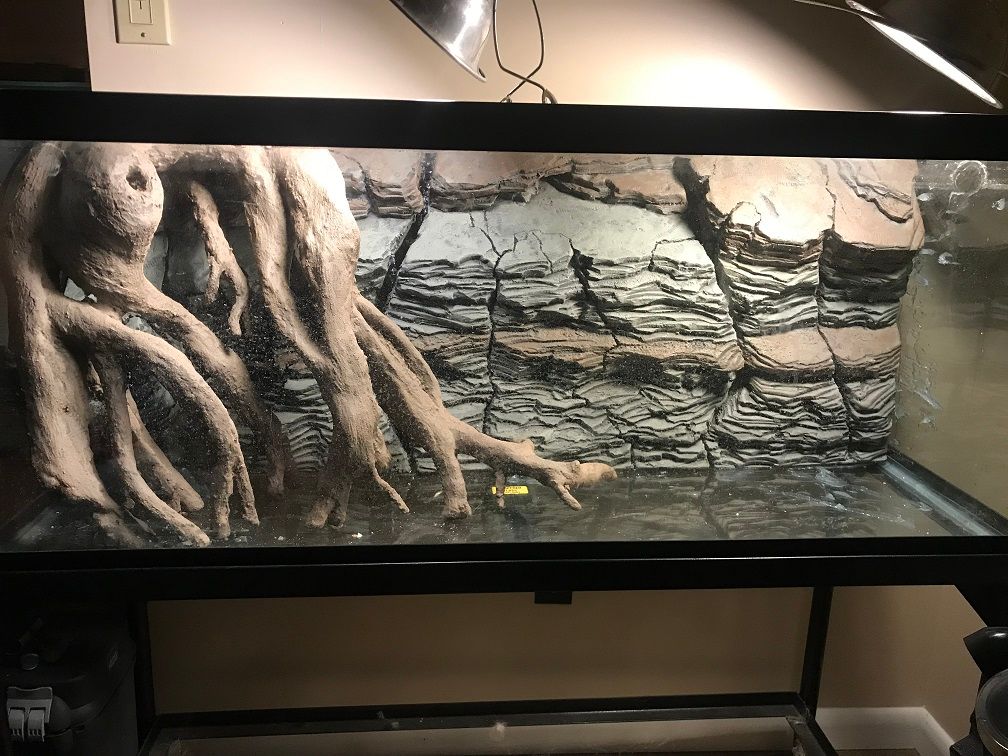
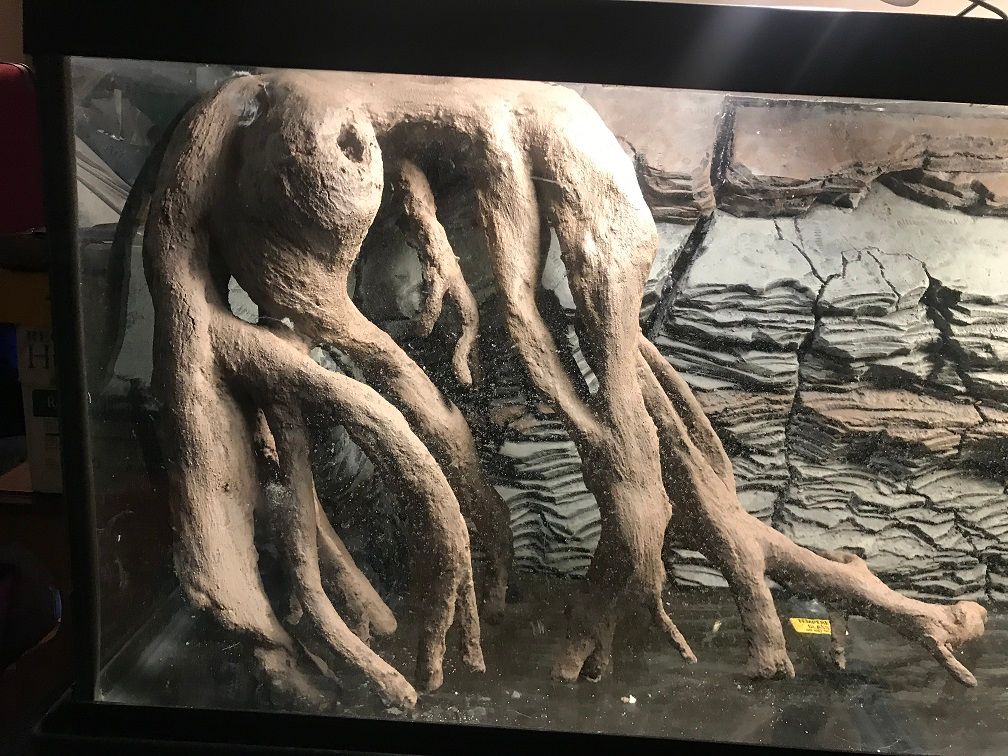
It's getting there...I can't wait to get home from work and work on it again tonight.

Kevin Wilson


#202 TheNonEuclidean

TheNonEuclidean
  • NANFA Guest
  • Aiken, SC

Posted 24 June 2019 - 08:10 AM

Looks awesome! This gave me some great ideas about hiding some intakes or powerheads in a "root" system! Looking forward to seeing the finished tank.

#203 Chasmodes

Chasmodes
  • NANFA Member
  • Central Maryland

Posted 24 June 2019 - 08:56 AM

Looks awesome! This gave me some great ideas about hiding some intakes or powerheads in a "root" system! Looking forward to seeing the finished tank.


Thank you so much!  I'm looking forward to it too.  I've taken way too long on this build, so it's nice to see some light at the end of the tunnel (or root system)!  I'm hoping to have water in it in the next couple weeks, or sooner.


Kevin Wilson


#204 mattknepley

mattknepley
  • NANFA Member
  • Smack-dab between the Savannah and the Saluda.

Posted 02 July 2019 - 07:12 PM

Wow.  Looks great, Kevin.   It's kinda disgusting  though, actually.  You're like some kinda aquatic Chip Gaines&Martha Stewart love child.  You have got a creative vision and ability I envy.    


(Actually you're more like Chip and Joanna proper, but that didn't have the snark factor I was going for...)


Keep it coming, buddy.  Love your work.


Matt Knepley
"No thanks, a third of a gopher would merely arouse my appetite..."

#205 Doug_Dame

Doug_Dame
  • NANFA Member

Posted 02 July 2019 - 07:32 PM

The difference between Kevin's 2-3 year project, and my 2-3 year projects, is that Kevin has actually produced something to look at. Already !!! 


Plus created an instructional on how others can follow in his footsteps, faster. 


It *IS* inspirational. 


Perspirational.


Rooterific.


Doug Dame

Floridian now back in Florida


#206 Chasmodes

Chasmodes
  • NANFA Member
  • Central Maryland

Posted 03 July 2019 - 07:54 AM

LOL, thank you Matt and Doug!


My original plan was to have the roots done by this past Sunday.  I had a 3 day weekend to work on it, and only managed to work on it on Friday.  I slapped on another coat of Drylok, this time, mixed with Brown cement dye.  I totally covered up the dark charcoal color, not really planning ahead.  But, once you paint it, you either have to do it over or settle with it.  I confused myself over the coloration of the roots that I was after. 


I had two different approaches for coloring the roots.  The first option was to color them as if they were tree roots above water, and let nature take its course in my tank.  This would be the darker gray base that I used on the first coat, dabbed with lighter shades of gray, maybe a tint of brown and green here and there.  After a while, option one, with fish tank life, like algae and bacteria, would grow on the roots and eventually bring some realism to them.  The other option was to color the roots up like you'd see them underwater in the wild, simulating algae, bacteria and other life on them already.  This would be the brown base, colored up with lighter shades of brown.  My first coat was option one, but, instead of dabbing on the grays, I coated the second coat, not thinking, like option 2.  Fortunately, the fix is easy.  Either I re-coat for option one, or keep it as it is and proceed with option two.  


Option one would look like the roots that are above water, and option two would look like the underwater roots, both seen in these pics that I took the other day:

IMG_1339_zps3rtlwwgr.jpg

IMG_1338_zpsz4djqqdl.jpg


Here's the brown coat, option 2, started, that I will complete.  I figured that the additional algae and other life in the tank will take it from being sort of lifelike to lifelike.  It will look more like nature sooner than option one.


Below are the roots after the base brown coat.  On the split root, I messed up and mixed up a funky mustard brown color.  I wanted a lighter shade of brown, but, it didn't work out.  I will fix it on the next painting application.

IMG_1319_zps0fbdj3zi.jpg

IMG_1318_zpshiaj3whe.jpg

IMG_1317_zpspt0zzjee.jpg


Kevin Wilson


#207 Chasmodes

Chasmodes
  • NANFA Member
  • Central Maryland

Posted 03 July 2019 - 08:50 AM

I had plans to fish on Saturday, so, my plan was to work on the tank on Sunday.  But, my buddy Glenn talked me into fishing on Sunday.  So, that's what I did, and I feel guilty about not working on the tank since.  But, I thought that I'd share some pics of the two streams that we fished.  I might collect rocks and gravel from one of them, or I might get them from the river.  But, I plan on doing my fish collecting from these two creeks below.


My buddy Rodger on Saturday, working a plastic worm for smallies.

IMG_1343_zpsgiiqbtty.jpg


IMG_1344_zpstwu3rerm.jpg


Here's my buddy, Glenn, fishing one of the creeks with me on Sunday.

IMG_1354_zpsv4kmfznj.jpg


Here's a box turtle that we saw on Saturday where we parked and geared up.  It was a remote area dead end road, no danger of him getting squashed.

IMG_1321_zpsjn1cqqnp.jpg


Now, I have this thing for roots.  I'm always checking out their shapes and forms, because of studying them for my fake roots, I guess.  I never used to snap pics of them as scenery.  I used to see them as potential fish holding spots, but not scenery.  But, here ya go, I thought this was cool.  If I ever build a giant stream tank with roots, this would be my model tree.

IMG_1353_zpsogwjvhoc.jpg


Kevin Wilson


#208 Chasmodes

Chasmodes
  • NANFA Member
  • Central Maryland

Posted 05 July 2019 - 07:20 AM

I'm almost finished with the roots!  I only have one more coat of paint to dab on there.   I brushed on a thick coat of dark brown last week, and this yesterday, dabbed on a lighter color of brown with the sponge.  I will dab on an even lighter coat this weekend to finish up the painting. 
 
Here's a pic taken when I was finished, no flash.  
IMG_1363_zpsep4gryjl.jpg
 
It was hard to see any detail in this picture under the room lighting.  So, I took one using the flash on my phone.
IMG_1366_zpsgcufqikm.jpg
 
I liked how the flash shows more detail, so I put the roots in the tank.  Then, I brought in the two shop lights and put them over my tank and lit up the background and snapped these pics.  First, full tank shot:
IMG_1371_zpsw80kf3nw.jpg
 
Zoomed in on the roots:
IMG_1372_zpskdgehv9n.jpg
 
Looking in from the right front view of the tank:
IMG_1373_zpsgkkgx7o5.jpg
 
I'm pretty happy with how they turned out so far.  Next steps after the last coat will be another dabbed on coat of paint for highlighting.  Then, I may seal it in with tile adhesive...I'm not sure yet.  I'm a little concerned about durability, because I had some cracking and a soft spot.  I don't understand why that happened, but maybe the tile adhesive will cinch things up.  I have some silicone mess to scrape off the right side of the tank too.
 
I am planning on going fishing this weekend, and my plan is to gather some rocks and gravel from the river.  If I can do that, then I can start running the tank!  I need to purchase lighting for this tank too, so I will do that soon.  I want an LED fixture that can grow plants.  It will be nice to get the 75g stream tank done so I can focus on finishing my oyster reef build.

Kevin Wilson


#209 Chasmodes

Chasmodes
  • NANFA Member
  • Central Maryland

Posted 10 July 2019 - 11:48 AM

News on the 75g stream tank:  First, I went on a fishing trip this past Saturday, and successfully collected enough river rock for my tank.  I need to get some sand and some smaller rocks and gravel still, maybe this weekend.  I decided on the new lighting fixture that I want, a Fluval Planted 3.0.  It should be perfect for this tank.  I will order this light fixture very soon.
 
Last night, I dabbed on the last coat of paint with a sponge to give it some highlights of a lighter color.  I think it turned out OK.  It doesn't look that much different than the last time I took pics.  I put my shop lights over the tank and took a few pics at different angles.
 
Full tank shot:
IMG_1397_zps9tdrtatk.jpg
 
From the left front corner of the tank:
IMG_1398_zpsu32mwmbe.jpg
 
Close up of the roots in front:
IMG_1401_zps9zckrjfp.jpg
 
Right front corner of the tank view:
IMG_1403_zpsarkvp45m.jpg
 
Basically, my roots and background are almost done.  If it wasn't for the next step, that I just decided to do, that will happen as soon as I can.  I decided to seal in and protect my work on the background and roots with a clear coat epoxy called Polygem 1319.  I've read good things about it.  For example, it looks not so great without water in the tank, that it shows a shiny coat when dry, but in the water the shiny coat disappears and you can't tell that there is epoxy on there.  It dries hard as a rock, seals everything in underneath, and is very durable.  It's used by public aquariums and museums.  So, I ordered a quart of it, and it should arrive in a few days, hopefully in time for the weekend.  Anyone ever use this stuff before?
 
I figured that I put so much time and effort into this stuff, that it would be a shame to ruin it.  The Drylok is great, but, all it takes is a scrape from some sort of cleaning tool to chip off some foam or Drylok and you have an ugly pink spot.  The rock wall background and roots are actually pretty fragile.  I'm sure that I could easily chip off the grout, so this epoxy will help the roots too.  So, for now, another week, probably.

Kevin Wilson


#210 Chasmodes

Chasmodes
  • NANFA Member
  • Central Maryland

Posted 11 July 2019 - 07:24 AM

After doing some research, I probably will not use the Polygem 1319 on my rock wall. Apparently, it melts foam. I don't know what will happen with foam covered in Drylok. I may try a test piece, but, this stuff apparently gets very hot. I don't want to chance ruining the look of the rock wall.
 
As for the roots, I think that I will test it on a small section of the roots near the bottom that will be covered in rocks and substrate anyway. I can always add more grout and paint it again. Since the roots are covered in both Drylok and grout, maybe the heat won't be an issue. If it works, then I'll test a small section of the knob. If all goes well with the tests, then I'll apply it to the entire structure. 
 
I originally wanted something to firm up the grout anyway. I thought that maybe it would be a good thing to do with the foam. After researching, there aren't many options for clear coating over already painted foam. There are plenty of coatings that are white that you have to paint, but, for me, that isn't an option.

Kevin Wilson


#211 littlen

littlen
  • NANFA Member
  • Washington, D.C.

Posted 11 July 2019 - 07:50 AM

Kevin, 

My 2 cents on Poly-gem:

It is GREAT stuff!  I've used lots of it for exhibit fabrication.  It is a 2 part epoxy and like some, it does get decently warm.  (I used a downgraded descriptor because 'hot' --- perhaps to the point of not being able to touch it---isn't the best fit).  So for your application, I would have no concerns that it would melt your foam due to heat.  But I cannot speak on any chemical rxns that may melt the foam.  I wouldn't think that it would, but test away!


Nick L.

#212 Chasmodes

Chasmodes
  • NANFA Member
  • Central Maryland

Posted 11 July 2019 - 08:15 AM

Thank you Nick!  I have plenty of leftover foam and Drylok to test with :)  If it works without melting on the test, then I'll be so fired up!


Kevin Wilson


#213 littlen

littlen
  • NANFA Member
  • Washington, D.C.

Posted 11 July 2019 - 08:42 AM

Thank you Nick!  I have plenty of leftover foam and Drylok to test with :)  If it works without melting on the test, then I'll be so fired up!

No problem.  I am confident that on the areas where you have Drylok covering the foam, you'll be fine.  And even on the raw foam, you should have a nice turn out.  You can knead in some concrete pigments when you're mixing the Poly-gem.  That'll save you from having to paint the entire thing a different color.  You'll then only have to do a light wash or add highlights to make it pop.  Good luck, sir.


Nick L.

#214 brackishdude

brackishdude
  • NANFA Member

Posted 11 July 2019 - 09:02 AM

2 part epoxy mixtures can get extremely hot, but mainly when in high volume/low surface area, like in your mixing cup.  Heat will also speeds the cure.  For a longer working time, use a large shallow mixing pan rather than a cup.  The thin layer applied should not be a problem for foam, unless it was allowed to heat in the mixing cup.

I am pleased to see you are taking this step.  I was concerned about your roots dissolving


As your fellow, I can demand of you no more, and accept no less, than I allow to be demanded of myself

#215 Chasmodes

Chasmodes
  • NANFA Member
  • Central Maryland

Posted 11 July 2019 - 10:36 AM

Thanks for the tips Nick and Andy.  I had some concerns about the roots too.  I think that the Drylok would protect them from dissolving, but, after it dried, I had some cracking.  I guess when the Drylok dried, it shrank, and cracked the grout.  If water gets in those cracks, then that could pose a problem with the plaster cloth inside.  I thought it would be best to find something that would seal it all in and improve the durability.  Your experiences with this stuff, and suggestions, give me a good amount of confidence.  Thanks again!


I purchased the Polygem 1319 which, based on what I've read in the reefing community, is crystal clear.  It shows up shiny out of the water, but literally disappears under water.  So, I'm hoping that I won't need to paint any more.  The Polygem rep emailed me back and wants me to call them.  I'll let y'all know what he says.


Kevin Wilson


#216 Chasmodes

Chasmodes
  • NANFA Member
  • Central Maryland

Posted 11 July 2019 - 12:31 PM

I talked to the rep and he said basically the same things that you guys recommended, that it should be OK, no problem with heat because you apply a thin coat, but to do some testing.  He answered all of my questions and took the time to really explain things.  Since I don't have to worry about mixing colors, he said that when using the clear coat, it would be better to mix up small batches and apply it in sections at a time, especially with the roots where it might take more time to apply because of the shape complexity.  As it turns out, they have a better product, 1618, that cures much faster.  Next time, I'll get that instead...same price.  In a nutshell, great customer service.


Kevin Wilson


#217 WheelsOC

WheelsOC
  • NANFA Member

Posted 16 July 2019 - 04:33 PM

Just a couple of tips on painting.


To bring out some of the texture and details, a common technique in painting models or sculptures is to take a darker tone than your base color and turn it into a runny, watered-down "wash." Apply the dark wash all over and then lightly rub off the majority with a towel or something while it's still wet. Doing this leaves the dark wash that collected in the textures, which dries and gives them a darker contrast to the higher surfaces making them more pronounced. It's a kind of baked-in shadow effect that prop and model makers use all the time.


This is usually complimented by taking a barely-paint-filled applicator like a relatively dry paintbrush or sponge  and just lightly skimming over the higher surfaces with a lighter color for highlights. Done sparingly, it can really enhance the dimensionality of the physical form underneath.


To keep the finish from getting chipped or flaking off, an aquarium-safe clear coat should be applied. You might like something in matte for a less polished look. Apparently, Krylon clear polyurethane sealer is something other fish/herp keepers have used in the past.


#218 Chasmodes

Chasmodes
  • NANFA Member
  • Central Maryland

Posted 17 July 2019 - 06:55 AM

Thank you WheelsOC!


Kevin Wilson


#219 Toad Drool

Toad Drool
  • NANFA Guest
  • NYC

Posted 26 July 2019 - 11:54 PM

Wow, I have to say this is epic and inspiring.  Very nice work!  I can't wait to see it completed with fish in it.


#220 Chasmodes

Chasmodes
  • NANFA Member
  • Central Maryland

Posted 29 July 2019 - 07:29 AM

Wow, I have to say this is epic and inspiring.  Very nice work!  I can't wait to see it completed with fish in it.

Thank you so much! 


I'm almost there.  75 gallon stream tank update:  As you may know, I purchased a quart of Polygem 1319 a few weeks ago.  I mixed up a small batch and tested it on a piece of foam that was half painted with Drylok, to see if any chemical or heat changes might affect either the Drylok or the foam. 

 
Then, I painted some on a small section of the roots, and had so much leftover that I just decided to go ahead full force on the roots.  I painted the epoxy on about 3/4 of the root structure from the front and sides.  Everything went very well on the tests and the roots.  On the test foam/Drylok piece, I only painted one side.  It was so strong afterwards that I could not break the foam.  This product will protect the wall nicely and there were no problems with regard to heat or chemical reaction to the foam.
IMG_1480_zpsaejnsjll.jpg
 
I finished the roots last night with a coating of epoxy on the back side, and then started painting the epoxy on the rock wall.  Here's a pic before I finished the back side (facing up in this pic).
IMG_1479_zps0h4kiqu9.jpg
 
I had a fair amount of epoxy mixed up, so I went full force on the wall.  I got about 95% done before the product was too thick to apply.  I will have to finish it up tonight.  I would have mixed up another batch, but, I ran out of protective gloves.  I checked everything this morning and the wall looks great with a nice epoxy coating over most of it.  I can't wait to finish it tonight.
 
The roots were hard as a rock this morning, just what I needed to happen.  I feel confident that they will hold up well in the tank.  The only flaw is a drop or two of epoxy that dripped from the last coat onto the front side that looks like a drop.  I'm hoping that it will disappear or not be noticeable underwater.  Otherwise, I'm very happy with the results.
 
This stuff reflects a lot of light and is very shiny, but, supposedly, when you fill the tank with water, you can't tell the epoxy is there.  I hope that is the case.  Polygem 1319 fully cures in a week, so, next Monday, I should be able to add water to the tank and test everything out!  Woo Hoo!  That means that I should be able to start scaping the tank in the meantime.  I have rocks and small stones, but I still need some creek sand and gravel.
 
I should have the tank up and cycling in less than two weeks, then it's time to collect some fish!

Kevin Wilson


0 user(s) are reading this topic

0 members, 0 guests, 0 anonymous users